

The Toolshed Guitar Builder's Diary
Legacy. Heirloom. Memorial. Commemoration.
What do these words mean? When something momentous happens in our lives, such as the passing of a dear friend whose life impacted many, how do we find a way to commemorate that?
Eulogies, headstones, some photos and kind words shared on Facebook... for me, that wasn't enough.

When my friend Charlie Boyle died of cancer on July 11, 2019, it was like a hole had been ripped in the hearts of those of us who loved him. For years we'd been gathering around him in the small greenhouse built onto the back of his home, nestled into a little wooded hollow in the heart of Dover, New Hampshire.
If you didn't know it was there, you'd never suspect such a place existed. A place of songs and stories, camaraderie and revelry unlike any other... and after Charlie's passing, it was going to be sold off to a developer so he could knock everything down and throw up a duplex or two.
We tried to save it, attempting to raise funds and find backers to buy and preserve the property. We failed.
As the sale date approached, I knew I had to find a way to commemorate my friend, using things he had used throughout his life. Charlie had been a great gardener, outdoorsman, roofer and many other things over the years, and he rarely threw anything away.
I knew that building a handmade musical instrument would be a perfect way to memorialize a man whose whole life had been filled with song.
As I helped to clean out the property in preparation for its sale, I kept my eye out for likely things an instrument could be built from... but it was slim pickings. There weren't any old cigar boxes or packing crates or anything like that. Some of the few wooden items that were there had sentimental value of their own and it wouldn't have been appropriate to use them.
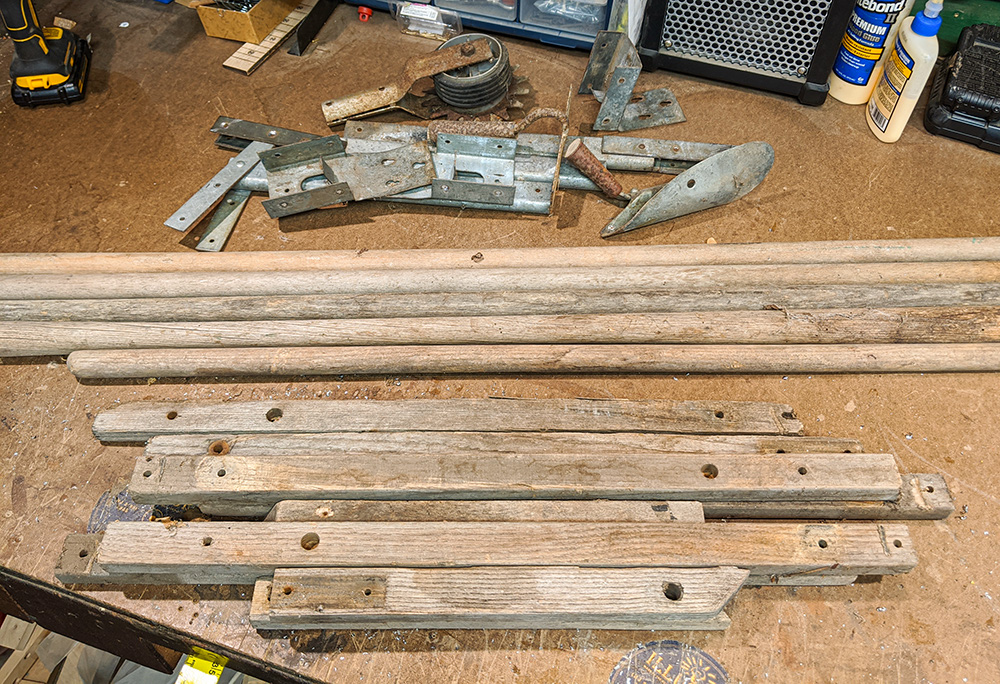
In the end, what I found was a bundle of old garden tool handles, and a few wood and metal brackets used by roofers... an unlikely assortment of cast-off, worn-out items that most people would throw in the dumpster and be done with it.
But I was on a mission.
This builder's photo diary is meant to chronicle how I built the Toolshed Guitar: the steps I took and mistakes I made. This creation is, to-date, the most involved instrument I have ever built... and the one of which I am the proudest. I hope this journey inspires you to create your own heirloom instruments.
Instrument Specs:
- Scale Length: 21 inches
- # strings: 4
- Tuning: G D A E
- String Type: Phos. Bronze Wound & Steel
- Tuners: Gold Wilkinson-style (antiqued)
- Pickup: Disk piezo
The Toolshed Guitar Builder's Photo Diary
|
|
This is "Uncle Paddy's Cabin", which my friend Charlie Boyle used as a catch-all sort of storage shed for worn-out tools. A couple of the handles I used in this build are visible in the front. This photo was taken in the summer of 2018, before Charlie got sick. It would be about a year later that I'd pull out any hardwood I could find with the idea of building a guitar. |
|
|
|
|
|
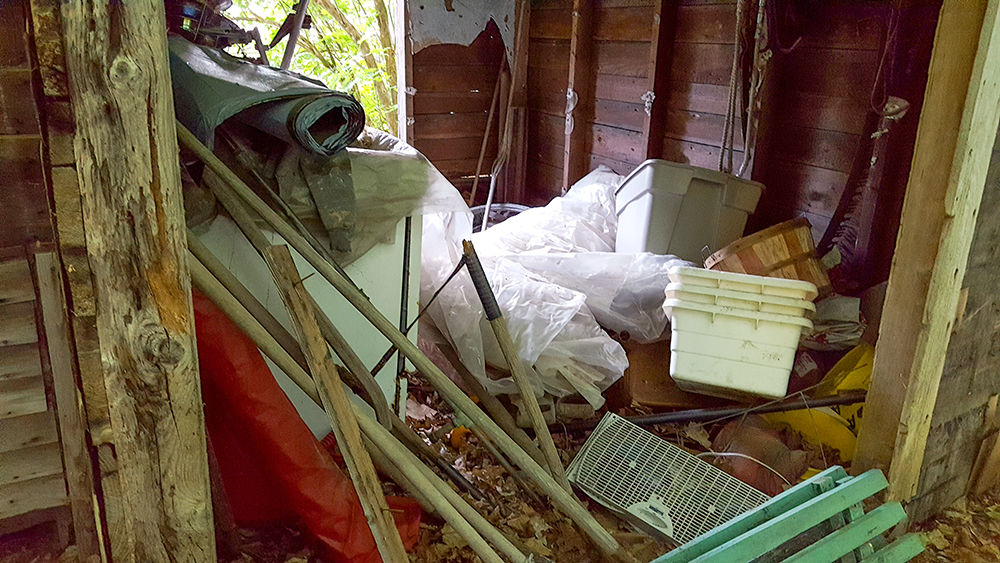
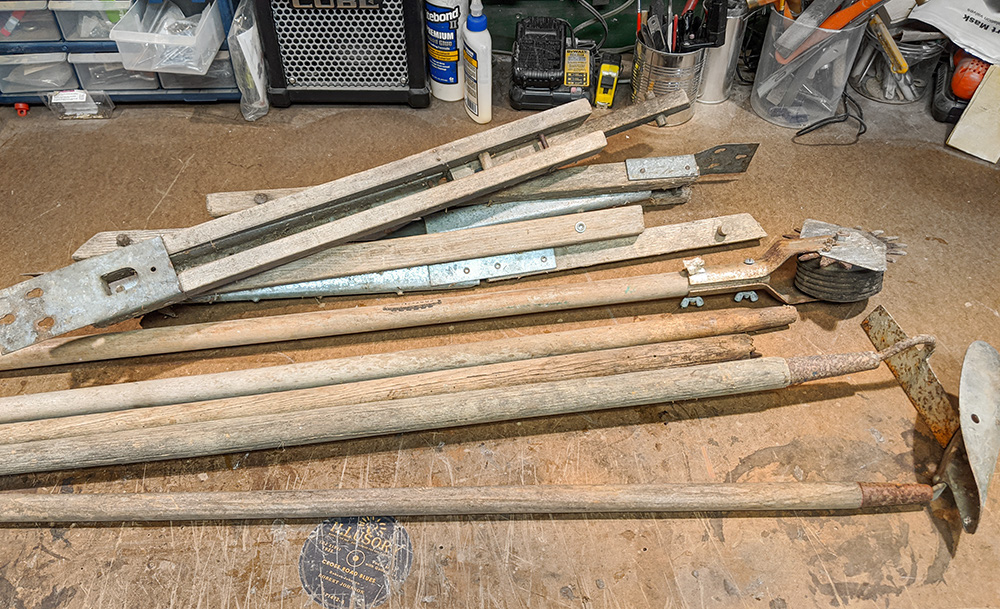
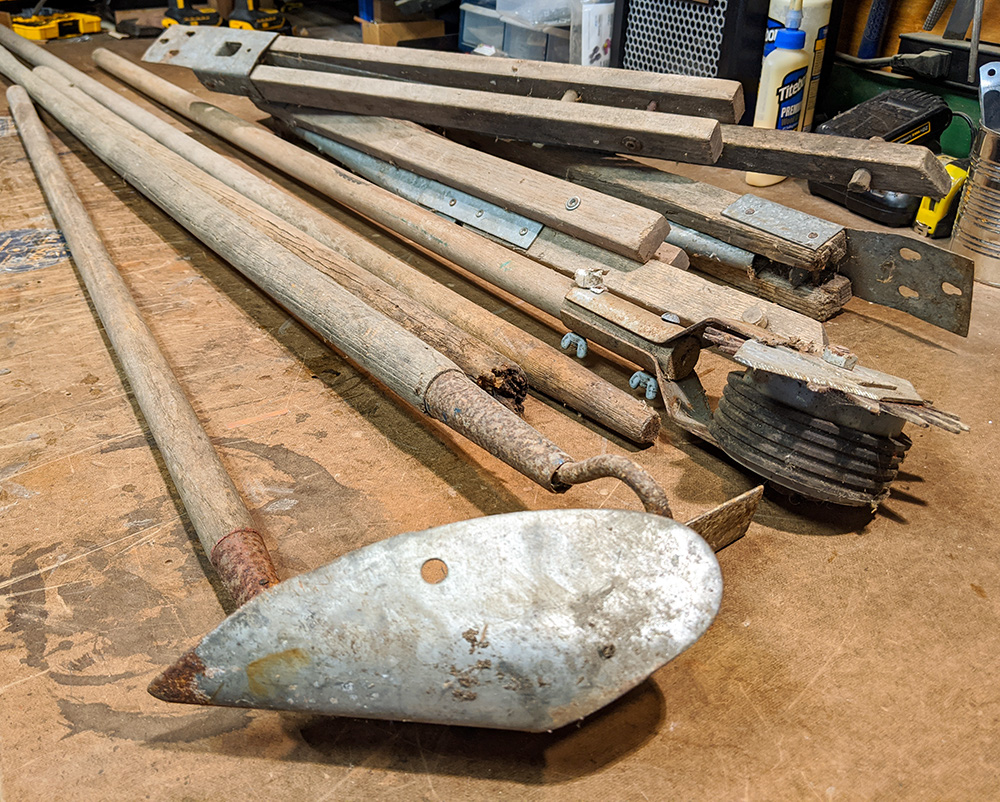
Here is what I had to work with: a few garden tool handles and some roofer's brackets, which are used to hold platforms for the roofers to stand on while working on pitched roofs. An unlikely collection indeed... show this to a conventional luthier and you'd likely be told the best place for it would be a garbage can. |
|
|
|
|
|
Another view of my raw materials, showing the well-used business ends of some of the longer-handled tools. |
|
|
|
|
|
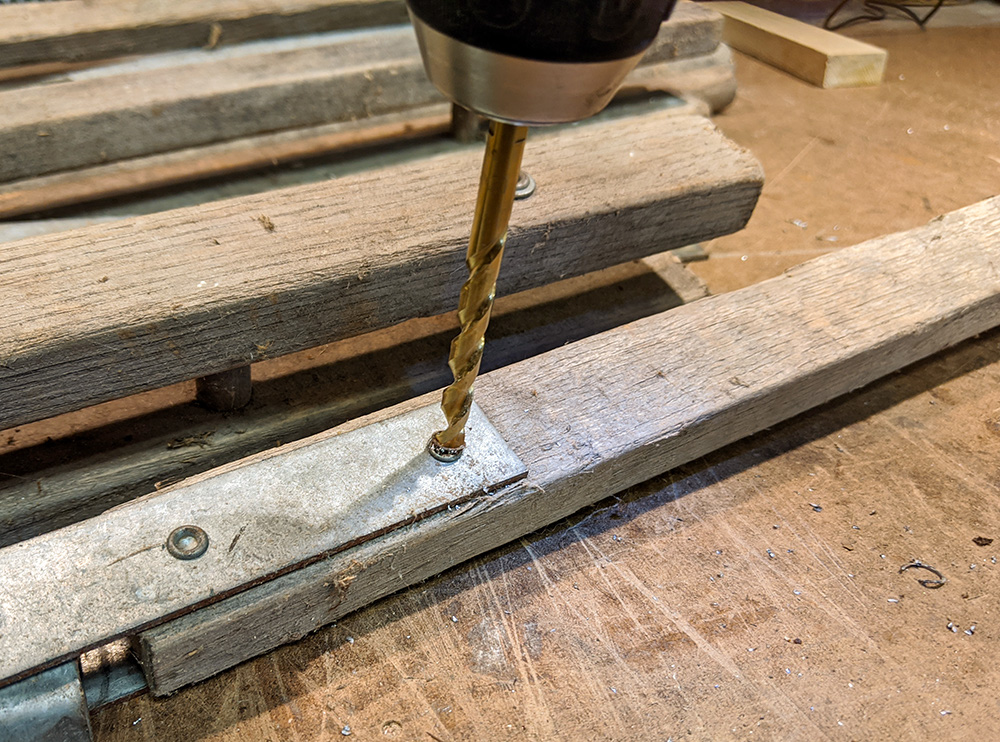
I began by drilling out the rivets on the roofing brackets, to free the wooden pieces. The wooden pieces were a mix of oak and maple, good hardwoods with nice weathered patina. I had already decided that some of these, resawn into thinner slats, would make up the side panels of my box. |
|
|
|
|
|
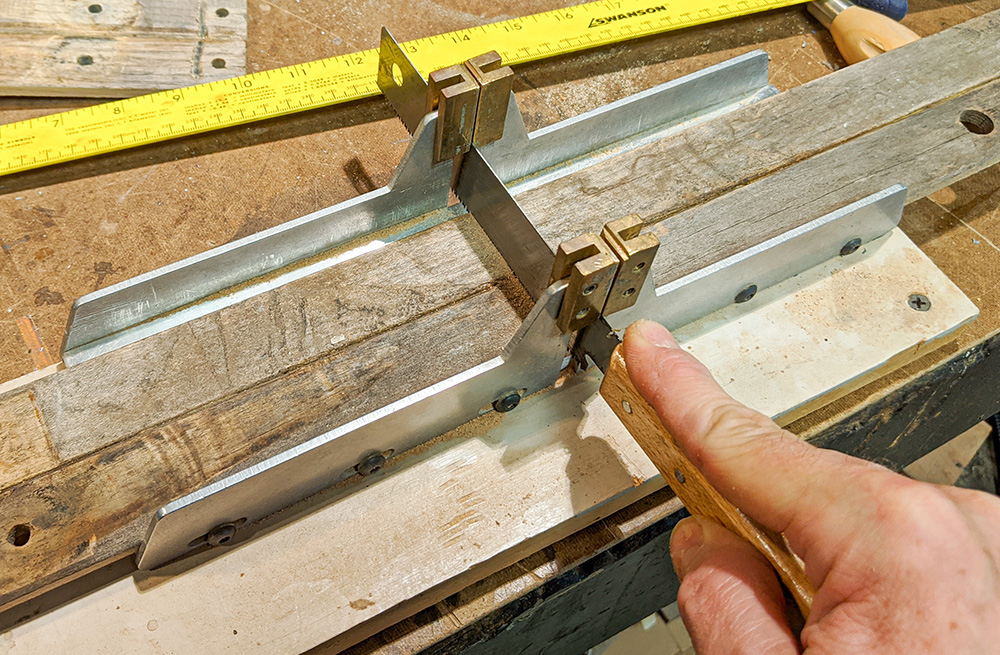
In addition to rivets, there were steel bolts with flanged ends holding some of the pieces together. I suspect that the brackets with the maple pieces were older than the oak ones, as they were joined together using different hardware. The only way I could come up with to remove these pins was by cutting them, so my old dull hacksaw came into play. |
|
|
|
|
|
Getting at some of those bolts and pins was tricky and I had to bend some of the metal pieces out of the way to get the job done. |
|
|
|
|
|
There were also some wooden dowel pieces in them, held in place with small rusted nails that had to be removed - hitting one of these while resawing would do a number on my bandsaw blade. Some of these dowels, cut down into plugs, came into play later for plugging holes in the panels. |
|
|
|
|
|
Next it was time to remove the metal heads from the handled tools. Here I'm cutting the hoe head from the handle - it'll appear later for some reworking into the guitar's tailpiece. |
|
|
|
|
|
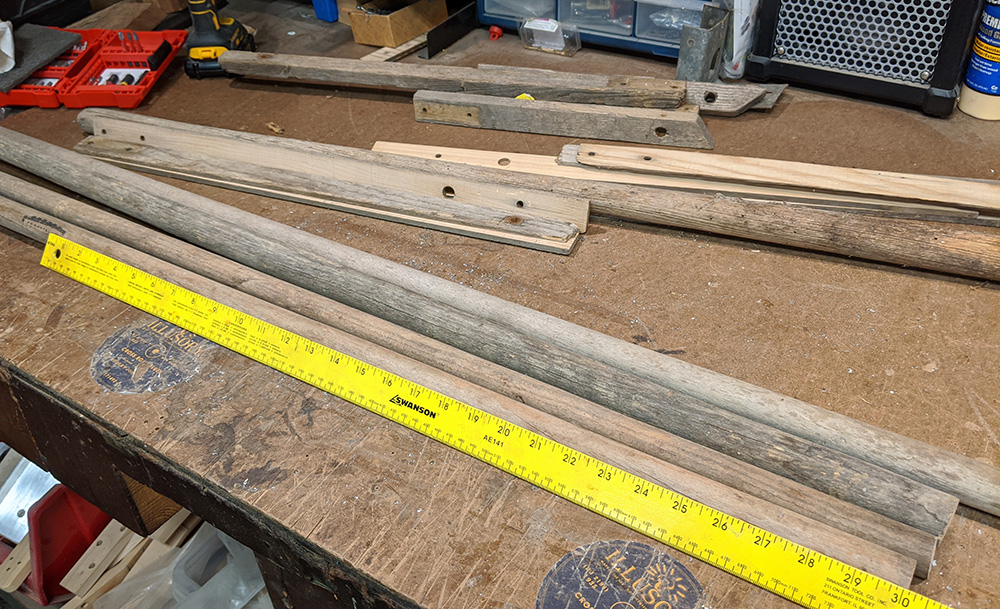
Here, all of the metal has been removed and I have my pile of wood. No piece that I had to work with was over 1 1/2 inches wide - so I already knew there would be a LOT of gluing involved with turning this pile of weathered sticks into a guitar. |
|
|
|
|
|
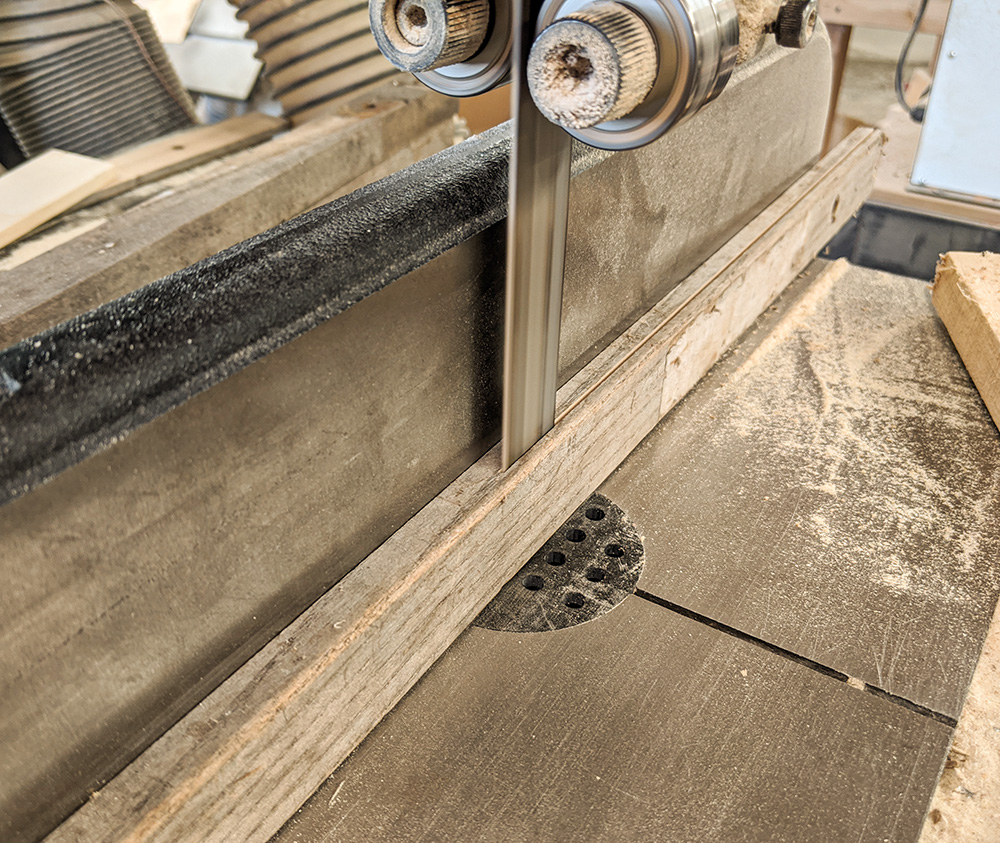
My first task was to build the box frame which would become the body of the guitar. So, I headed to the bandsaw and started resawing some of the roofing bracket pieces into thinner slats. I cut them about 3/16" thick to provide enough stability for the box (I knew I would also be bracing it further), and to maximize my material. My goal was to use ONLY wood from the original bundle, so I knew I had to be very careful to not waste any. |
|
|
|
|
|
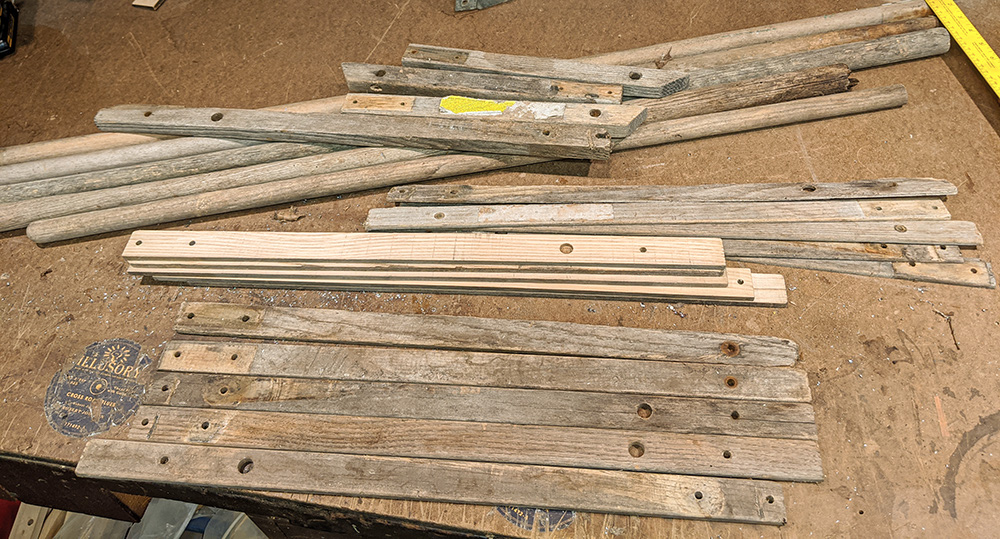
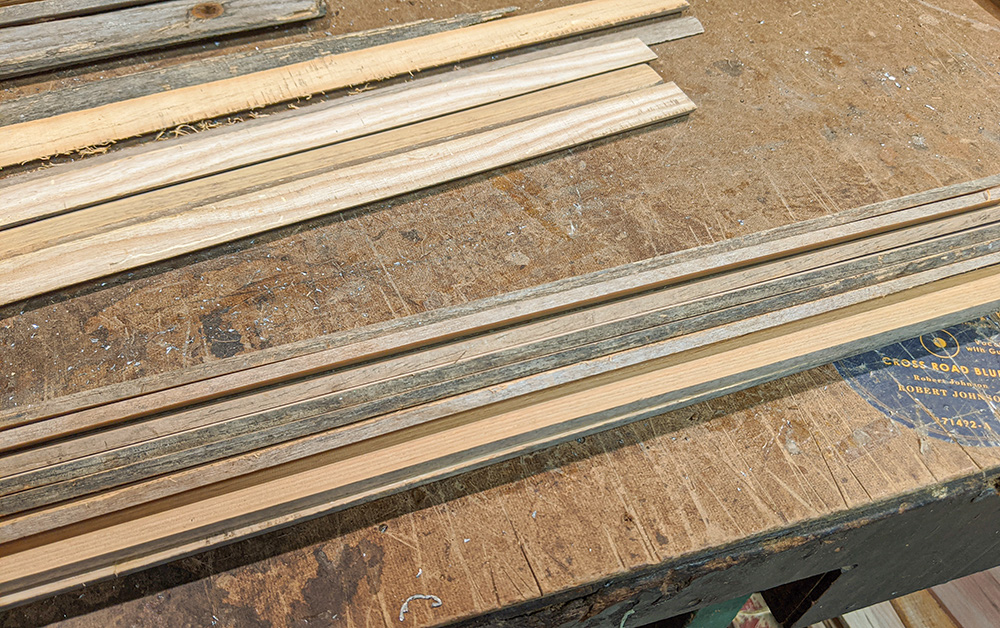
Here are the slats resawn from the longer roofing bracket pieces, laid out in preparation for starting to create my box side panels. |
|
|
|
|
|
Before I could glue them together, however, I went over to the edge sander and sanded the edges of my slats to expose a strip of bare wood. When gluing together weathered slats like this, having some bare wood for the glue to adhere to makes for a stronger bond. |
|
|
|
|
|
With my edges sanded, I'm ready to start gluing. As you can see from this picture, I didn't go crazy with the sanding, as I didn't want to remove any more wood than I had to. Just a light touch to take off some of the weathered roughness. |
|
|
|
|
|
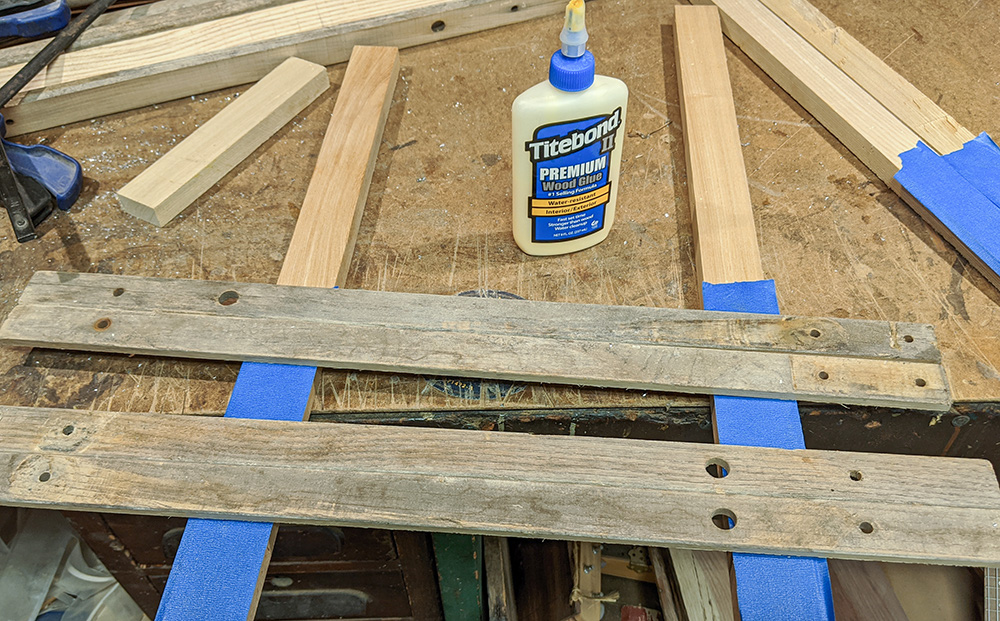
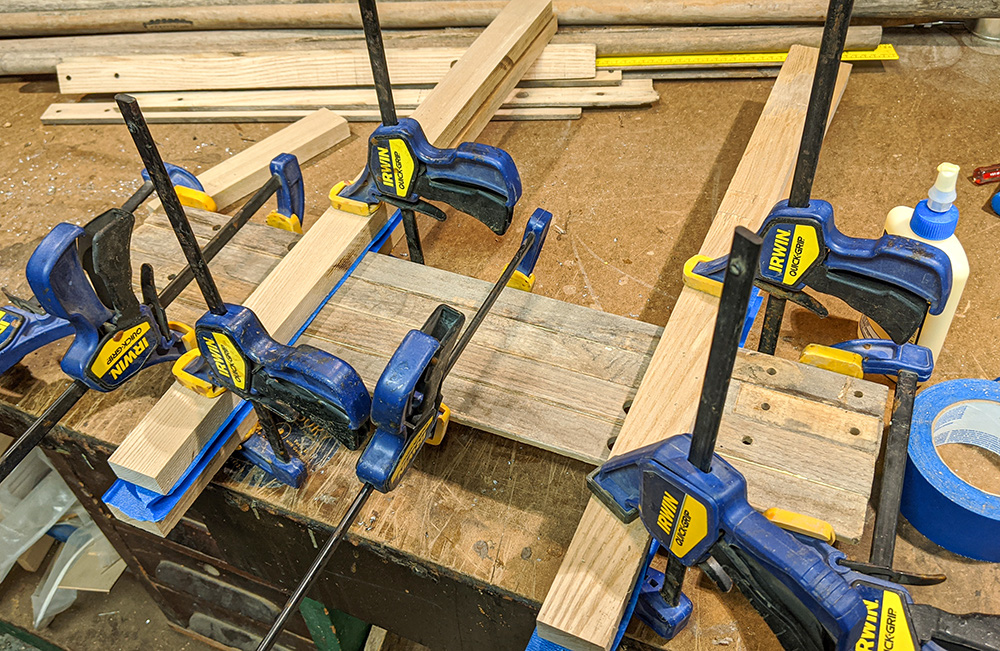
Now it's time to begin gluing my side panels together. I decided to join them together two and two, to give my instrument body a nice depth (about 3 inches). Here I have the slats laid out two and two on my gluing rails. Blue painter's tape on the gluing rails helps prevent the glue bonding the rails to my workpieces. |
|
|
|
|
|
I put glue in between two of the joins (but not the middle one since my goal was to create two wider slats and not one large panel), and apply the clamps. The gluing rails hold everything flat so the slats can't buckle as the horizontal clamp pressure is applied. |
|
|
|
|
|
A close-up of the gluing and clamping. There is no glue in the middle joint. I wipe off excess glue as I go, as I don't want any visible on the surface of my panels. |
|
|
|
|
|
While my side panel glue is curing, I turn my attention to the tool handles that will form the neck of my instrument. I had never tried to make a solid rectangular stick from round handles before, so I wasn't exactly sure how to proceed. I decided first to get them cut to length. I settled on 30 inches, which was a bit longer than I thought I would need, but I figured that it would be better for it to end up a little longer rather than shorter. |
|
|
|
|
|
Over to the chop saw I went to make the cuts. Extra caution is always recommended when cutting round stock, to make sure it doesn't bind and kick. |
|
|
|
|
|
Here I have four of the largest, straightest handles cut to my 30-inch target length. The cutoffs and remainders are visible below. |
|
|
|
|
|
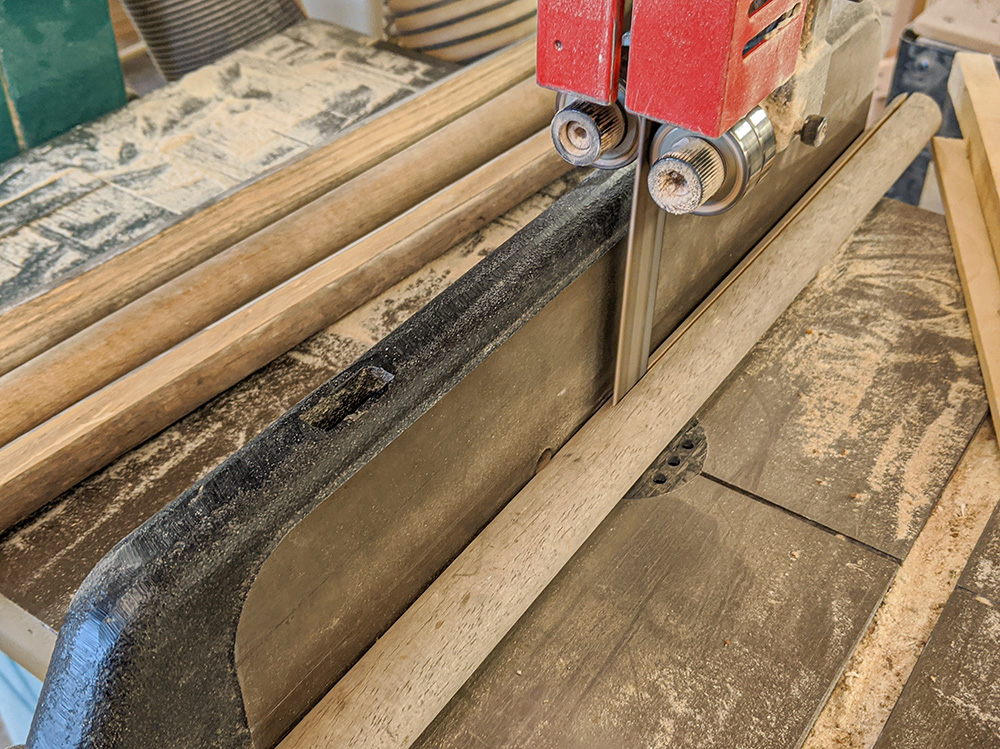
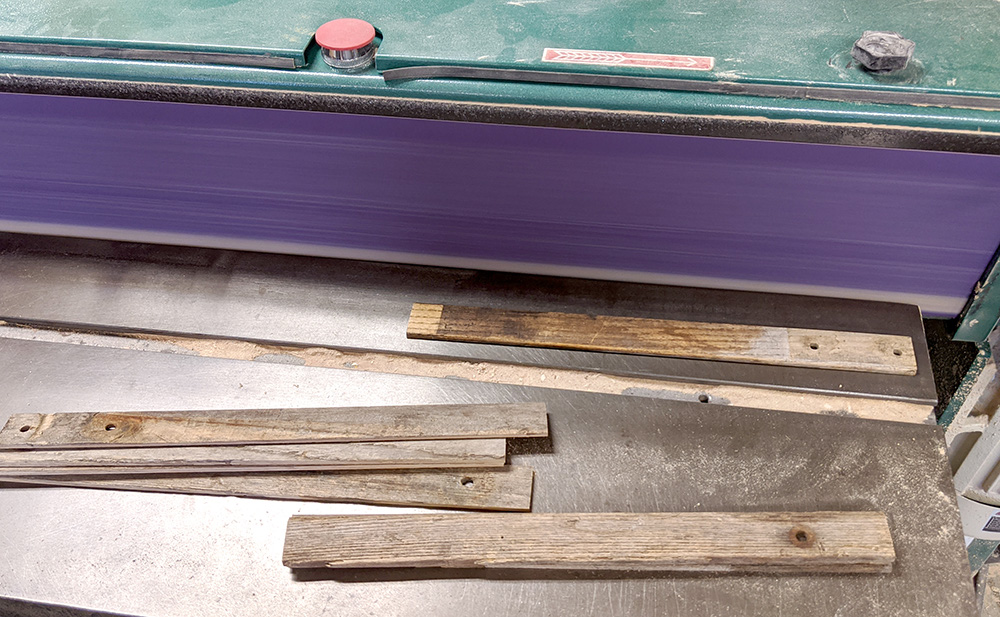
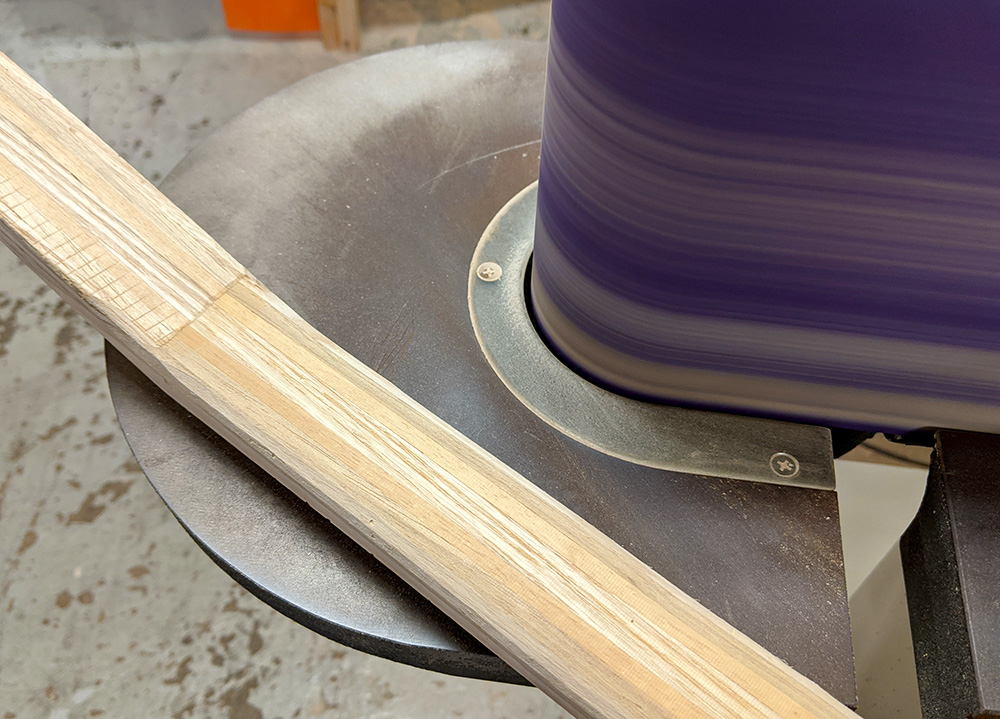
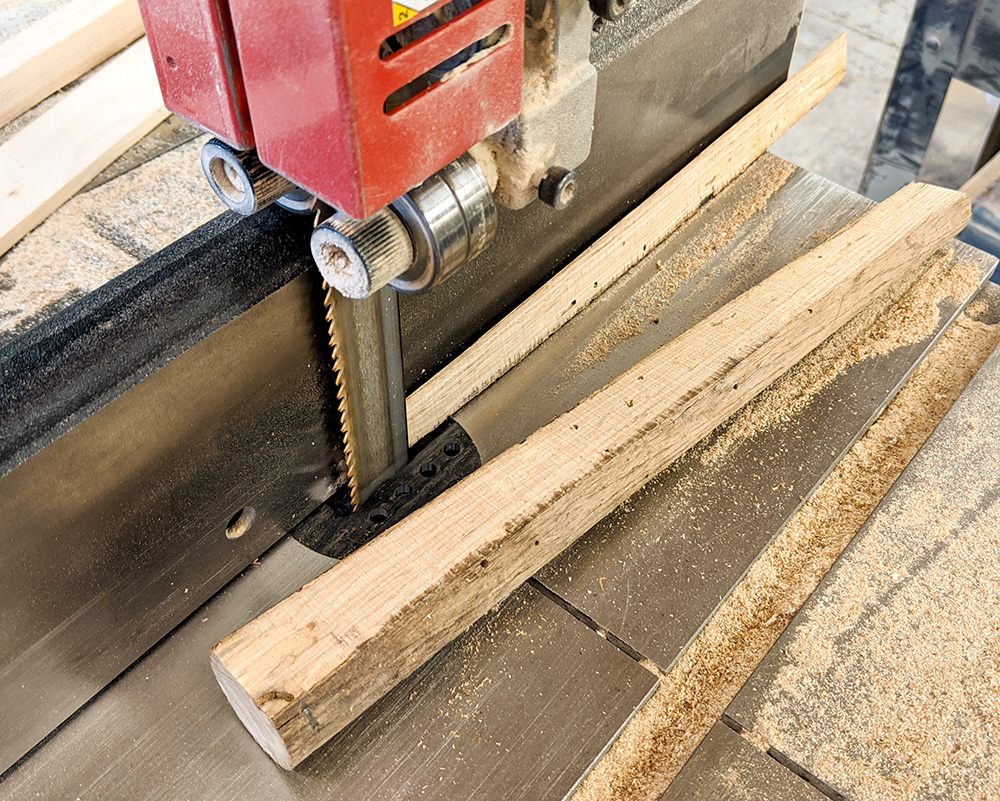
Now to the bandsaw for resawing the handles into thin slats. An important note here: resawing round stock into thin strips is difficult to do cleanly. The dowel wants to turn as you saw, which gives you a corkscrew profile. I tried sanding a flat surface onto some of the handles (visible on the one just to the left of the saw guard in this photo), and that worked OK. Later (too late for these cuts) I discovered that the planer would pull them through cleanly and put a nice flat surface onto them as well. At least one of my slats ended up somewhat corkscrewed, but it didn't cause too much trouble. |
|
|
|
|
|
Here I have all of my resawn handle slats laid out, with the widest in the center, in preparation for laminating them together to form my neck. The widest pieces were about 1 1/4 inch, and the thinner ones on the end about. All of the pieces had beveled/curved edges as well (having been cut from round handles), which complicated the overall process. |
|
|
|
|
|
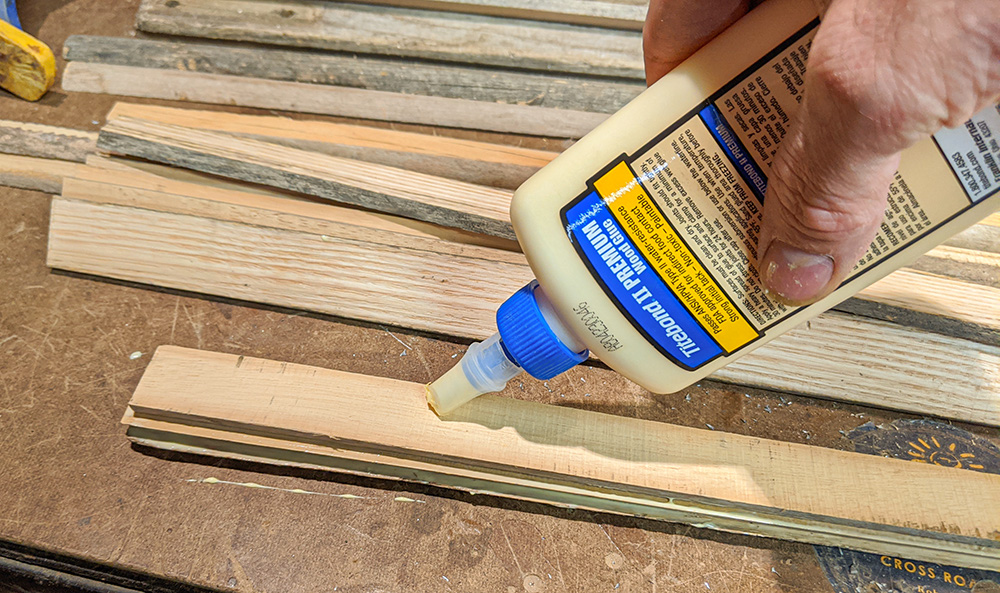
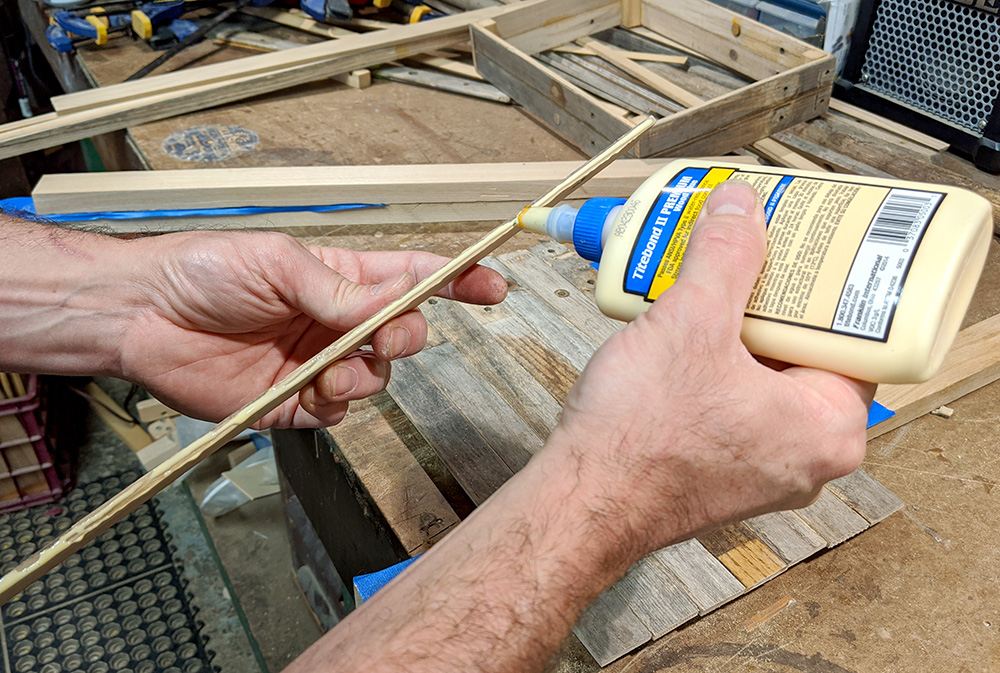
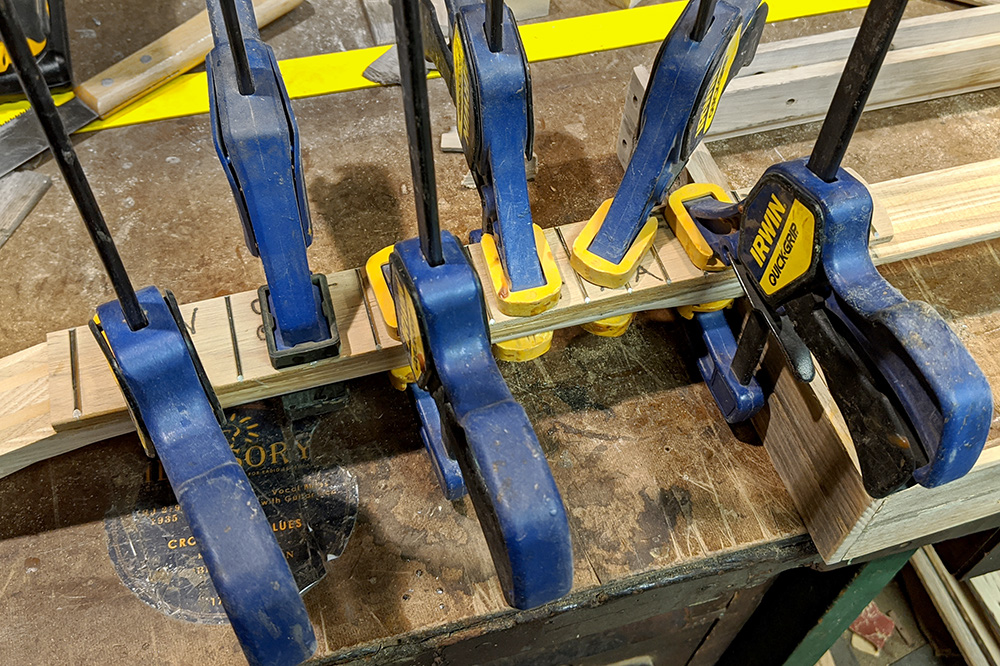
I think about half a pint of Titebond II glue went into this build. Here, I'm liberally slathering the gluing surfaces of my neck slats with the glue. I had run the slats lightly through the planer to smooth their surfaces down a bit before gluing, so I would get cleaner joins. |
|
|
|
|
|
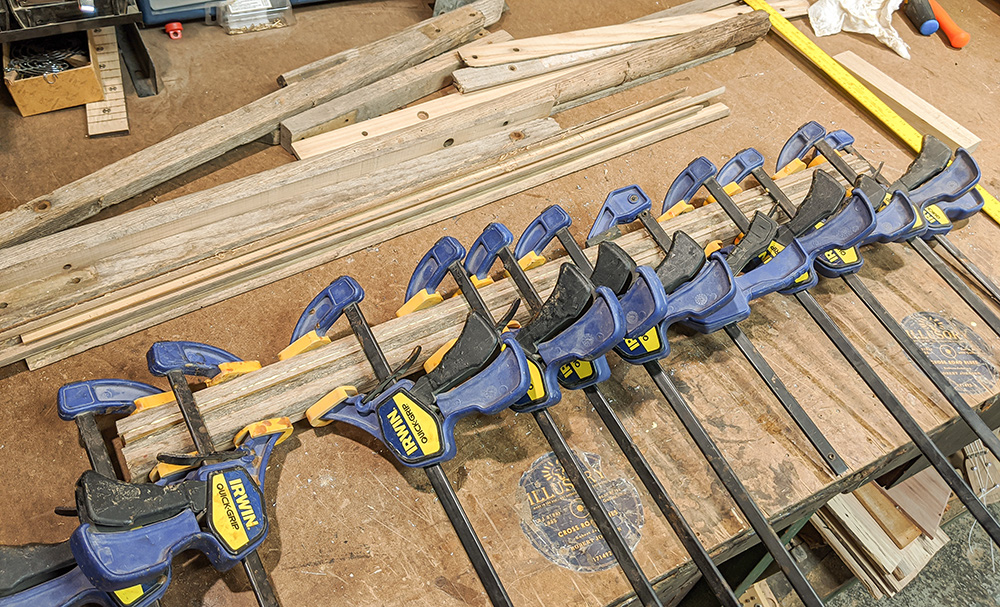
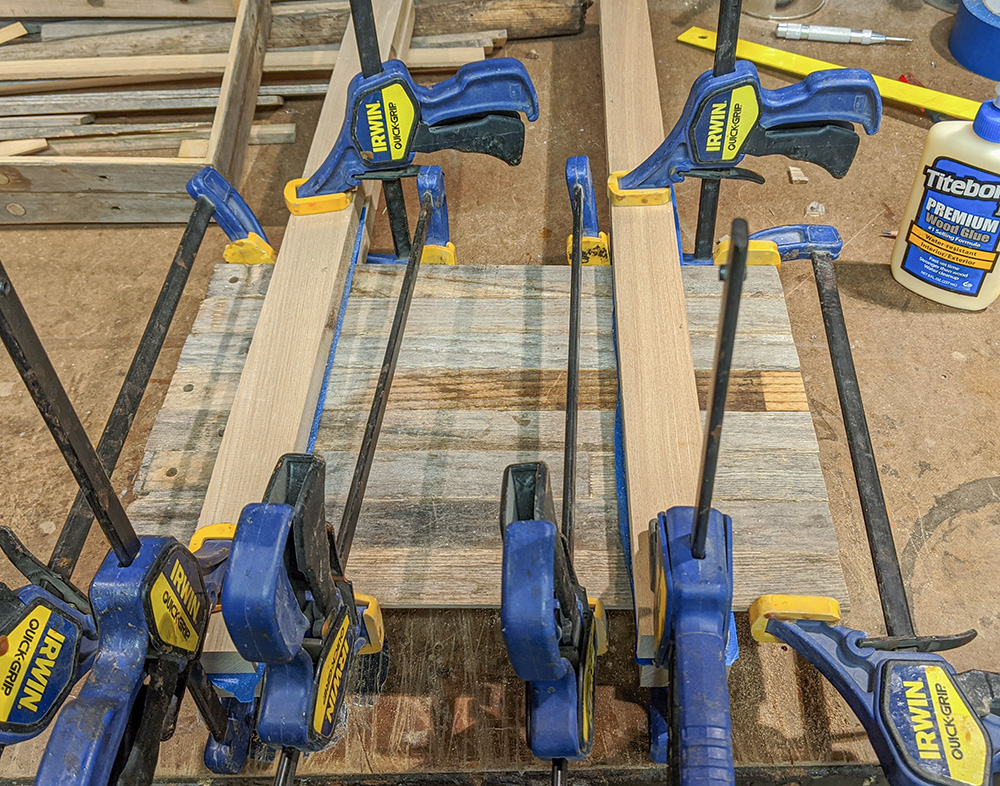
No such things as too many clamps when laminating thin pieces together like this. |
|
|
|
|
|
While the neck glue was curing, I decided to get going on building the box from the slats I had previously glued together. My side panel slats were 24 inches in length overall, and I wanted to use all of that, so I chose a box size of 10 inches by 14 inches. This would be a nice big box to form the body of my guitar, and I hoped that size would give it a nice rich tone and resonance. Spoiler alert: It did. |
|
|
|
|
|
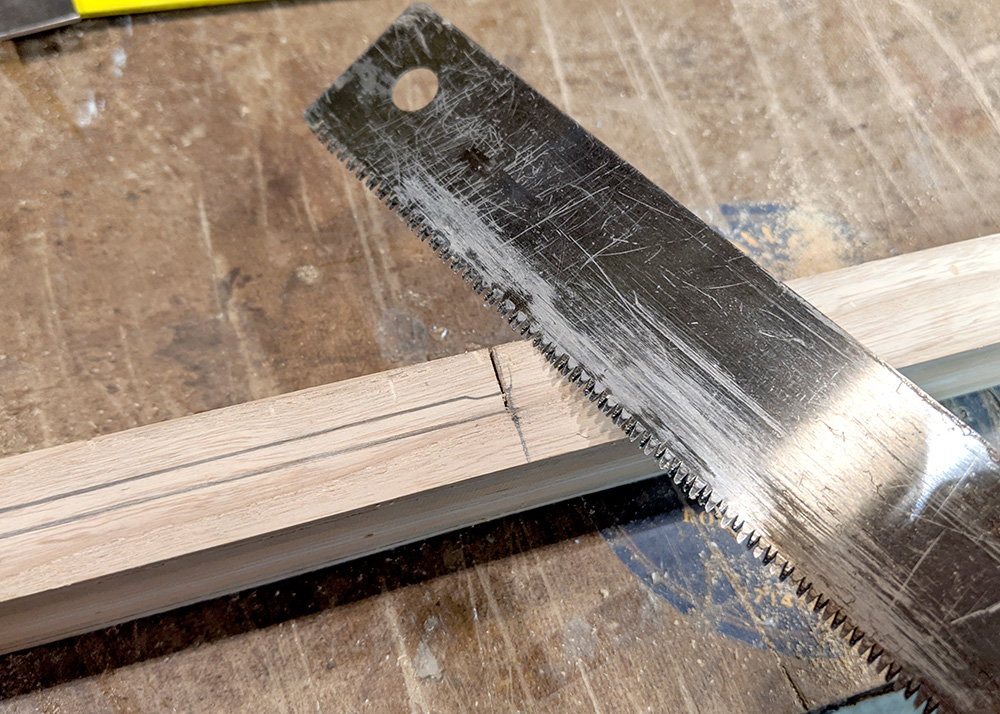
Here I am cutting my side panels to length using a pull saw and a miter box. I could have used the chop saw for this, but I find for quick cuts through thin panels, it's just as quick to do it by hand. |
|
|
|
|
|
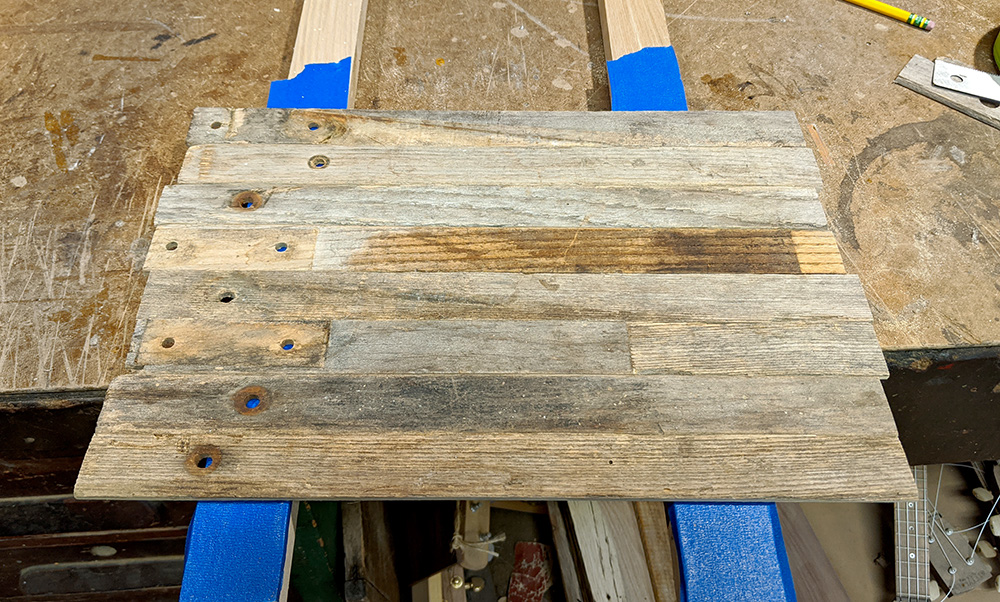
A mockup of my box layout. Before gluing, I headed over to the edge sander to take the ends of the panels down to bare wood, for stronger glue joints. |
|
|
|
|
|
Having miter vises such as these makes gluing boxes up a lot easier, but they aren't necessary - you can get great results with homemade right-angle jigs made from hardwood. |
|
|
|
|
|
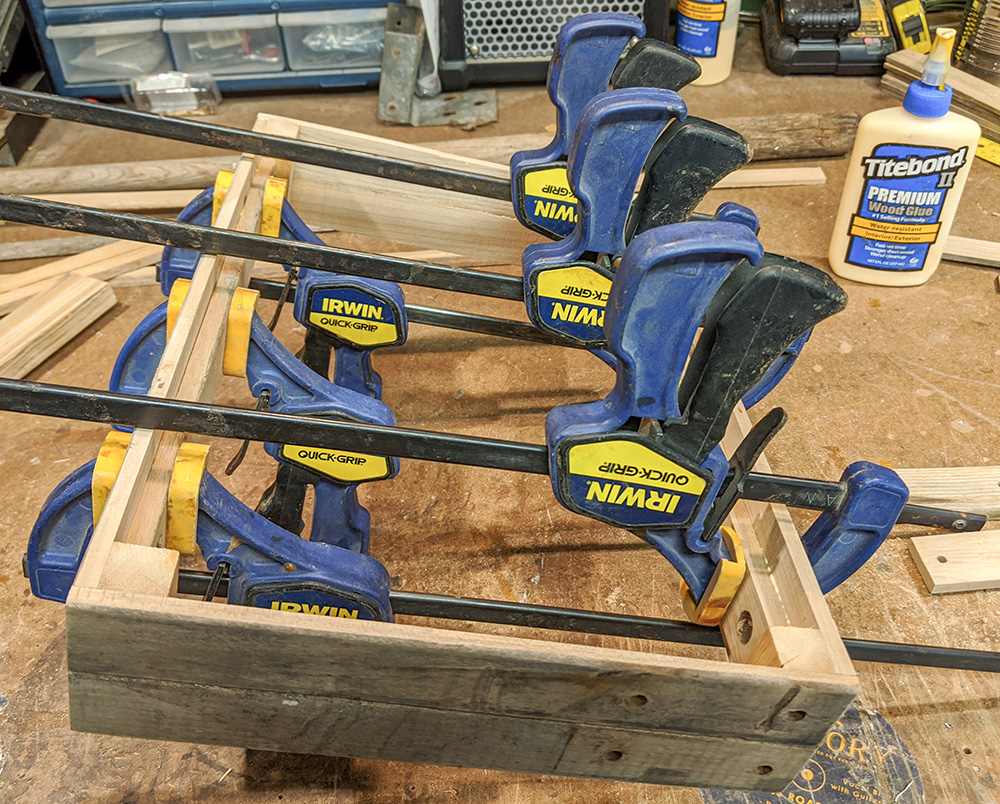
Always try for nice tight joins on your box corners. Because of how thin these panels are, and because I intend to glue bracing into the interior, I don't bother with trying to put any screws or nails in. |
|
|
|
|
|
I needed to apply a little pressure to bring that top panel join together tightly. What do you do when you don't have a clamp long enough to do what you want? You clamp to a clamp, and get the job done, as shown in this photo. |
|
|
|
|
|
While my box joints were drying, I took one of the neck handle cutoffs and planed/resawed it down into a (mostly) square stick, and then cut that to length for use as corner braces. |
|
|
|
|
|
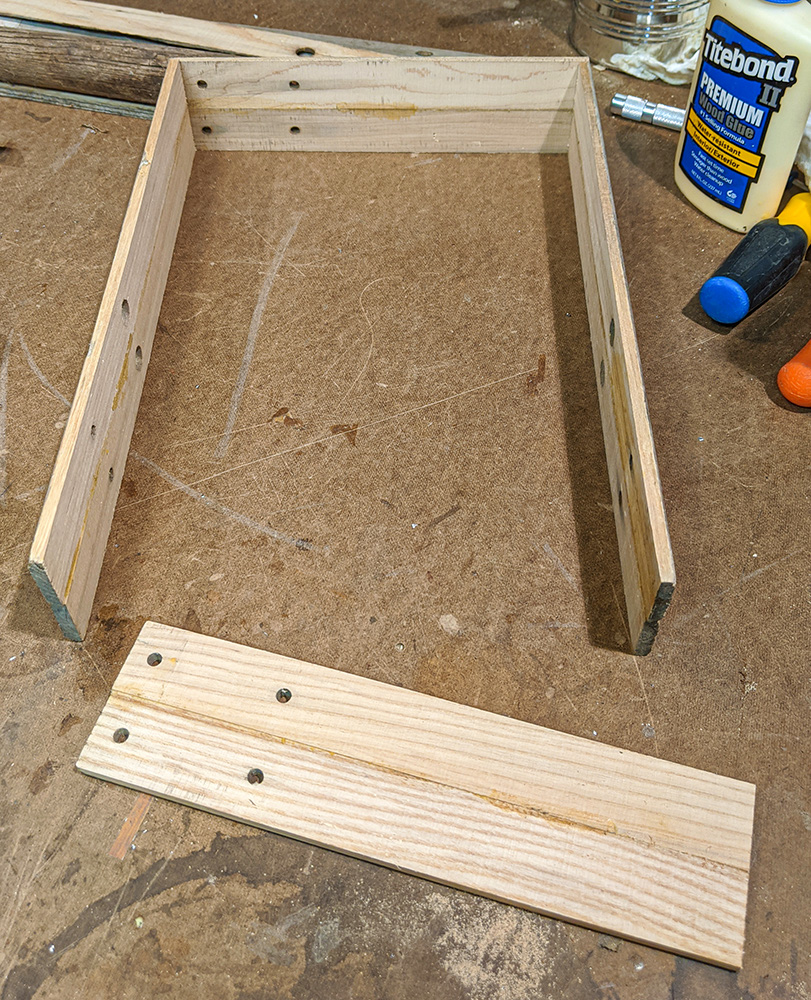
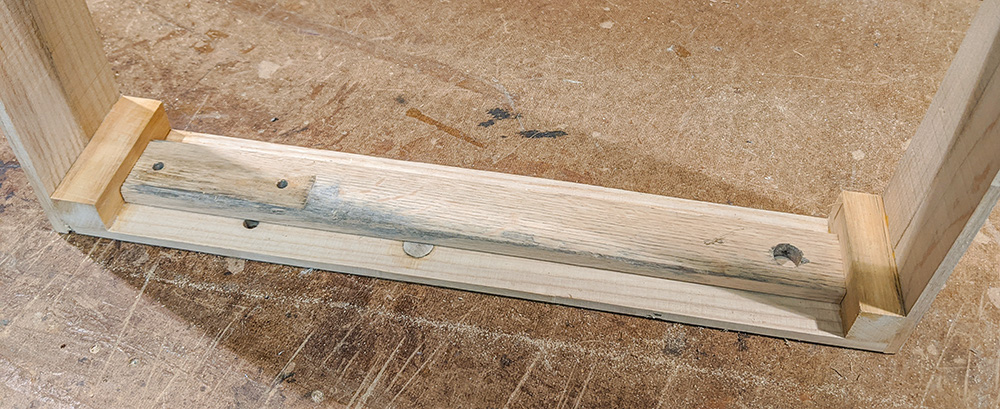
As my box joints cured, I glued my braces in to stabilize and strengthen the corners. This is a good way to add a lot of strength to wooden boxes (and thin-walled cigar boxes as well) when building instruments. |
|
|
|
|
|
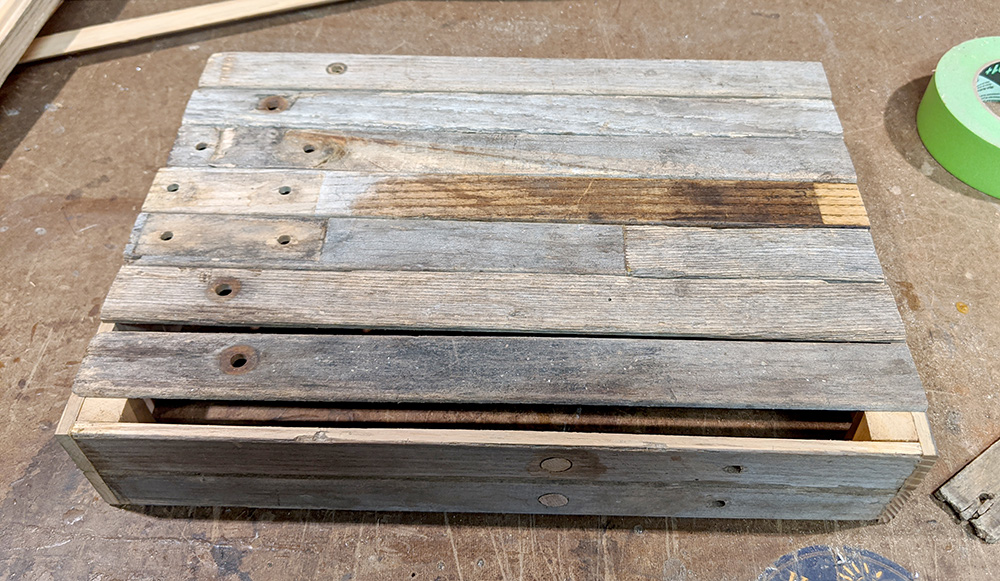
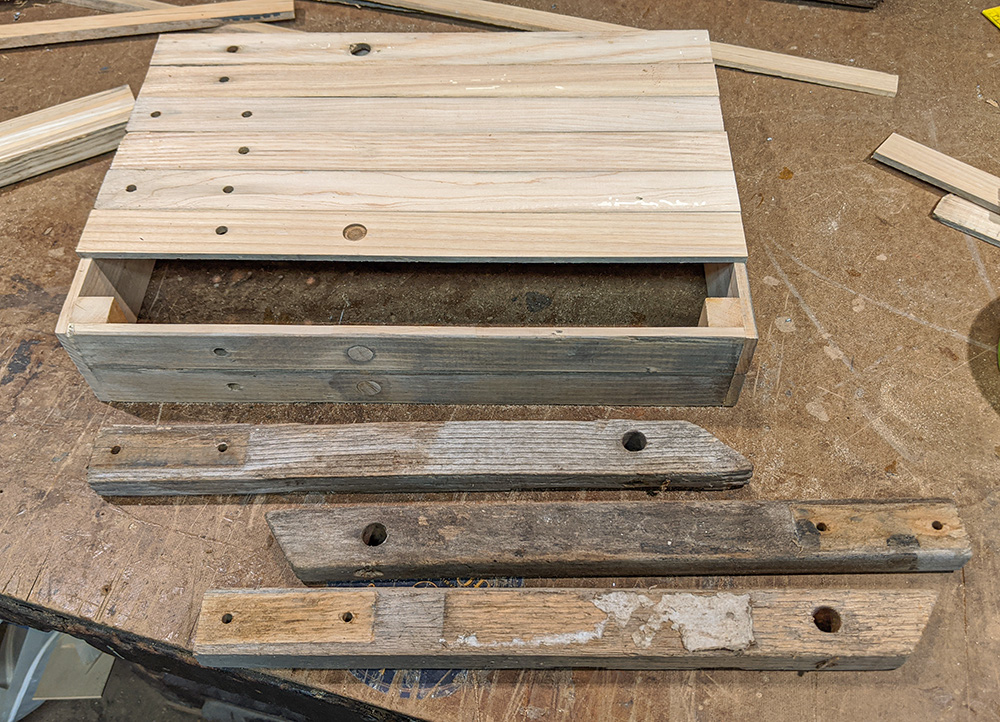
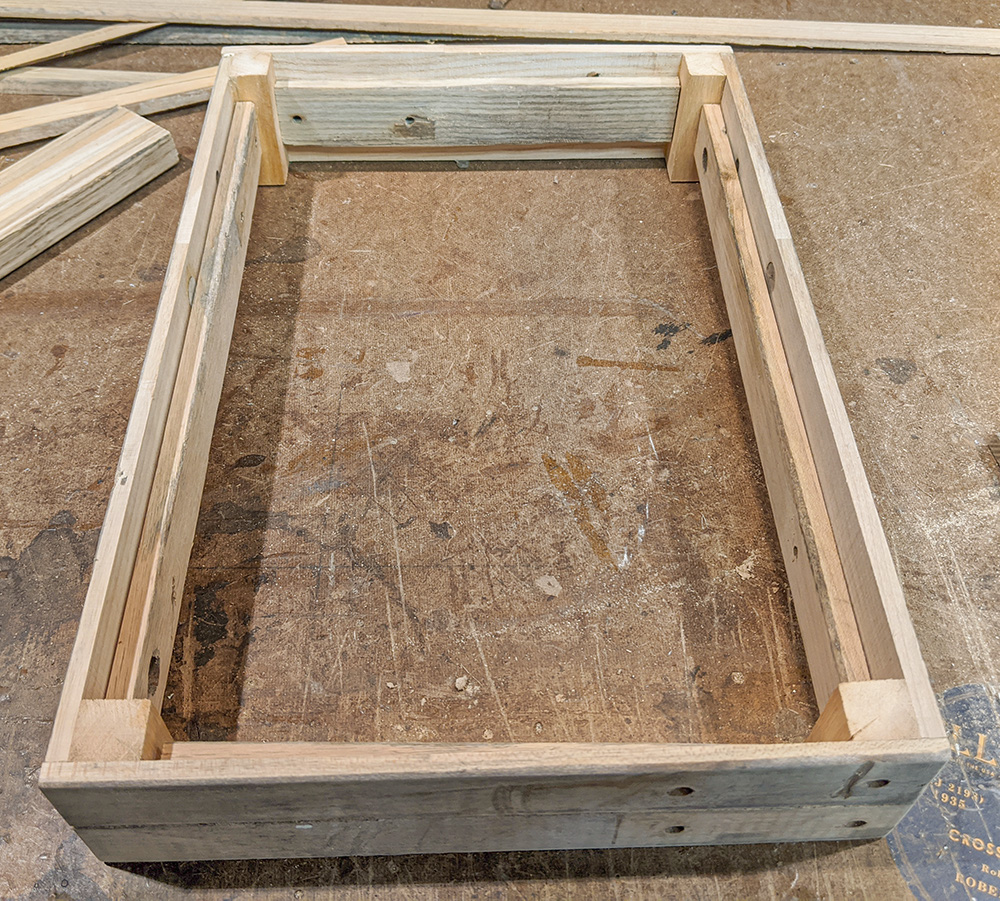
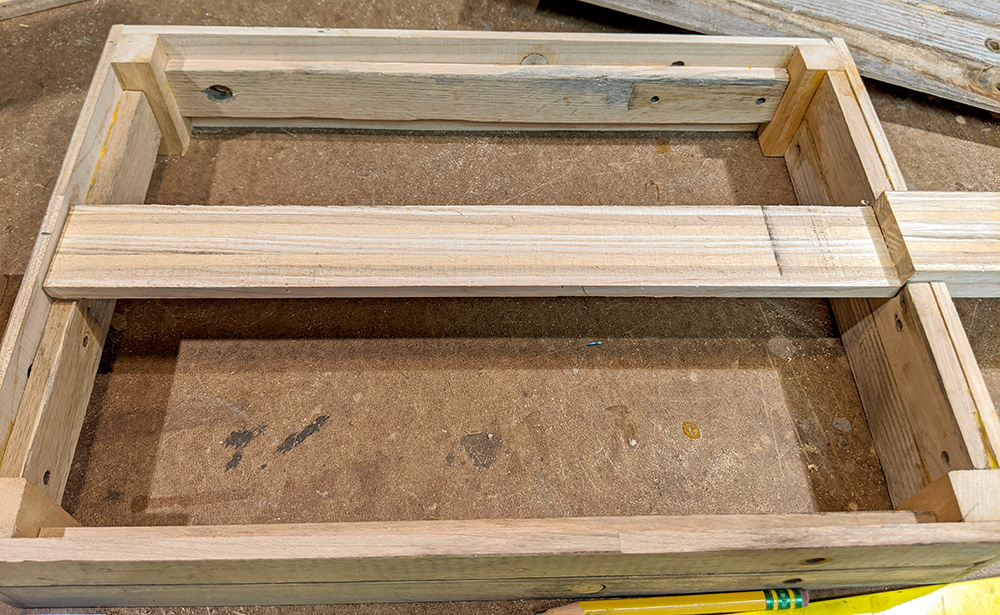
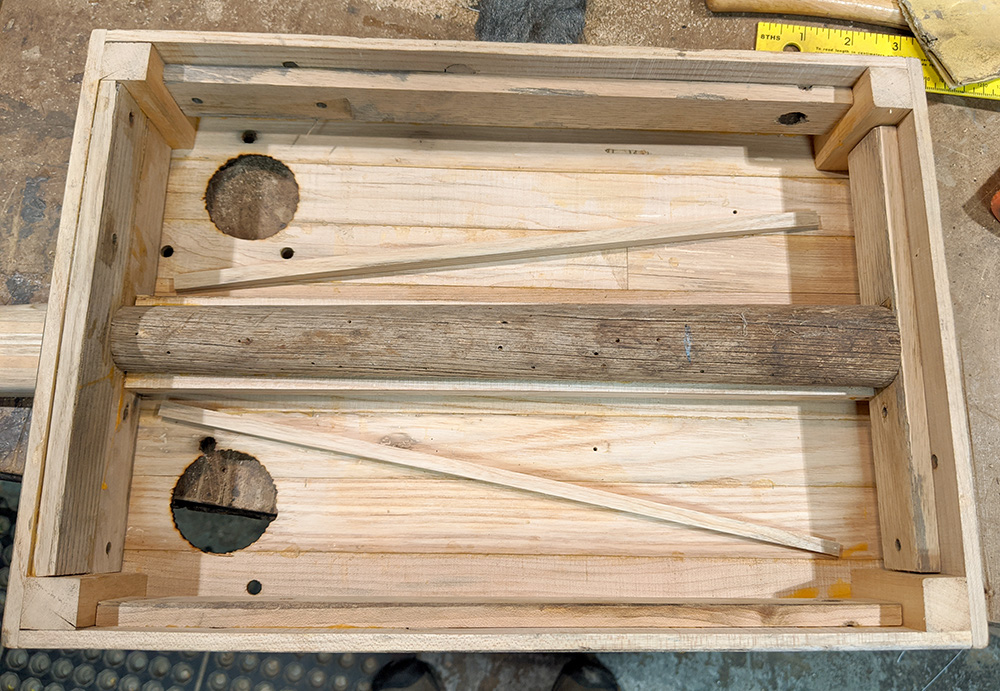
Here is my completed box frame, with braces installed. Also note the plugs glued into the round holes in the side panels - I used leftover dowel pieces from the roofing brackets for this, and it worked great. I later sanded off the glue smudges. |
|
|
|
|
|
Here's my neck blank after clamping and with the glue partly cured. I chose to proceed before the glue was fully cured, because I knew that some of the sawdust from sawing, planing and sanding would get forced down into the glue joints and stick there, helping to fill gaps. |
|
|
|
|
|
First, I ran the neck blank through the bandsaw as evenly as I could, using the guard, to remove the biggest protrusions on the back side. Then, using that flat surface face down on the planer, I planed as much as I dared off of the other side. Finally, I planed down more of the first side until I had a fairly straight, mostly smooth piece. It had a bit of a twist to it which I tried to sand down on the edge sander, with OK results. When finished, one end of my neck was a good but more uneven/out of square than the other, and had the grooves visible in this photo, and I decided that end would be inside the box. |
|
|
|
|
|
Now that I had a workable neck, it was time to turn my attention to my fretboard. I took the last remaining handle, which also was the largest in diameter and straightest, and planed a flat side onto it. I am not sure what wood this handle was made from... possibly red birch. |
|
|
|
|
|
Resawing a handle that has a flat side planed onto it definitely makes for stranger cuts. I cut my fretboard slats from the widest part of the handle... I knew I would be gluing two of them together to yield a fretboard wide enough for my neck. |
|
|
|
|
|
Once sawn, it was over to the edge sander to take off the curved edge to make a clean join for gluing. |
|
|
|
|
|
I wanted the glue joint down my fretboard to be as invisible as possible, so I was careful to sand the edges straight and smooth. Having a wide edge sander definitely made this easier. A jointer would also have done the job nicely. Doing it by hand would be a lot trickier. |
|
|
|
|
|
Here I am again using my tape-faced gluing rails to clamp and glue my fretboard blank. |
|
|
|
|
|
Once the glue sets, my neck and fretboard blanks are ready to roll. |
|
|
|
|
|
Now I turn my attention to making the top panel / sound board for my guitar. For this I used the remaining weathered edges that I had resawn from the roofing bracket pieces. Because my box is just over 14 inches in length (the length of the side panels plus the thickness of the end panels), I have to cut down each of the 24-inch long slats to fit. |
|
|
|
|
|
I don't have quite enough full-length slats to make the soundboard, so I have to glue a couple together end-to-end. |
|
|
|
|
|
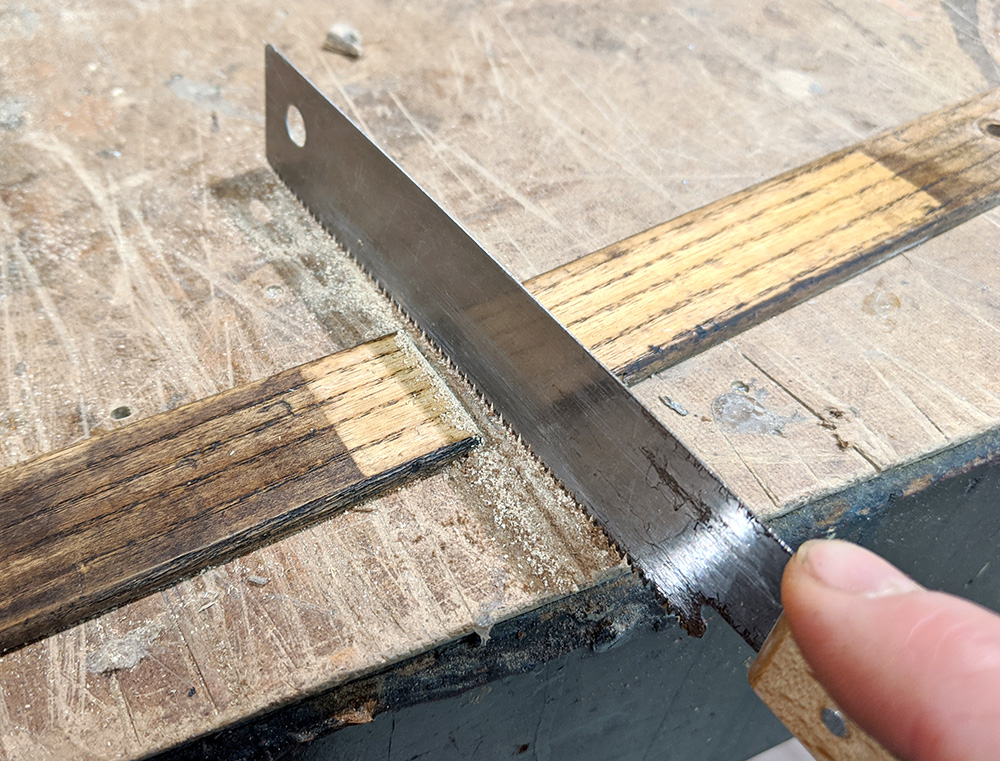
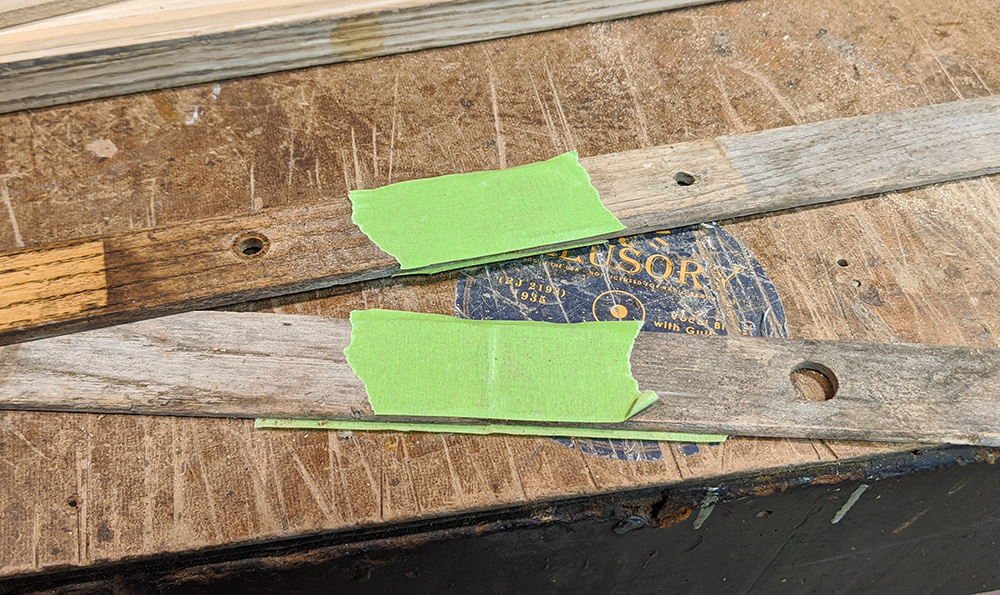
I use painter's tape to end-glue cutoff pieces into longer slats. To do this, I start by sanding a nice flat surface onto the two ends. Then I place them down on the bench, holding them tightly together, and put a piece of tape on one side. Then I turn them over, open up the joint to add glue, then close it up and put on another piece of painter's tape to hold it tightly closed. Works great with no clamps needed! |
|
|
|
|
|
Once the glue sets, I head over to the edge sander to sand the gluing edges down to bare wood. A couple of the edges were pretty rough and splintered, so I sanded them down a bit more. |
|
|
|
|
|
Then it's back to the gluing rails to create this panel. With wide, thin panels like this made from multiple slats, using gluing rails in this way really makes the job easier. |
|
|
|
|
|
Glue is applied to each of the long, narrow sides of the slats. |
|
|
|
|
|
And then it is firmly clamped into place. The gluing rails are clamped together first, using moderate pressure, and then the longer horizontal clamps are put on. The rails keep the slats from buckling under the horizontal pressure. I use my fingers to adjust the flushness of the join towards the end of the slats, and when it is good I squeeze the clamping pressure up good and tight to hold everything in place. I am not going for a perfectly smooth panel, but I do want to get it as close as I reasonably can. |
|
|
|
|
|
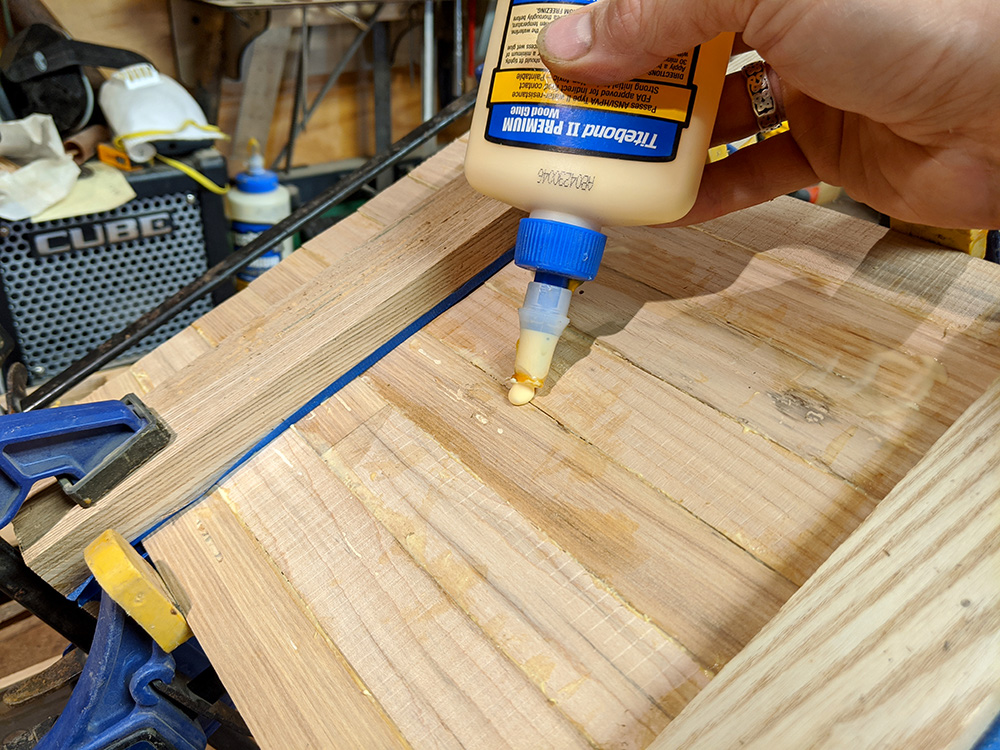
While clamped, I apply some more glue to the back of the panel to fill in any gaps that remain, smoothing it down into the gaps with my thumb. |
|
|
|
|
|
While my front panel sets, I take the box frame over to the sanding table to smooth down the inner surface of the side walls, in preparation for gluing in some bracing. |
|
|
|
|
|
I didn't have any leftover pieces so far that would serve as bracing, so I decided to use the three remaining shorter pieces from the roofing brackets. First stop was the chop saw to remove the angled ends... |
|
|
|

|
And then to the bandsaw to cut them in half. I left these pieces a little thicker (about 3/8 inch) because they were being used for bracing and some extra heft seemed to make sense. |
|
|
|
|
|
After a quick sanding on the edge sander to smooth up the cut surface, it was time to cut them to length and fit them into my box. |
|
|
|
|
|
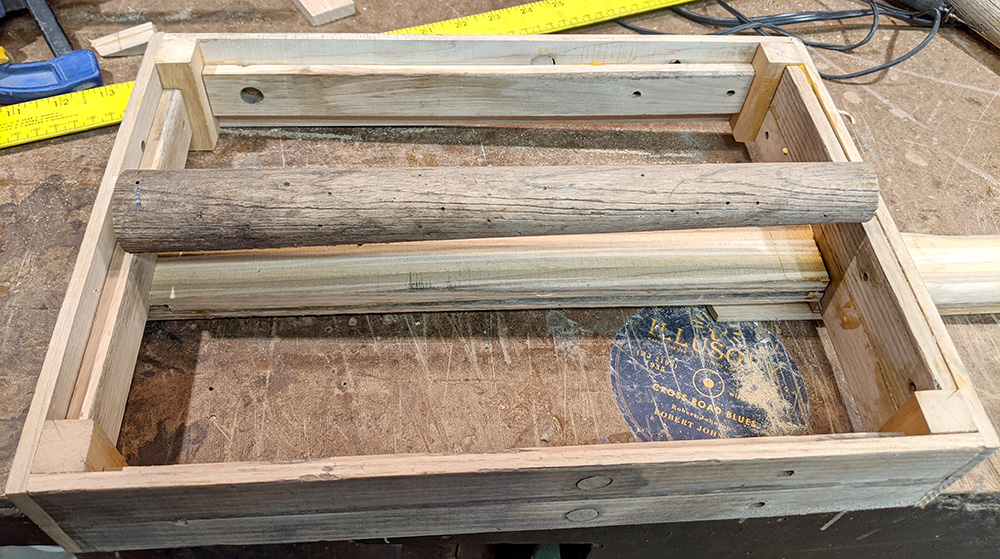
Here is a mock-up dry fit I did before applying glue. Though it isn't shown here, I ended up doing a double brace on what would be the neck-end of my box, for extra stability. The other three sides just got the single width brace in the middle of the panel, as shown. |
|
|
|
|
|
The clamping of the braces. No screws or other fasteners were used - just glue. |
|
|
|
|
|
While my braces were clamped in, I decided to get to work on turning that hoe head into a tailpiece. I wasn't exactly sure whether this would work when I started, but I knew if it did the effect would be pretty cool, so I decided to have a go at it. |
|
|
|
|
|
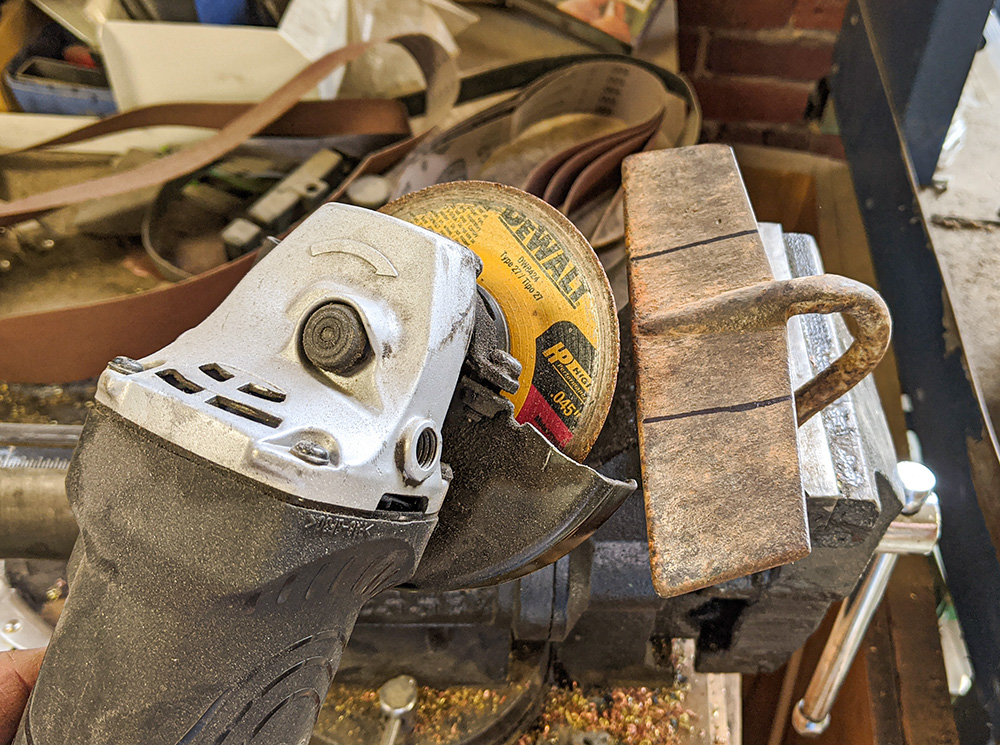
Step one was to cut the wings of the hoe a bit shorter. At first I thought I would grind them down, but that would have taken forever, so I quickly turned to the angle grinder. |
|
|
|
|
|
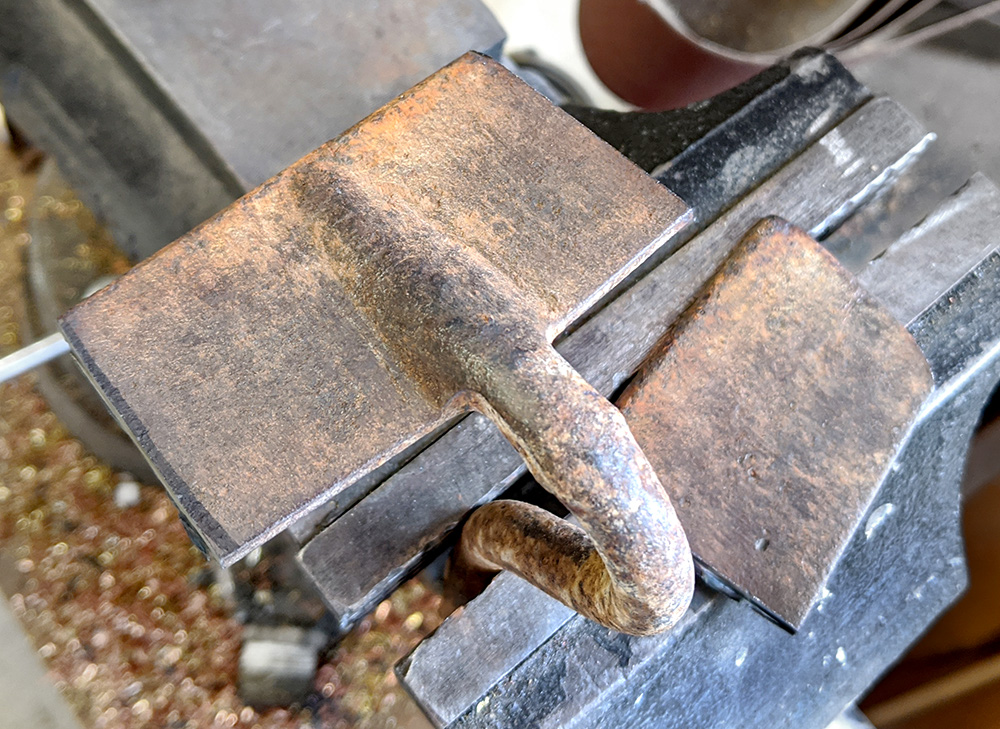
With the excess removed, it was now much closer to the size I wanted for my tailpiece. |
|
|
|
|
|
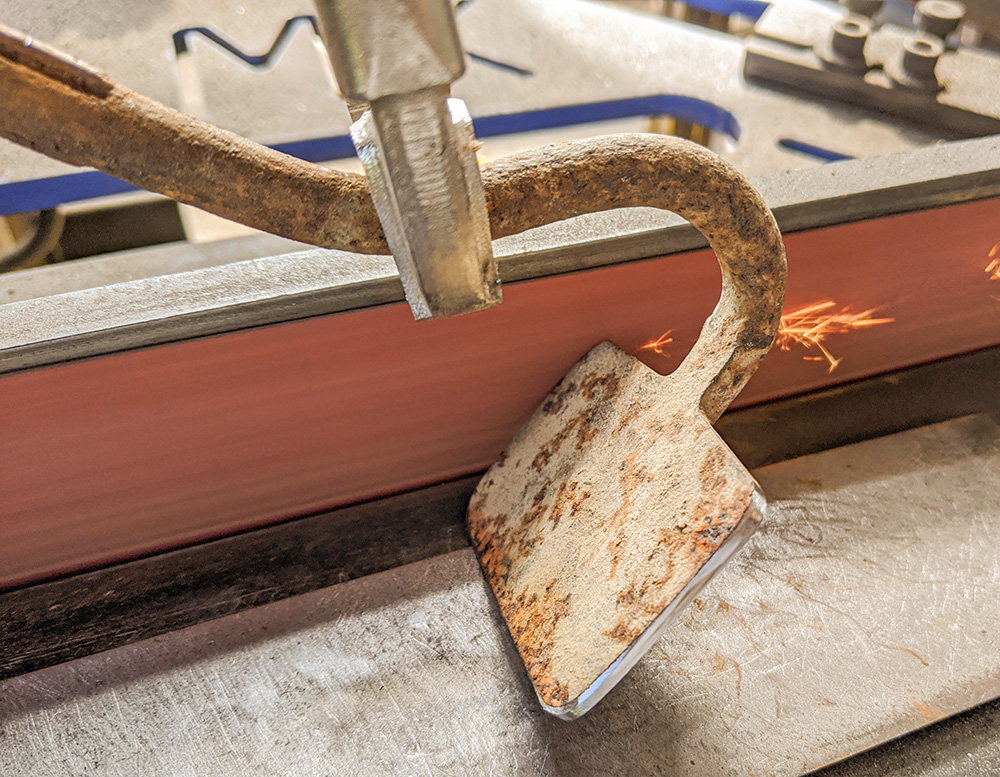
Next it was over to the belt grinder (a very handy tool used by professional blacksmiths and knife makers) to smooth the edges and get the angles right. |
|
|
|
|
|
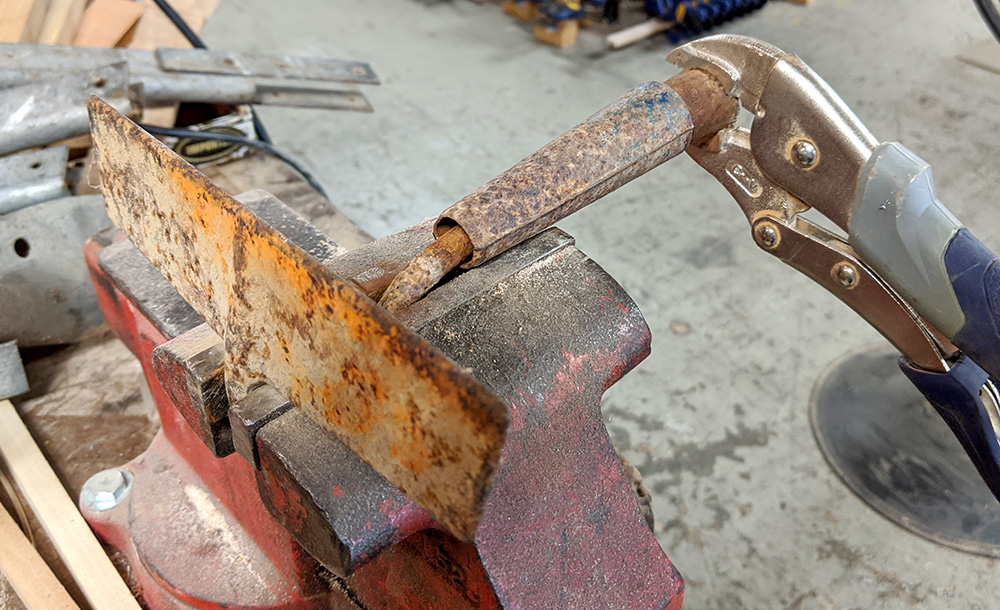
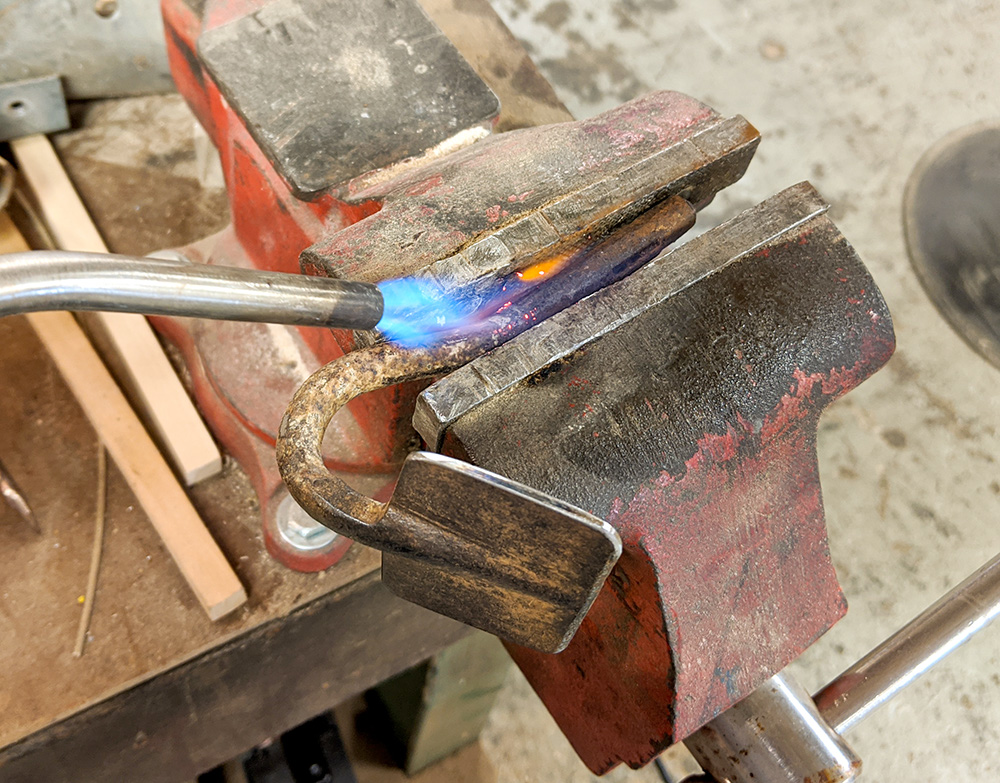
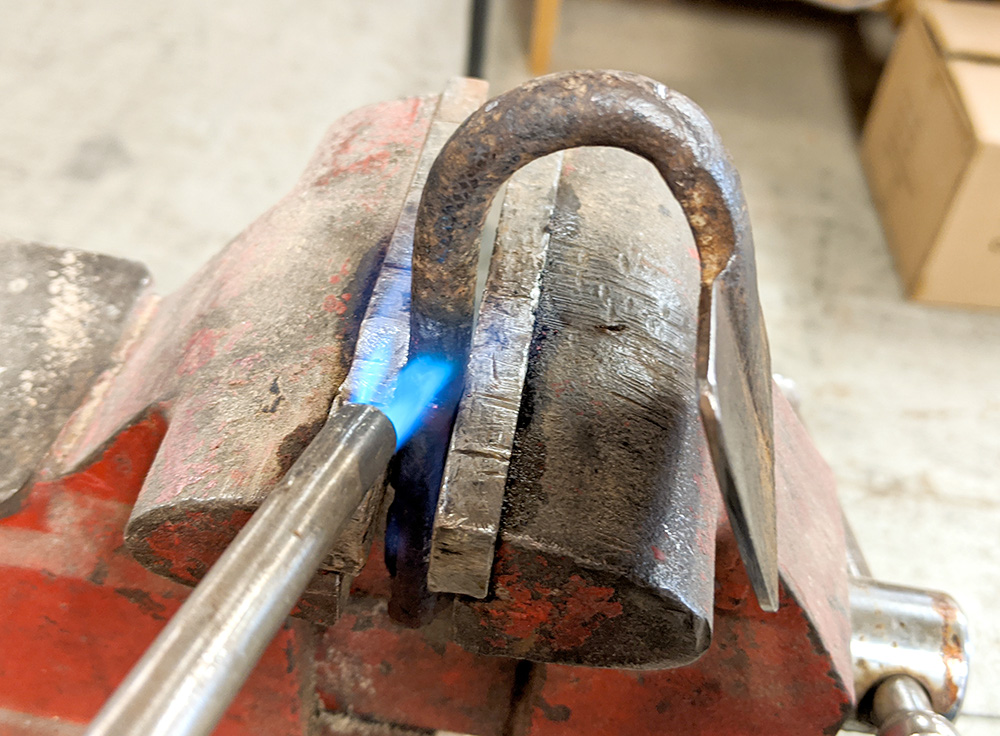
The hardest part of turning this old hoe head into a tailpiece was changing the angle and curvature of the stem. I basically had to straighten it and then bend it into a full "U". Step one was using a propane torch to heat the metal enough that I could straighten it. Without an anvil to work on, I made use of my grandpa's old bench vice instead. |
|
|
|
|
|
It took a lot of heating, hammering, and vice squeezing, but eventually I had that stem bend around in the way I wanted. |
|
|
|
|
|
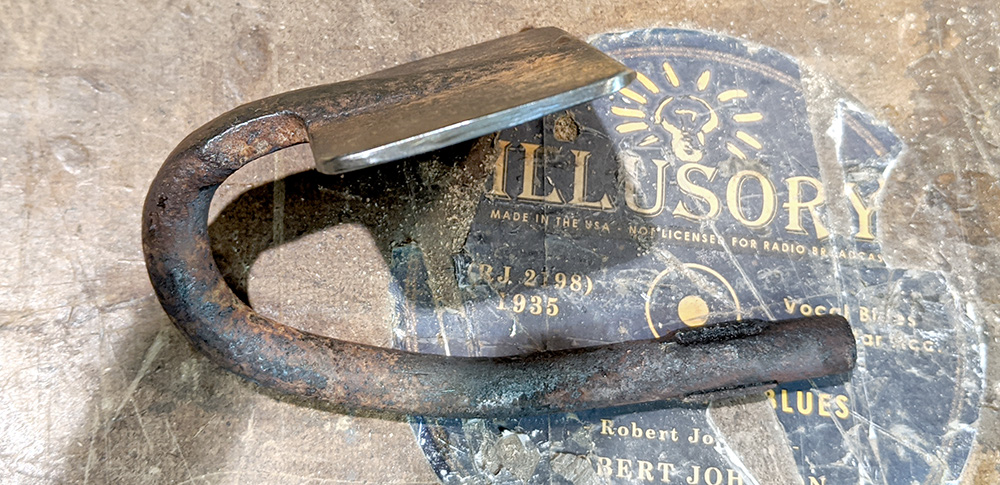
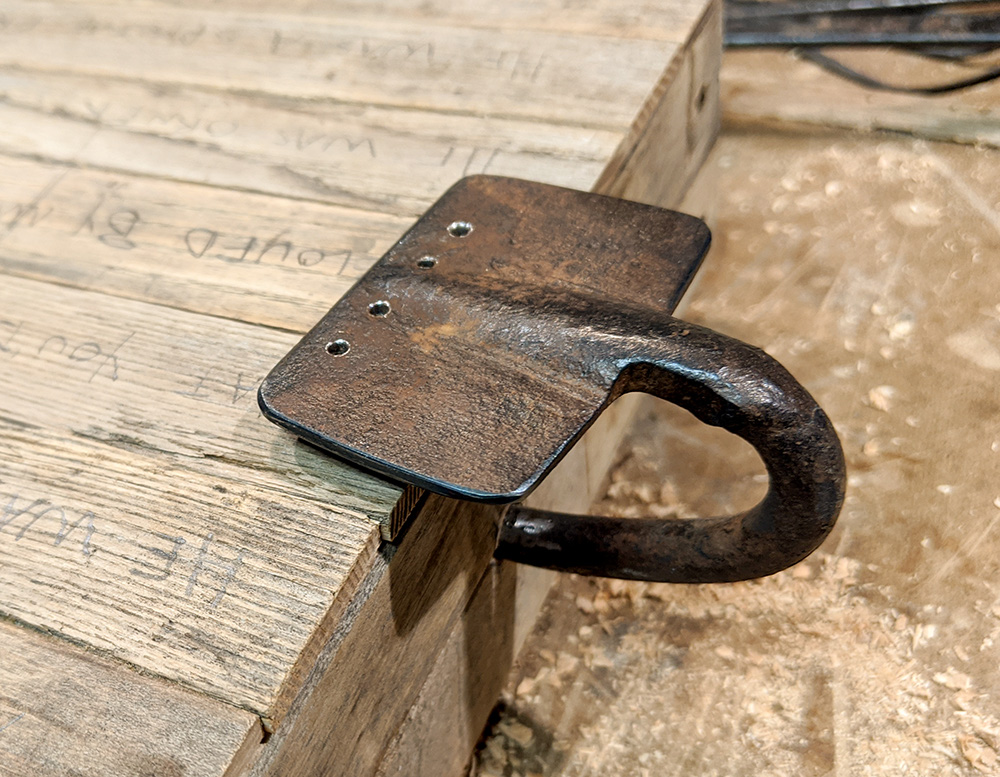
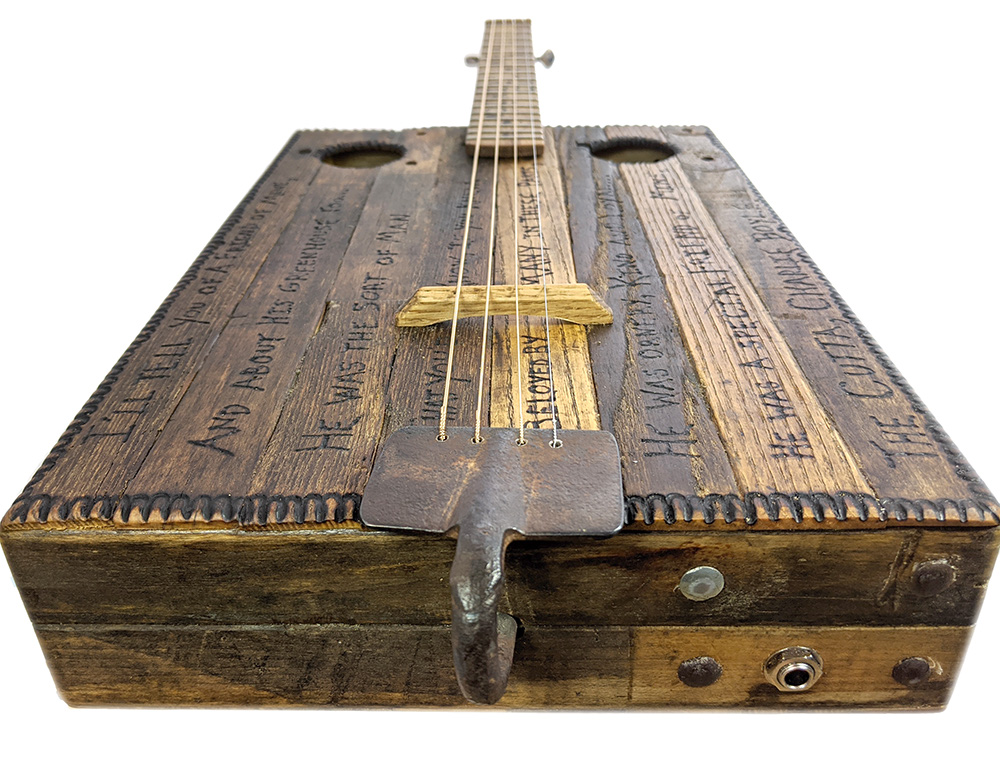
The final result of my hoe-head-turned-tailpiece. |
|
|
|
|
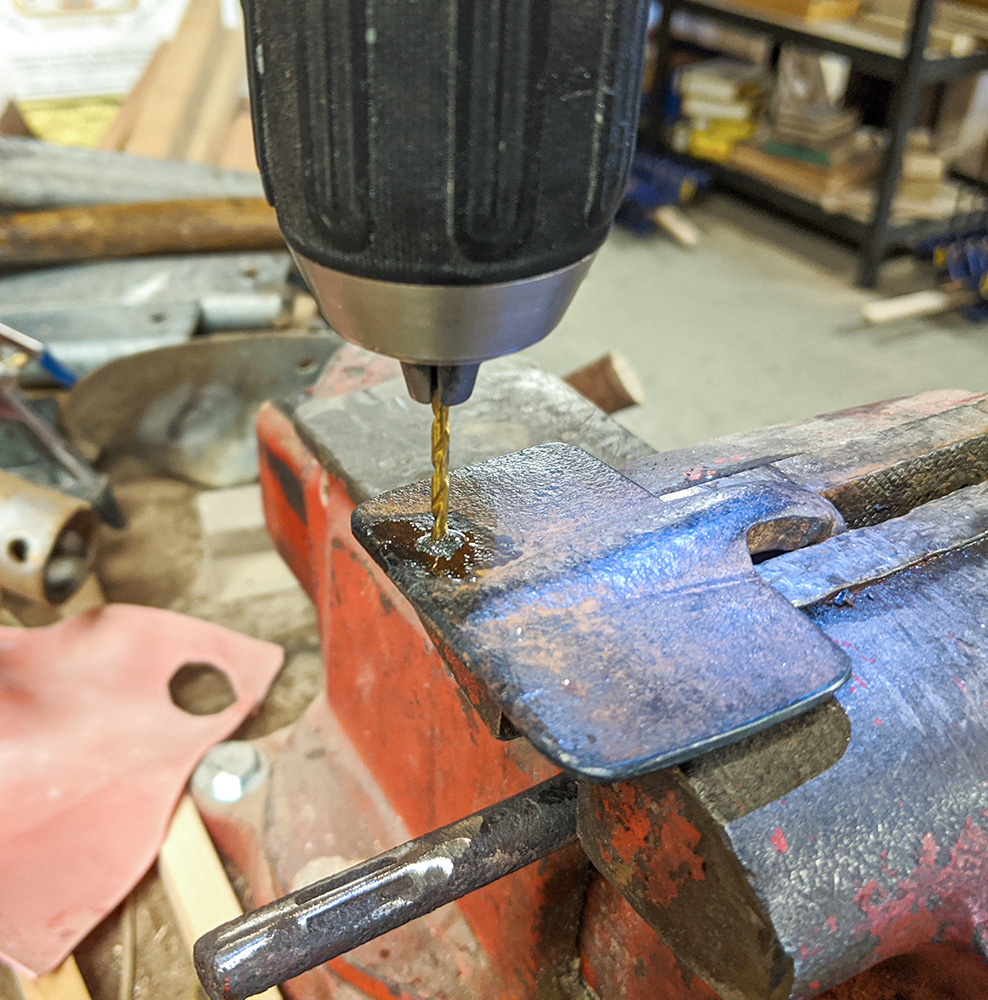
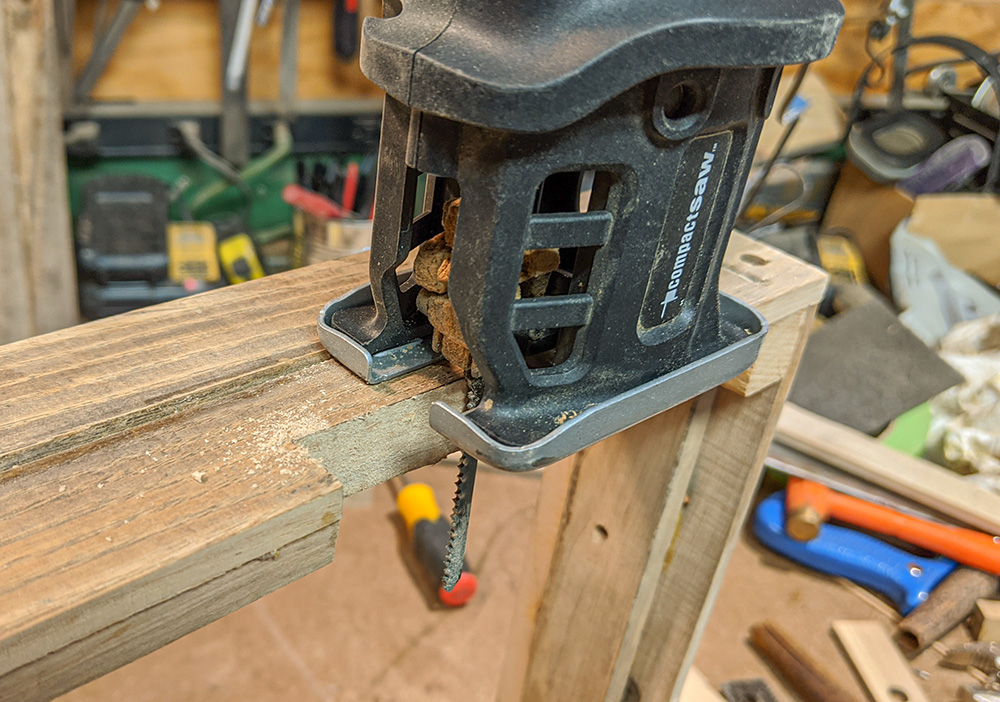
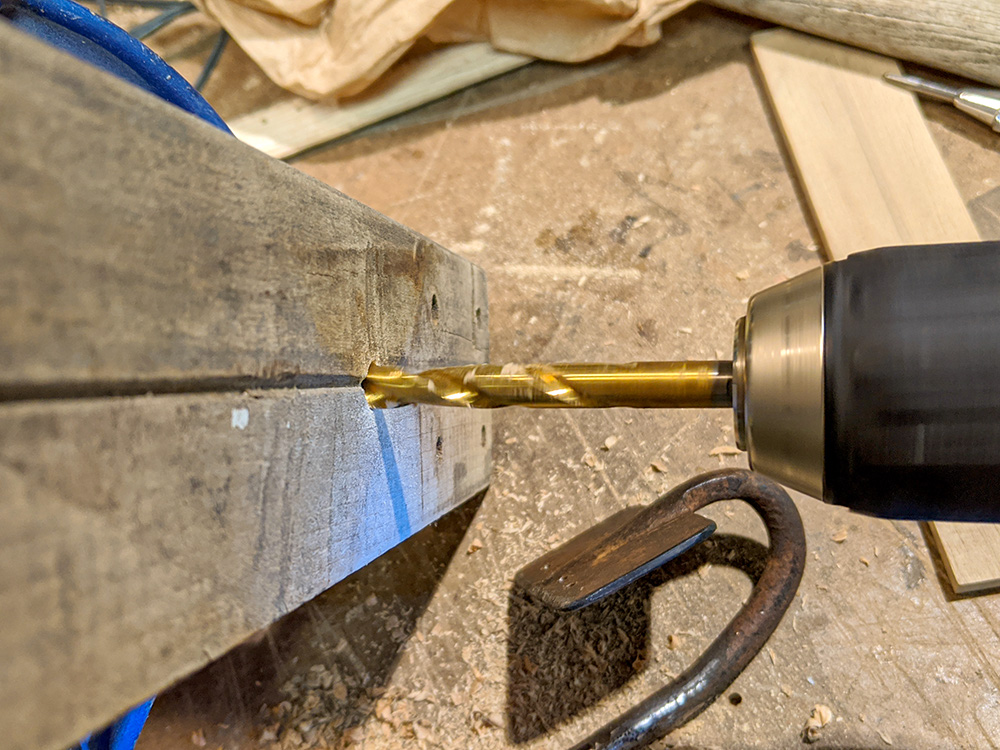
| Then it was time to begin drilling the string holes. Drilling through tool steel is always a chore, even for small holes like these. I used a punch to create a small starter divot for each hole, and 3-in-1 household oil as cutting fluid. I had some actual cutting fluid nearby, but was too lazy to go get it. In the end, the 3-in-1 did a good job and I didn't burn out my bit... but it took a while! |
|
|
|
|
|
All four holes drilled and ready to go. I used a slightly larger bit to deburr the edges of the holes. Clearly, by this point I had already decided that I was building a four-string instrument. I had decided on a 4-string GDAE-tuned instrument, because when I was playing music down at Charlie's Greenhouse I was usually playing my 4-string GDAE-tuned Irish Tenor banjo, so I thought building one in that style would be a good fit. |
|
|
|
|
|
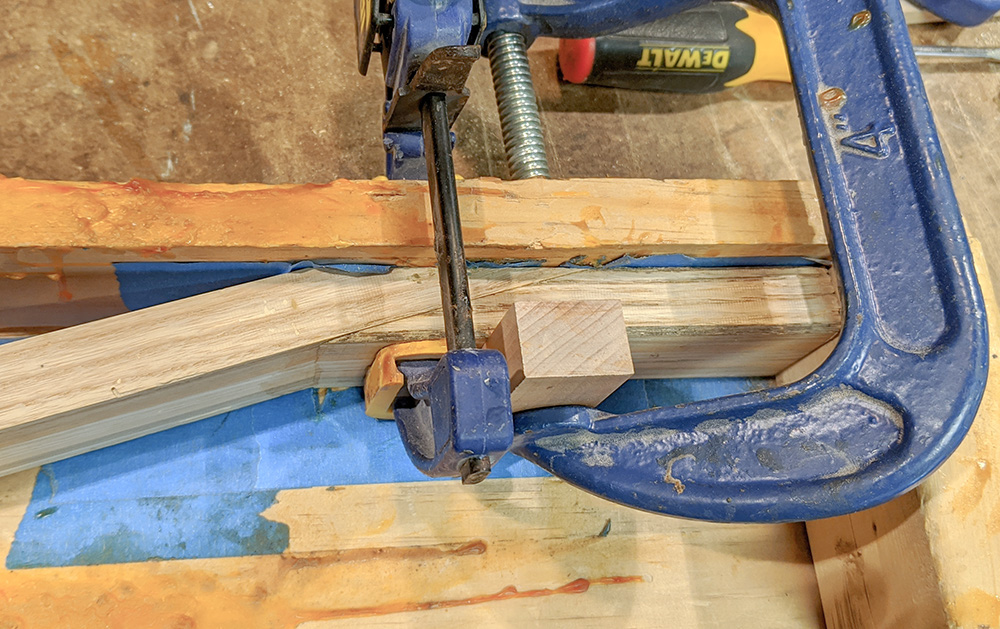
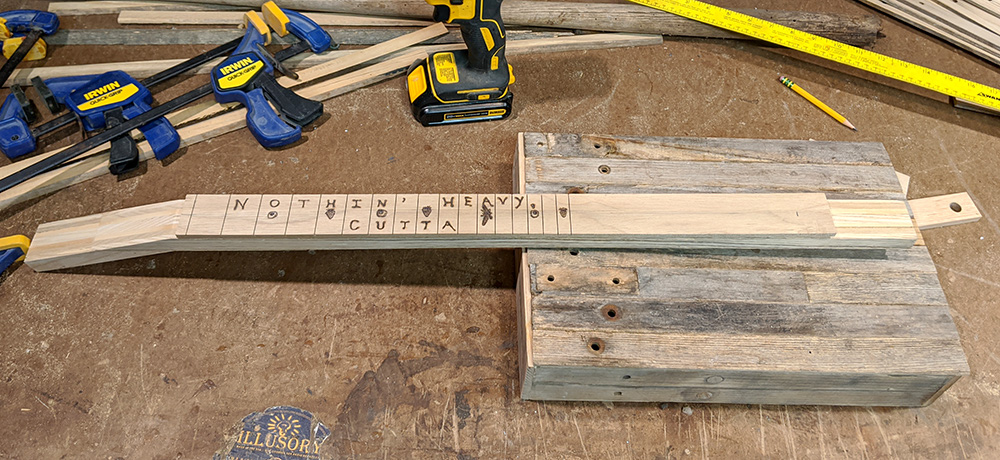
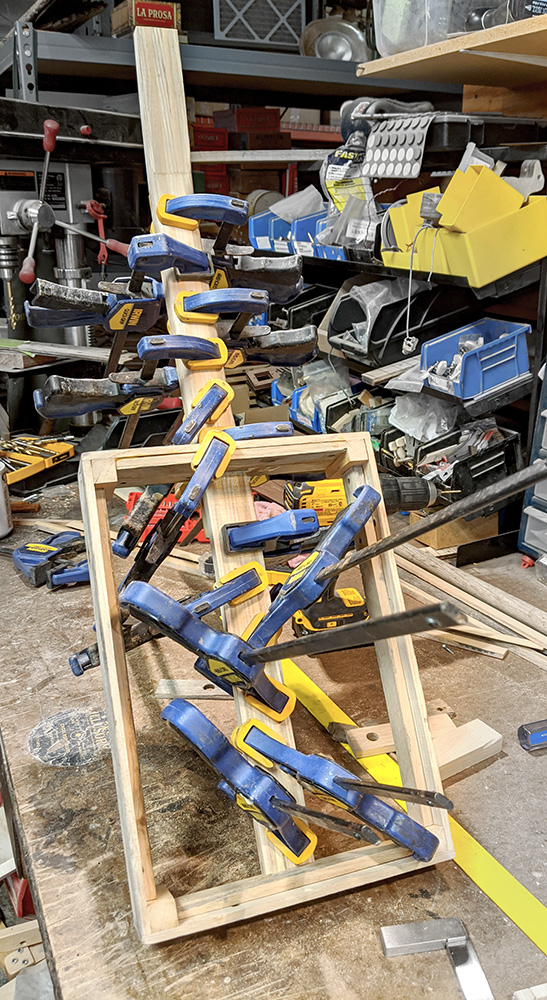
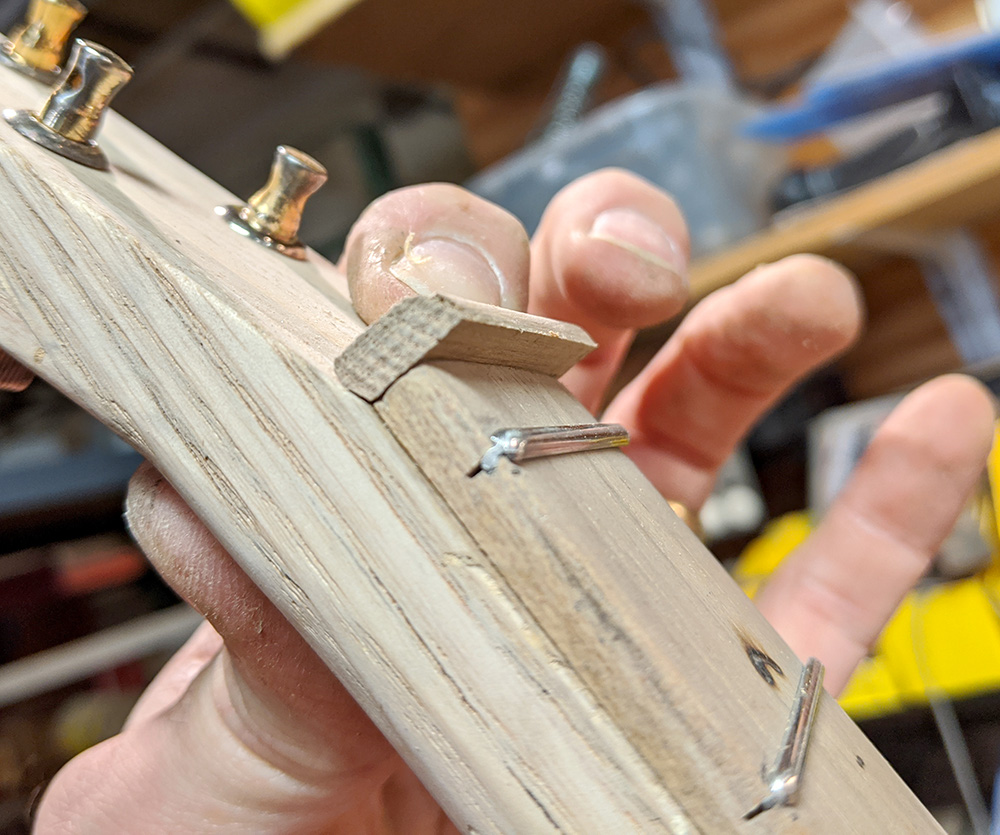
Next, I turned my attention back to the neck. I decided to do an angled headstock on this one, using a scarf joint, instead of the recessed headstock I usually do. This photo shows a clamping jig being used to glue the scarf joint. |
|
|
|
|
|
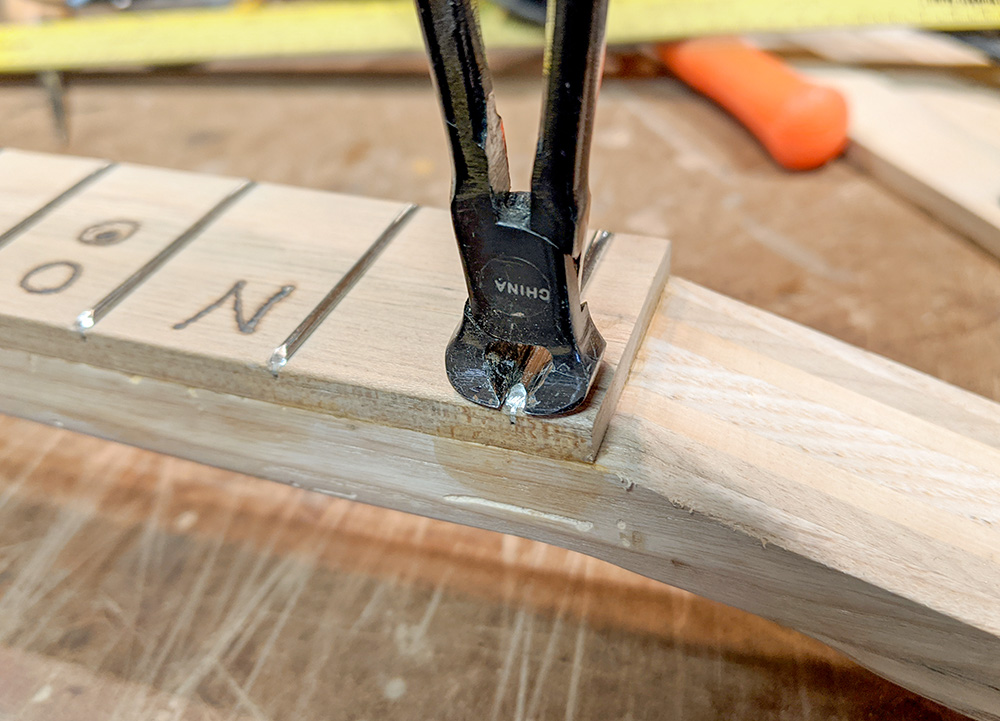
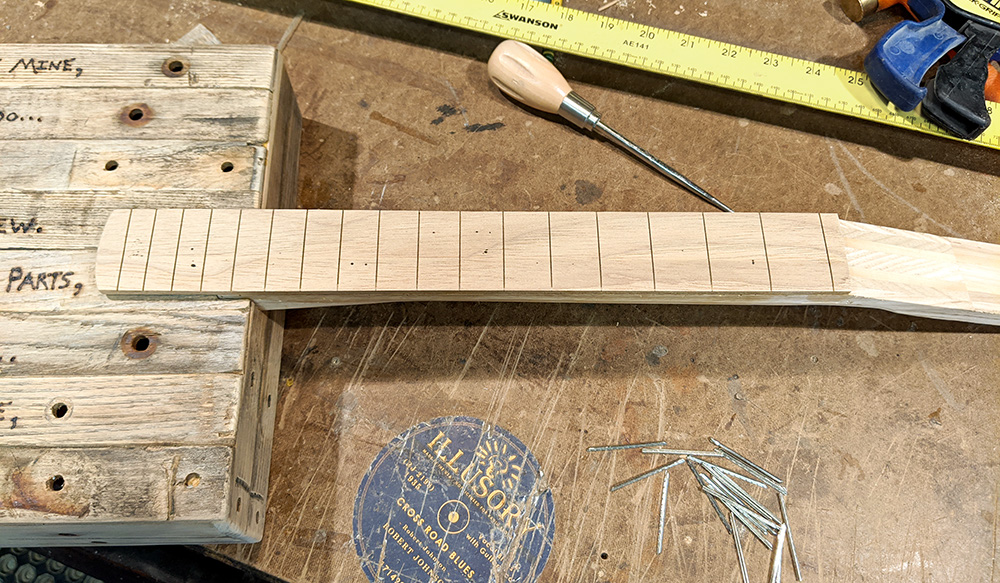
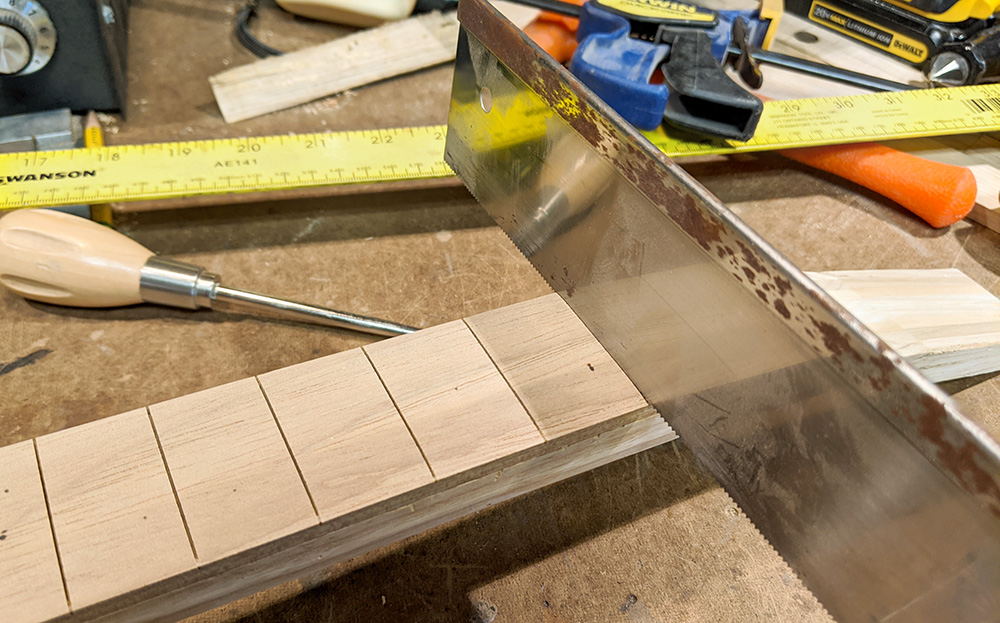
While my headstock was in the clamps, I started work on my fretboard. Step one was to mark my fret positions using one of our C. B. Gitty fretting templates, and to cut the slots using our Deluxe Miter Box and Fretting Saw. |
|
|
|
|
|
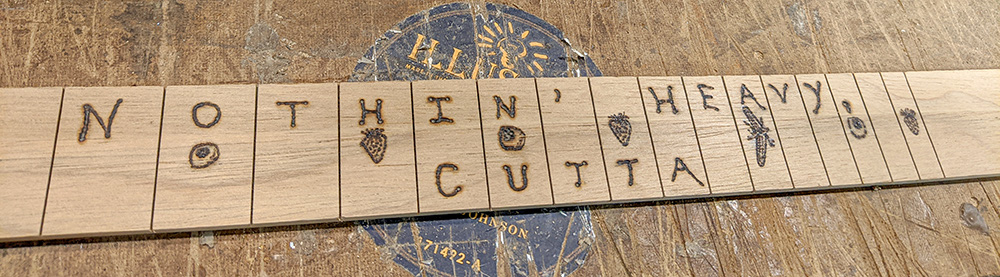
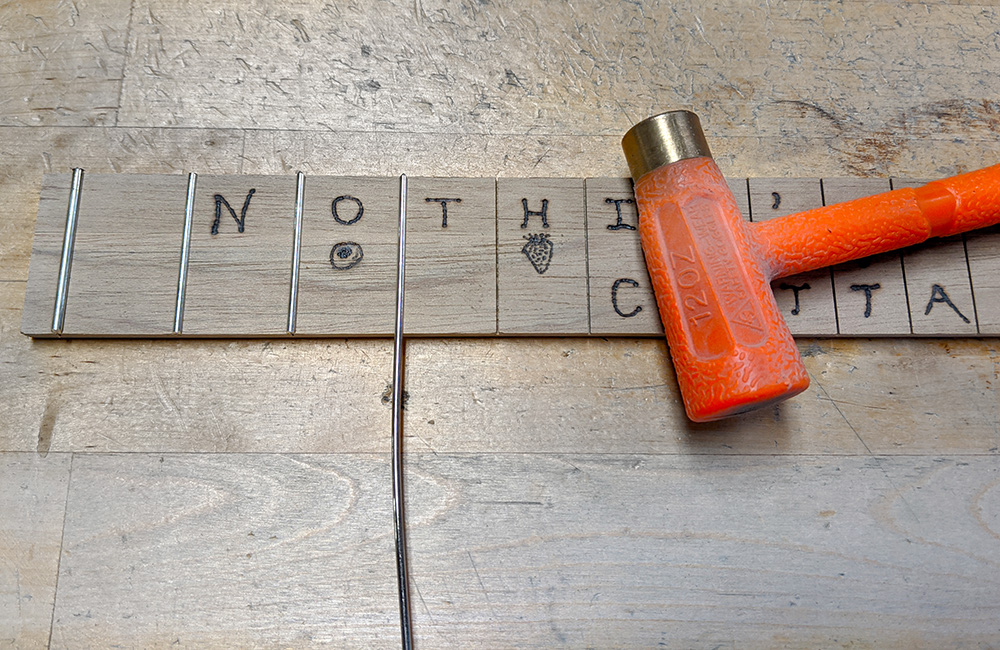
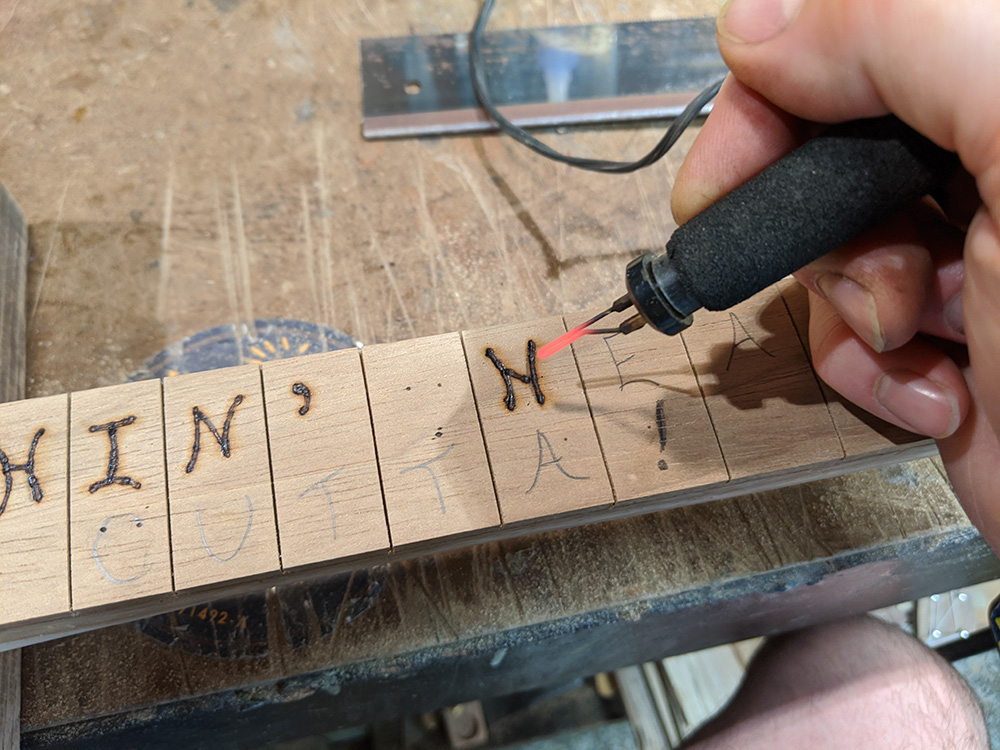
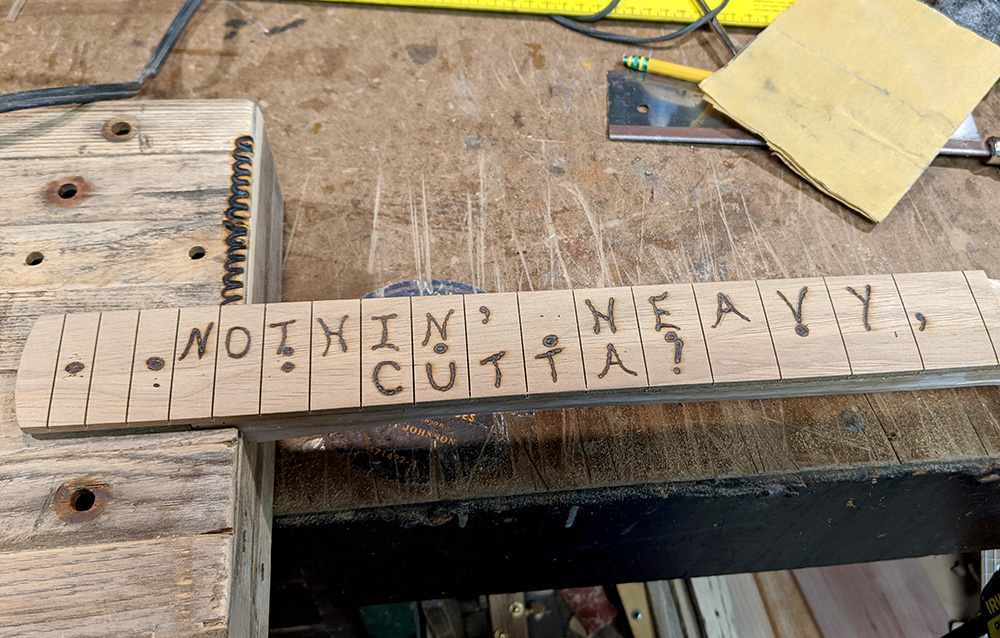
Once the slots were cut, I decorated the fretboard using my woodburning station. I was pretty happy with how it came out, right up until... |
|
|
|
|
|
I realized I had done the design upside down. What a horrible sinking feeling it is when you realize you've made a major mistake like this on a deeply important build. I mulled over my options. The back surface of the fretboard was a lot rougher, and trying to plane it down to smooth wood would make it too thin. I didn't have enough handle stock left over to make another fretboard. I didn't know if there was enough material to sand off the design and do it over. I didn't want to learn to play left-handed. So, I decided I would just use it as is, gluing it down with the design upside down. I told myself that it was OK, that when I was holding the guitar and playing it, when I looked down at the fretboard, the lettering would be right-side up. I lied to myself it would be OK, and I proceeded. |
|
|
|
|
|
The next step was cutting the neck notch into the neck end panel of the box. Of course I did some measuring and figuring before making any cuts, but I'll spare you all of that. This can be one of the trickier calculations of the entire build, whether with homemade boxes like this or cigar boxes, and I have to admit that I usually just sort of eyeball it and hope to get close enough. Usually I do. |
|
|
|
|
|
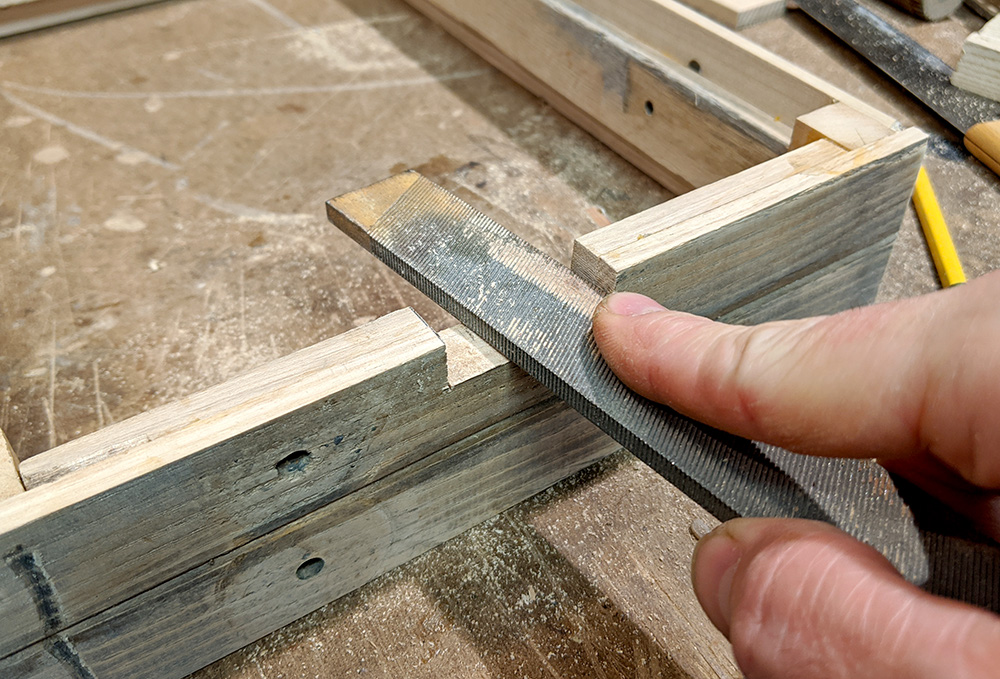
Once cut, some filing smooths down my notch. |
|
|
|
|
|
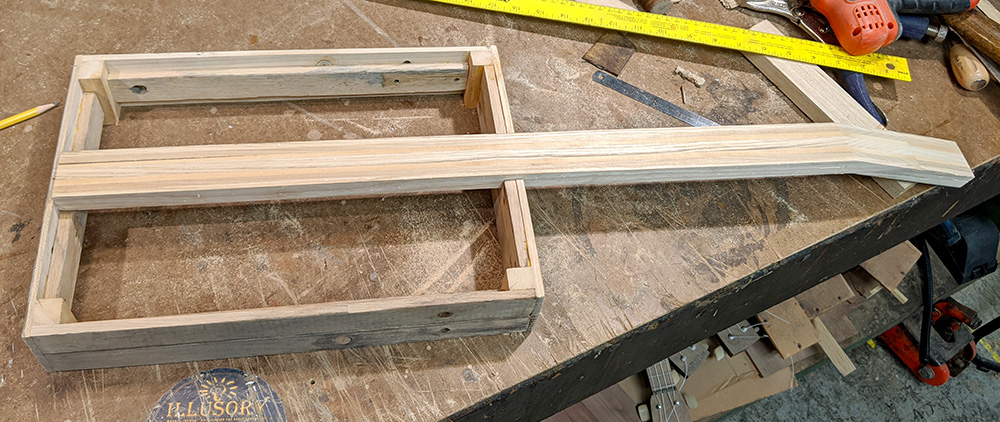
Here's a dry fit of the neck into my notched box. |
|
|
|
|
|
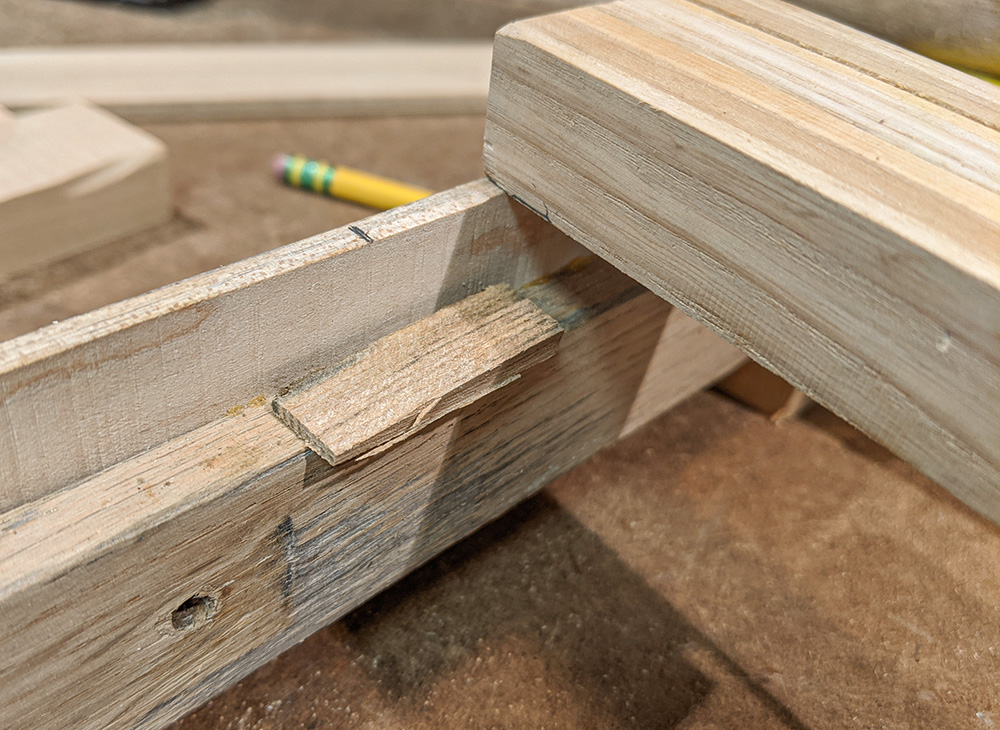
Because the butt end of my neck blank isn't quite square in profile, I have to make an angled shim for it to rest on against the brace. This helps keep it at the correct angle so the neck surface is parallel to the box tom. |
|
|
|
|
|
Now I mark the neck for notching where it will run through the box. The purpose for this is so that the surface of the neck inside the box will not touch the sound board, which would dampen the resonance. I determine where the box top will sit (the upper line) and then go a little ways below that to create a gap between the two. I make the initial vertical cuts with a handsaw, and then... |
|
|
|
|
|
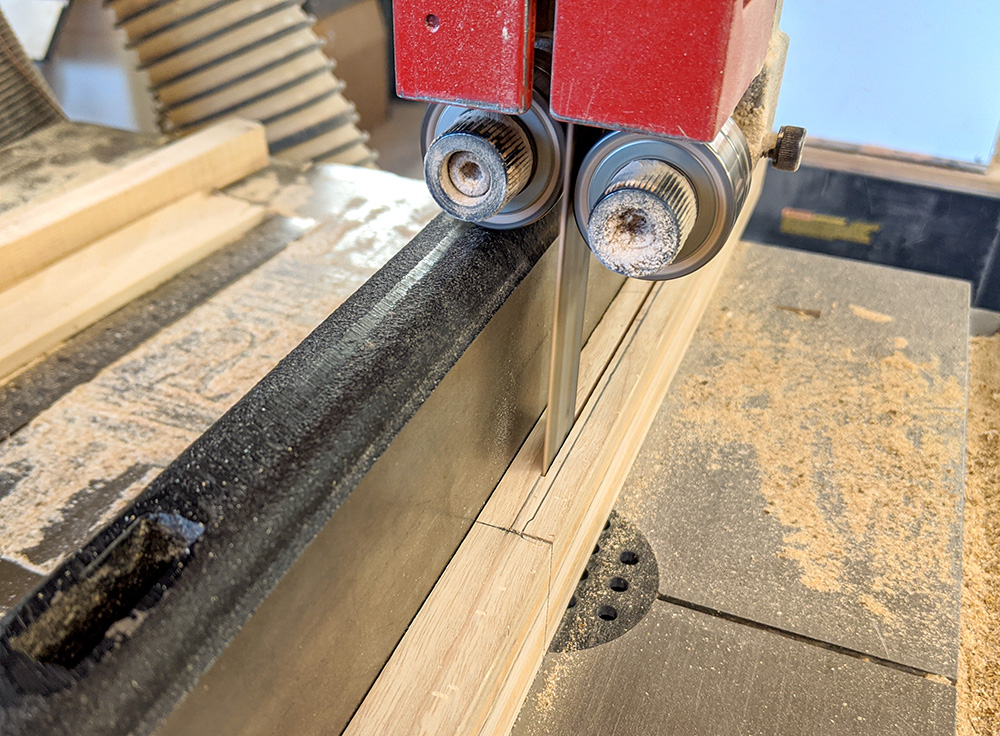
Over to the bandsaw for the long horizontal cut. |
|
|
|
|
|
When done, my notched neck fits cleanly into my box. |
|
|
|
|
|
I determine at this point that I am ready to fasten the neck into the box permanently, so I put some glue onto the joining surfaces at the notch and but end, and then drill and countersink for mounting screws. I know that my fretboard will cover this screw, which is why I don't worry about what it looks like... and also explains why it had to be countersunk. I also at this point cut a notch into the sound board so it will fit over the neck. I could have notched the neck itself to the outside edge of the box, but I wanted to leave that extra wood there to give the neck more strength to stand up to the string tension. I knew I'd be using four steel/wound strings on this instrument, so every bit of neck strength was needed. |
|
|
|
|
|
Now it was over to the fretting bench to install medium/medium frets (and a jumbo zero fret) into my still upside-down-design fretboard. |
|
|
|
|
|
Some time at the shaping end of the edge sander added some rounding to the back of my neck, which I smoothed up over at the sanding table. |
|
|
|
|
|
Then my upside-down-design fretboard gets glued onto the neck. |
|
|
|
|
|
While the fretboard is being glued on, I take the notch cutout piece that I cut from the top of the neck, and glue it back in on the underside of the notch. My goal was to increase the neck's thickness and strength inside the box. |
|
|
|
|
|
I then got to thinking about what it would take to mount that hoe-head tailpiece. My intent was to drill a hole into the box and neck bracing, which the stem would insert into. After doing a dry fit, however, I discovered that the bracing inside the box didn't extend deep enough for the tailpiece stem to go into. As such, I needed to add even more bracing... and this cutoff length of worm-eaten tool handle seemed just the thing. After measuring the needed length, I headed over to the chop saw and bandsaw to get it done. |
|
|
|
|
|
Using the bandsaw, I sawed a flat onto one side of the handle. It turned a little bit while sawing, so I had to true up the surface on the edge sander. |
|
|
|
|
|
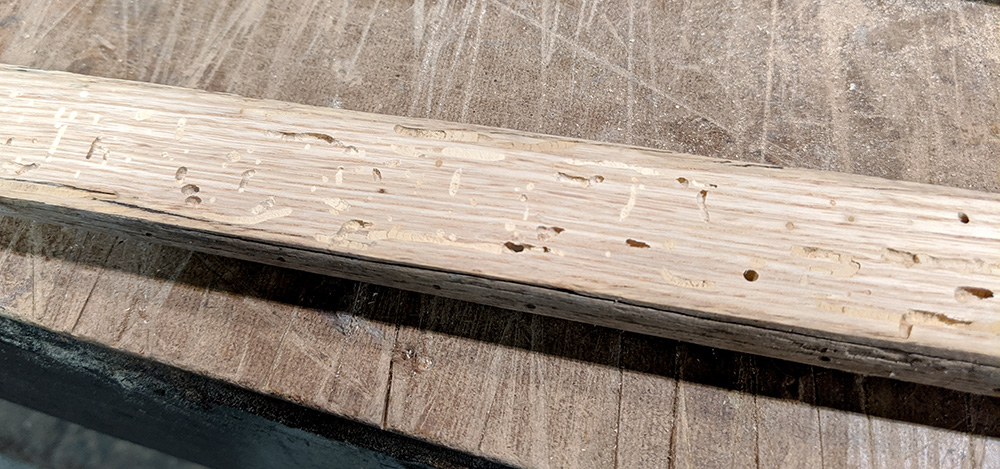
Take a look at that worm-eaten wood. There's a lot of history in that handle. |
|
|
|
|
|
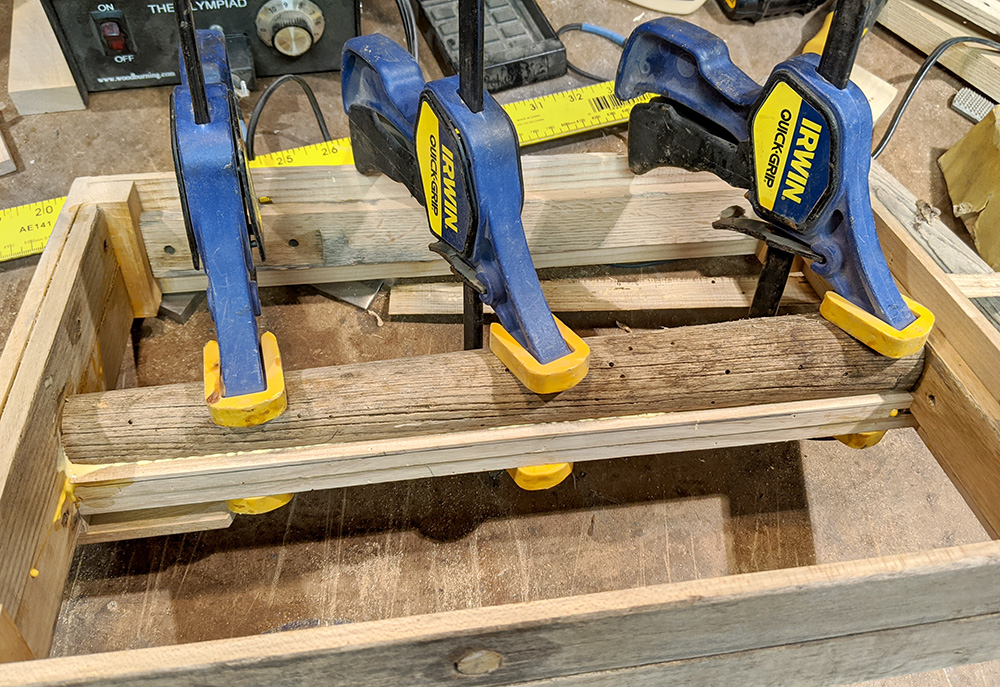
Then the brace is glued into place, both to the existing bracing and also to either end. All together, this is quite a lot of bracing and I am confident it will be able to handle the string tension just fine. I later add three screws to this bracing sandwich to give it even more strength... probably overkill, but better safe than sorry. |
|
|
|
|
|
Then I drill the hole for the tailpiece stem into the butt end of the instrument, being careful to angle the hole correctly so it goes into the freshly glued-in brace. |
|
|
|
|
|
It took a few tries to get the hole to the right size for the tailpiece stem, and in the end I had to push in a short piece of dowel as a spacer to keep it from going in too deep, but finally I had it how I wanted it. You can also see in this photo my penciled-in design for the soundboard, in preparation for woodburning. |
|
|
|
|
|
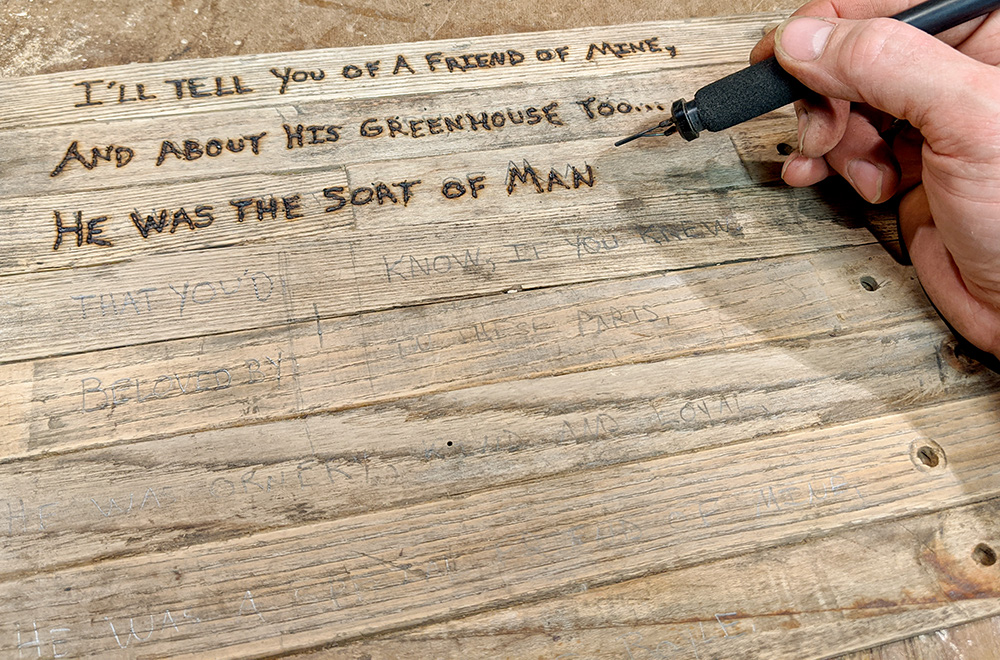
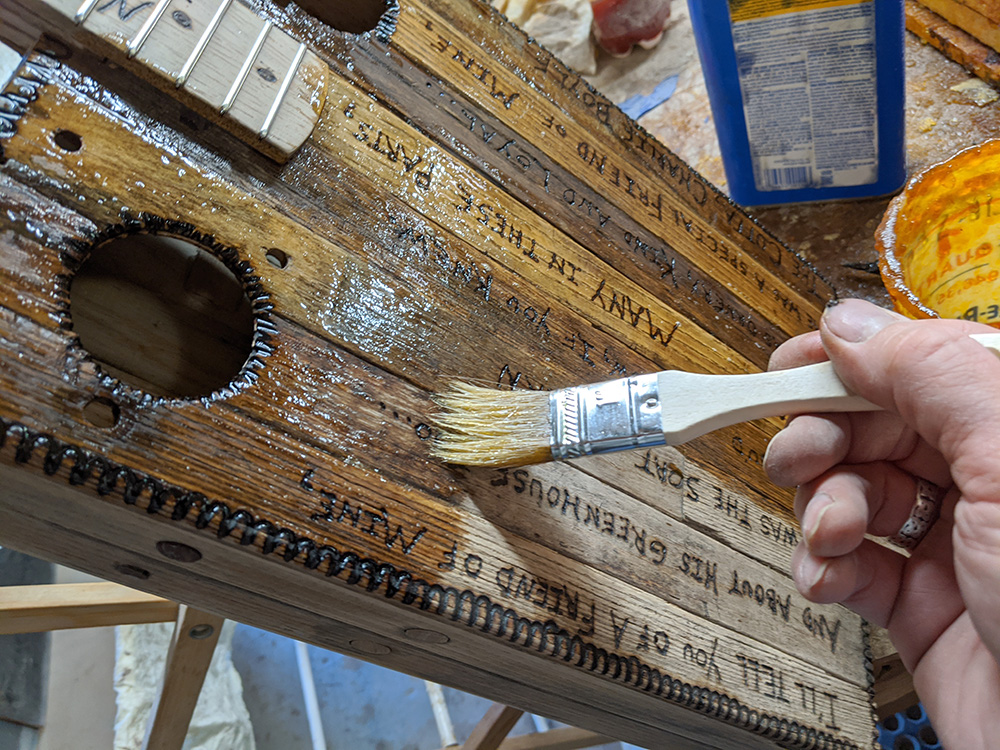
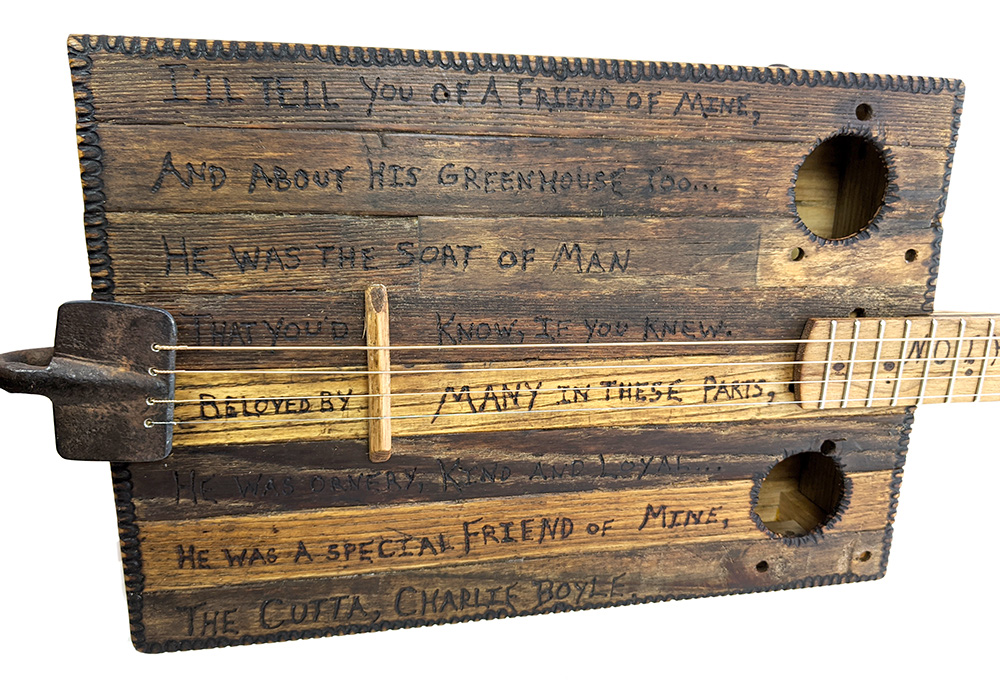
Woodburning in my soundboard design. This is the first verse of a song I wrote about Charlie Boyle soon after his passing last year. |
|
|
|
|
|
Now I started working on the tuners for the guitar. I wanted them to have a weathered look to match the rest of the instrument. I started with a set of shiny gold Wilkinson-style tuners, and used a combination of wire brush, steel wool and special metal etching chemicals to give them a worn and spotty patina. This was the last thing I did on that day of the build, and I went home expecting to fairly quickly finish the guitar the following day... |
|
|
|
|
|
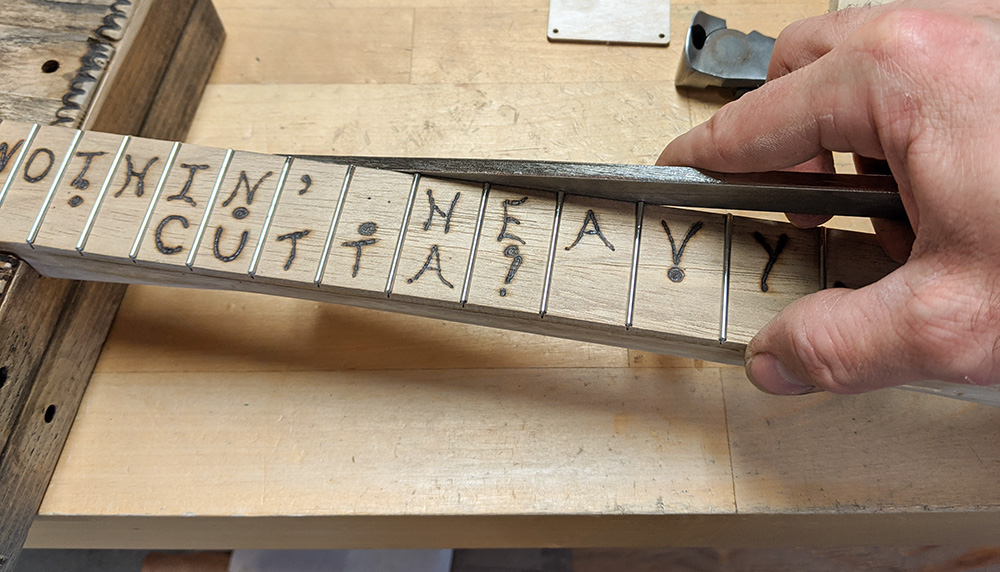
But after sleeping on it, I realized I just couldn't leave that fretboard design upside down. This build was too special, the legacy too deep, for it to be so obviously wrong. It would have been a lot easier to fix earlier in the process, but it was what it was. With the fretboard already glued in place, there was only one thing to do - remove the frets, sand it down, deepen the slots, re-woodburn the design, and refret. So I began. |
|
|
|
|
|
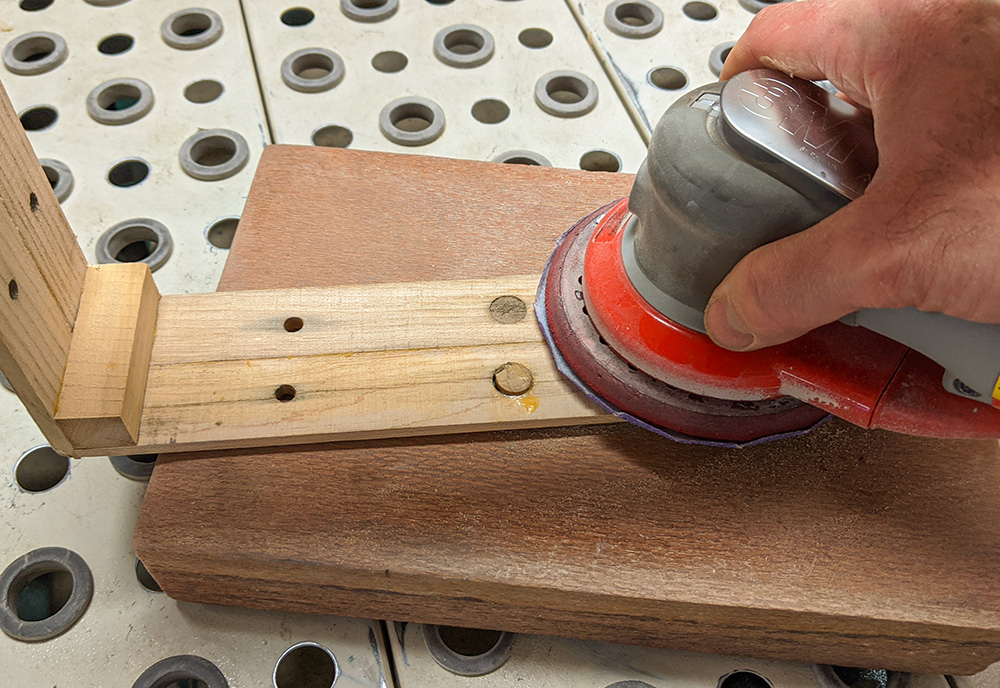
With everything already attached, I couldn't use the edge sander to sand off the design, so I had to use a palm sander instead. Even trying very hard to keep things level, I still managed to round off part of the edge a bit... but not too bad. |
|
|
|
|
|
Once the design was sanded off, I had removed enough wood that the fret slots needed to be resawn a bit to make them deep enough. |
|
|
|
|
|
Then I had to re-woodburn the fretboard design. I decided to make the letters bigger this time and not add the blueberry and strawberry-themed fret position markers, opting for basic round ones instead. |
|
|
|
|
|
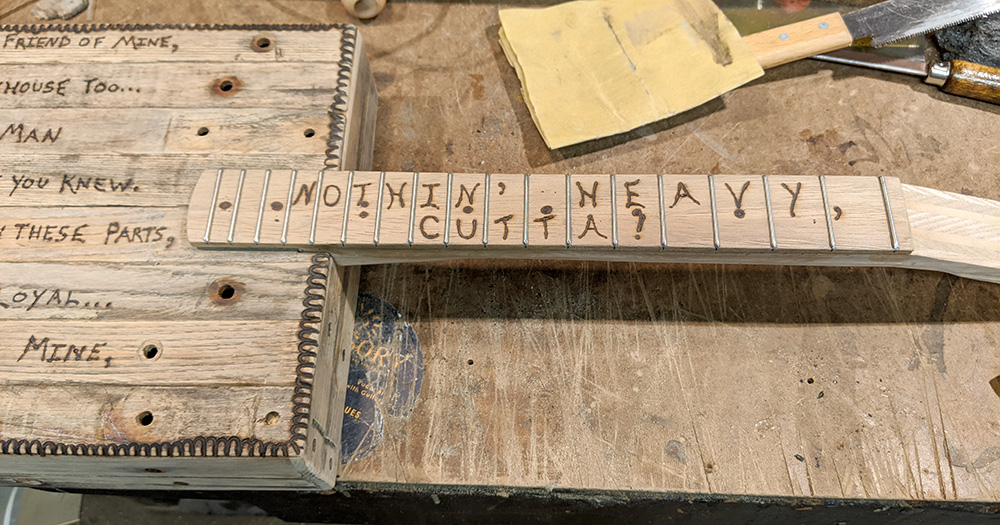
With the design re-added, and right-side-up this time, I could begin refretting. |
|
|
|
|
|
Getting the frets to seat smoothly was complicated by how my hand sanding rounded off parts of the neck, but I was able to get them in there. Smoothing and beveling the fret ends was also made harder by it already being attached to the neck, so I did most of it manually using a diamond file, as shown here. |
|
|
|
|
|
Finally, the corrections are finished and the frets are dressed and I am ready to proceed. It wasn't fun or easy to re-do all of that, but in the end it was definitely worth the effort. There are some things that just must be done right, and this was one of them. |
|
|
|
|
|
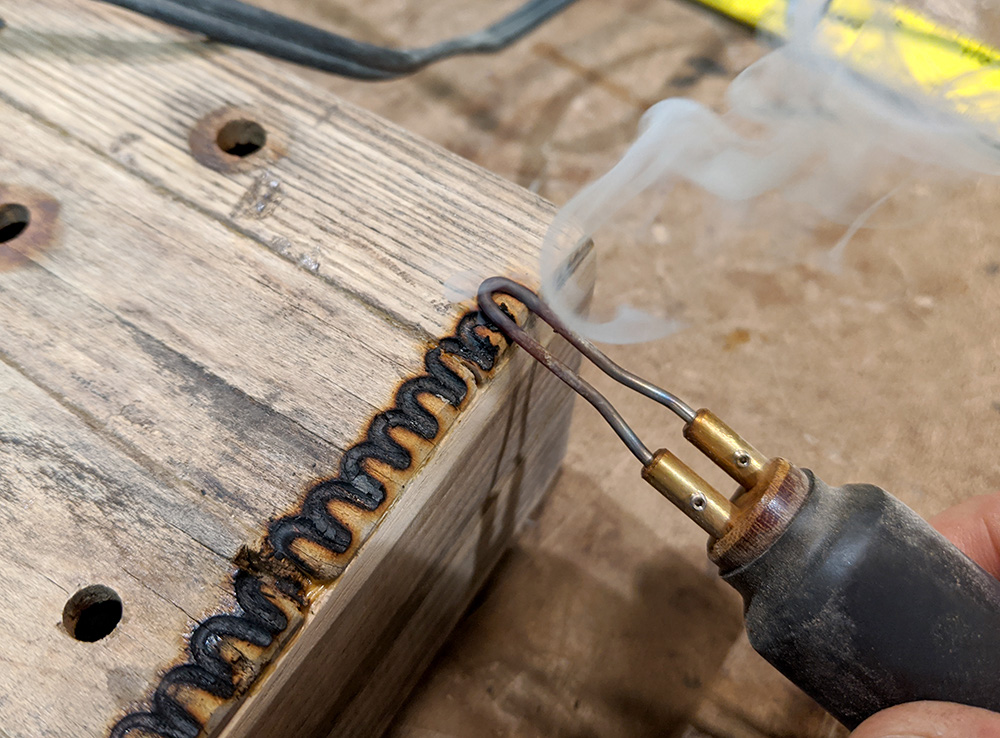
Here's a close-up detail of me adding the decorative border to the box edge using a loop tip on my woodburning pen. Having a professional woodburning setup with various tips opens a lot of decorative options, even for people like me who have no drawing skills. |
|
|
|
|
|
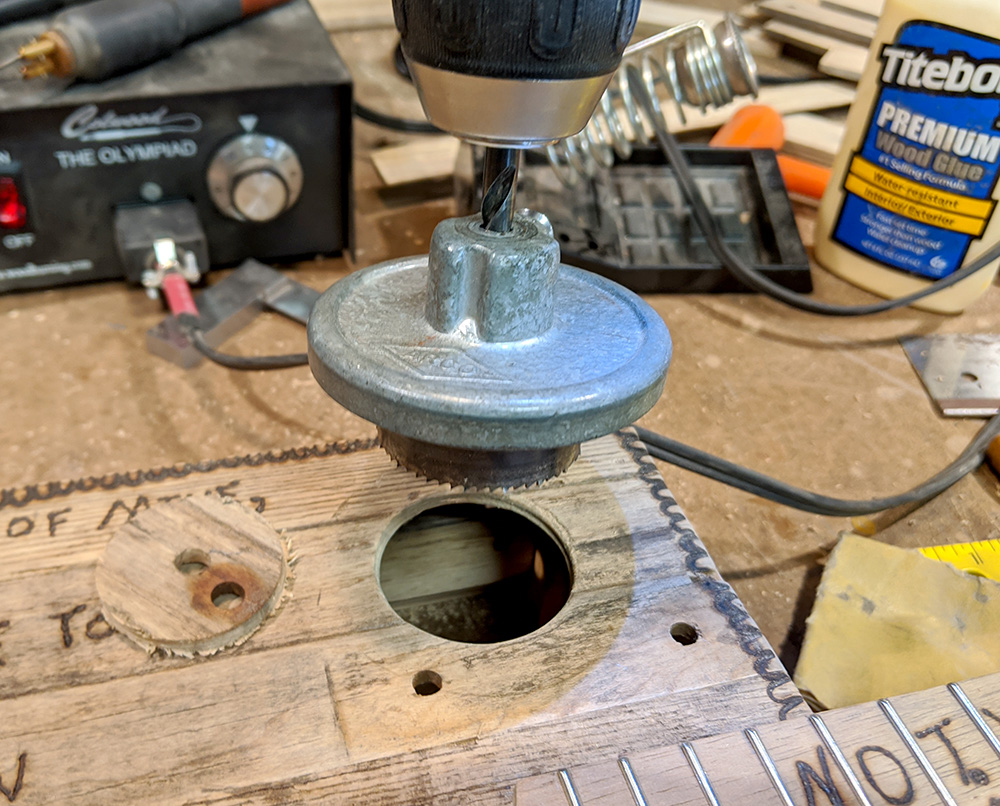
Now I cut in two soundholes using my grandpa's old hole saw. The hole diameter is about 1 1/4 inch. |
|
|
|
|
|
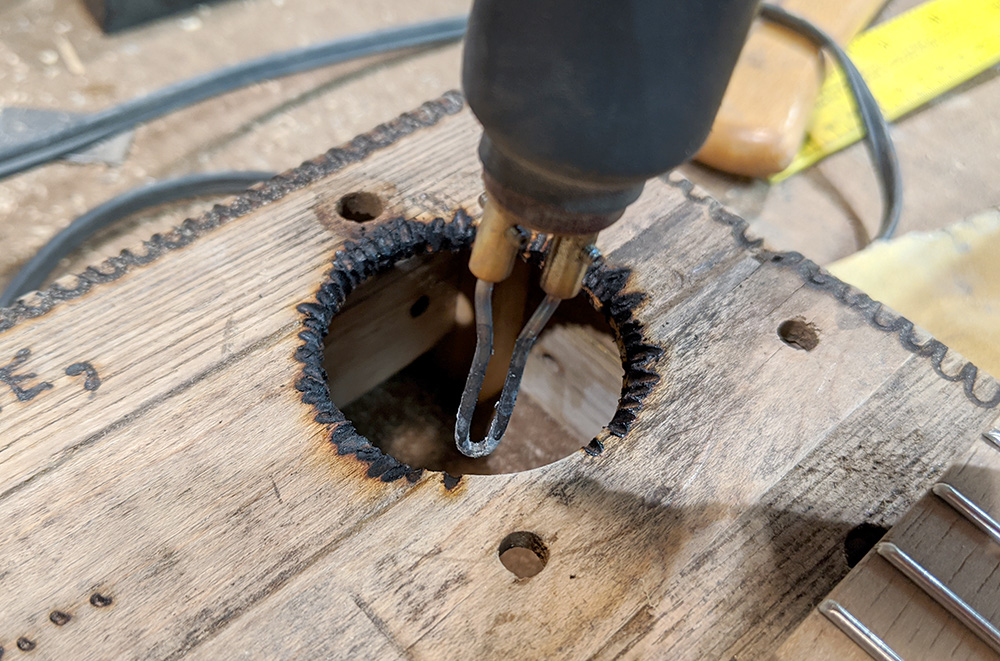
Then I add a burnt edge effect using my woodburning pen. I started doing this on my hobo fiddles several years ago, and really like the effect. |
|
|
|
|
|
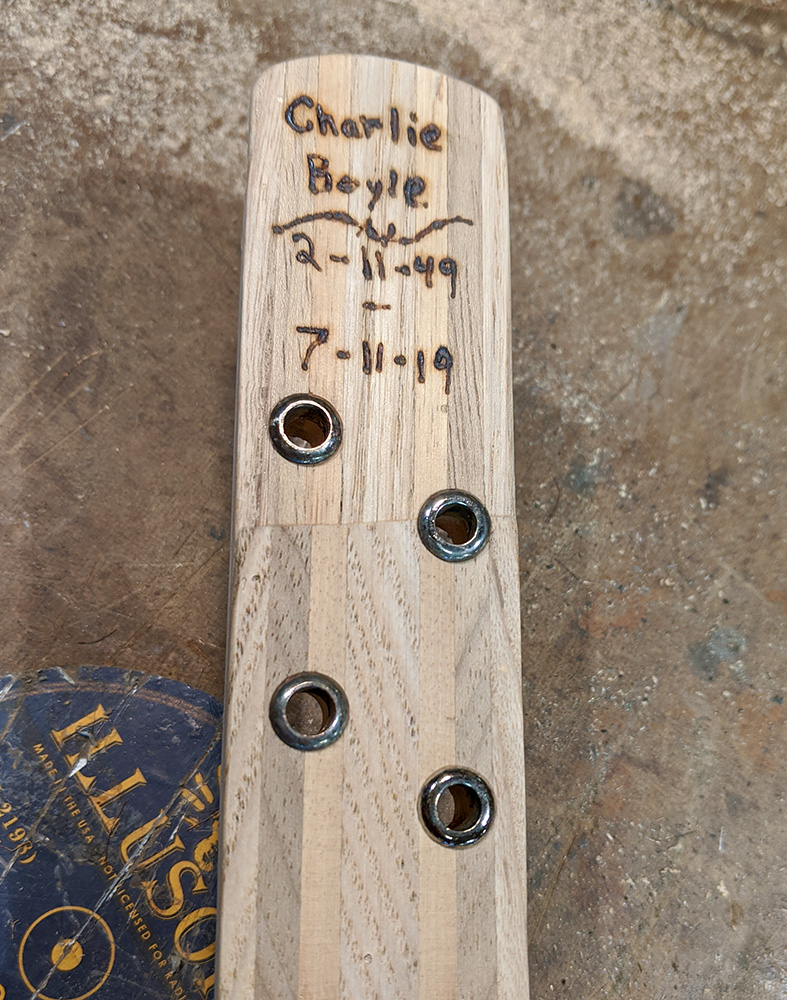
Between the last photo and this one, I have marked and drilled my tuner holes (2 left 2 right), installed the bushings, and added a woodburned memorial to my friend. |
|
|
|
|
|
I am now getting close to being able to make my back panel and seal the box shut, so I need to get everything necessary done inside the box. The first thing is to make some soundboard braces from leftover scraps resawn from the roofing brackets. I shape and thin them on the edge sander... |
|
|
|
|
|
And then install them to the underside of the soundboard using hot glue. |
|
|
|
|
|
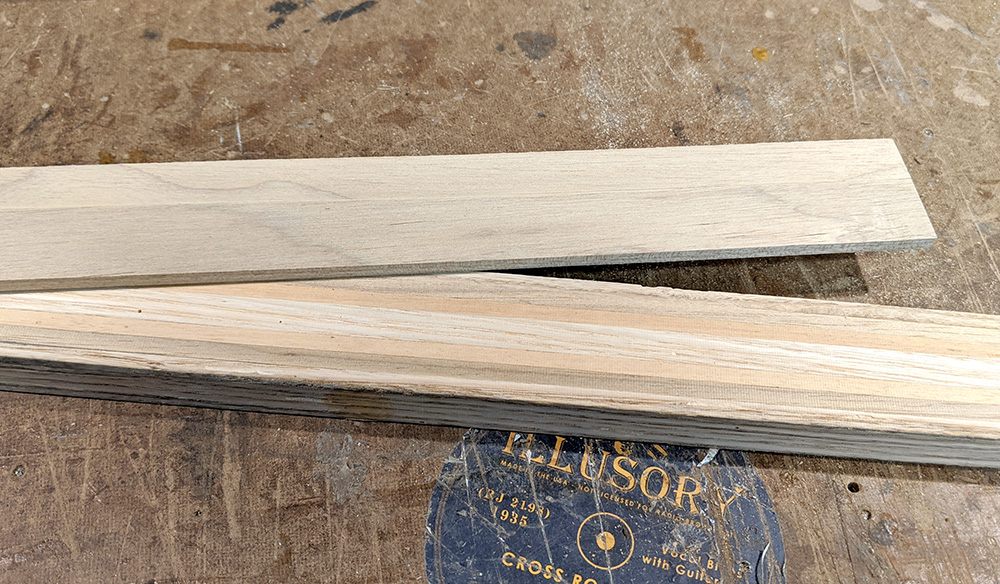
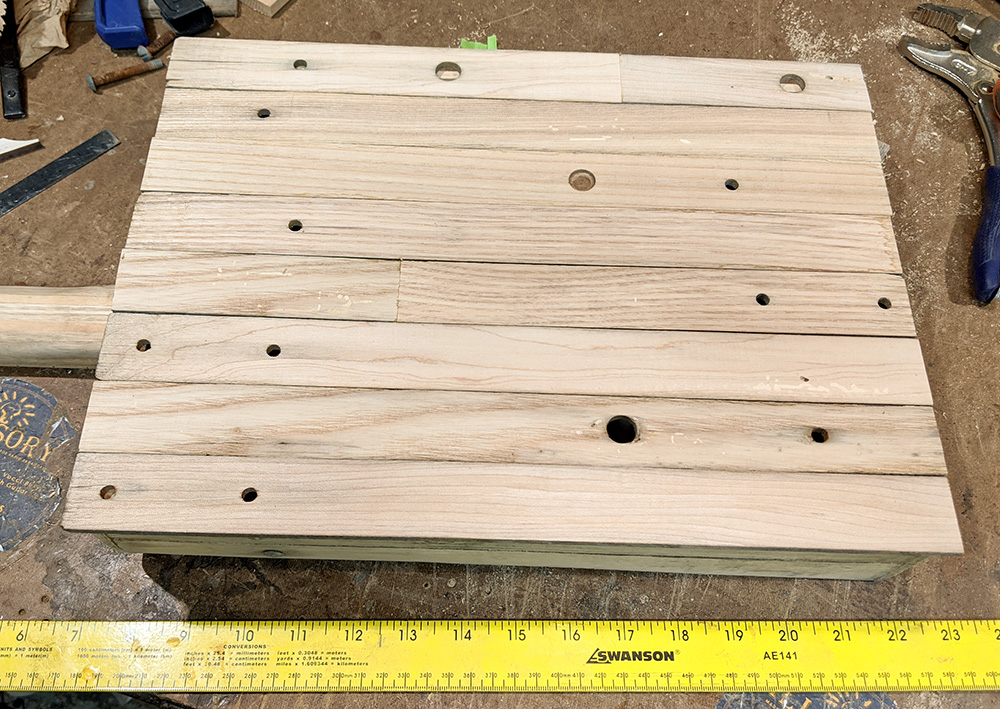
Now I begin making what will be the back panel of the box. These are the remainder of what I resawed from the roofing bracket slats - I used the slats with the weathered edges for the front panel, and now I'm using the slats with the bare wood for the back. It quickly becomes clear that I'll need to join a couple of cutoffs together in order to get enough slats to make the full panel. |
|
|
|
|
|
Now I have enough slats (note the two that I had to make from cutoffs), and the panel can be glued up. |
|
|
|
|
|
Back to the gluing rails and clamps to get the panel done. |
|
|
|
|
|
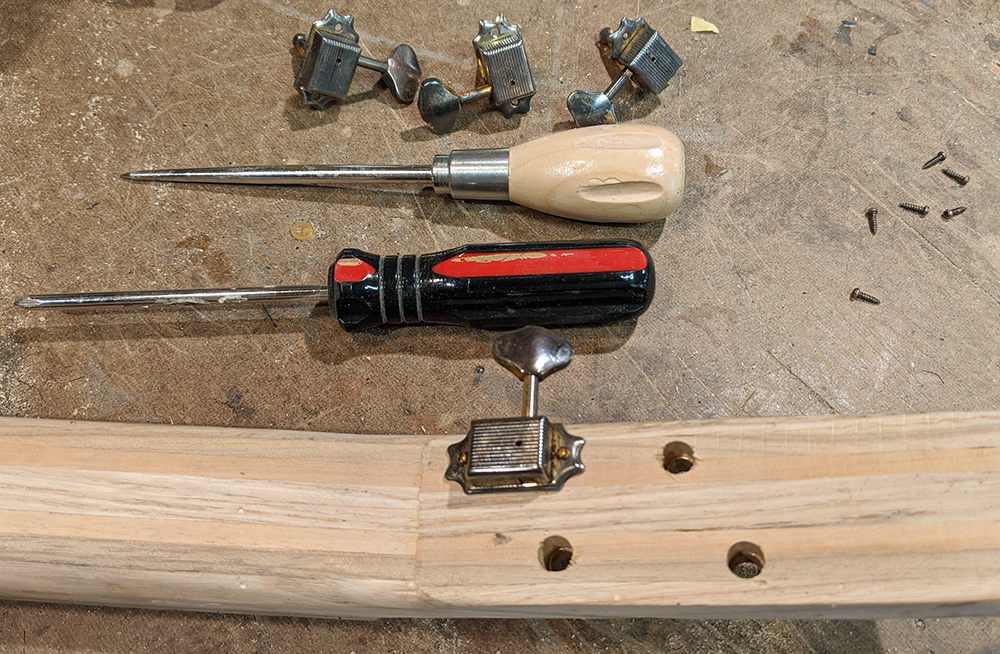
While the back panel is clamped and curing, I get the tuners mounted, carefully pre-drilling the screw holes to avoid twisting off any screw heads. I will later remove the tuners before applying linseed oil to the entire guitar. |
|
|
|
|
|
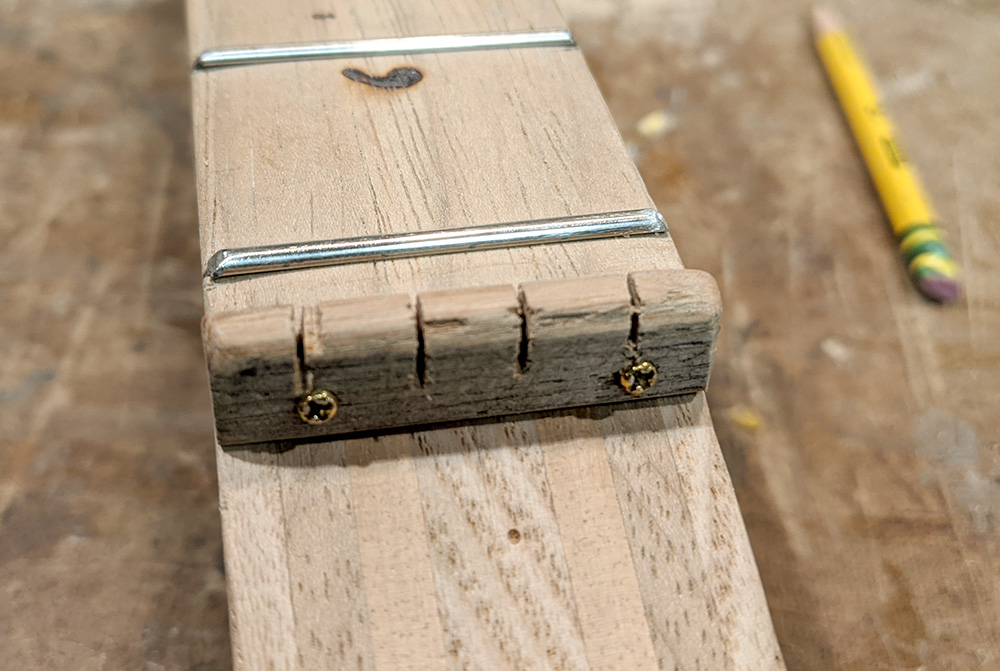
Because I am using a zero fret, I do not need a true nut for this guitar, but I do need to add a pseudo-nut as a string guide. For this I use a scrap piece of hardwood left over from one of the other panels. |
|
|
|
|
|
After gluing and screwing the nut in place, I use a thin-kerf pull saw to add the string slots... |
|
|
|
|
|
And of course break a piece off. A bit of Titebond and a small clamp soon has it good as new. |
|
|
|
|
|
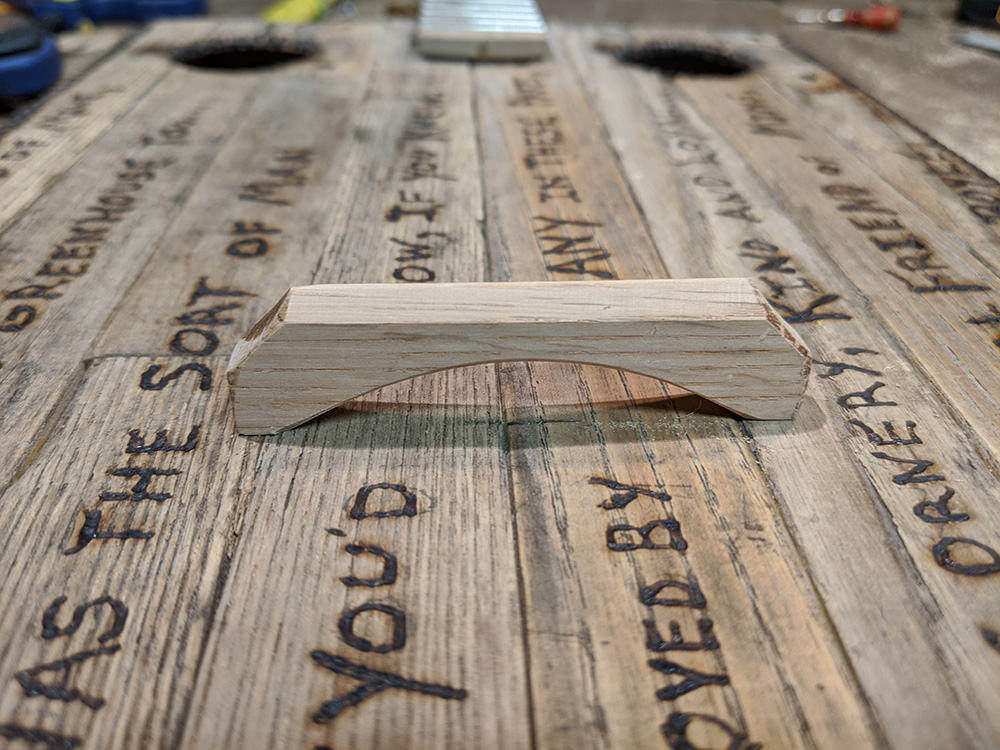
While the back panel glue cures, I also form a bridge from another left-over piece. I later end up lowering this bridge by about 3/16 inch to get the string action just right. |
|
|
|
|
|
Because the back panel has a lot of holes from where the pins, rivets and bolts went through the original sticks, I decide to glue on thin wood "patches" on the inside of the panel to cover them. I use hot glue to attach the patches, and then sand them down nice and thin. I later have to pry a couple back off because they hit the braces inside the box and prevent the panel from gluing on evenly. |
|
|
|
|
|
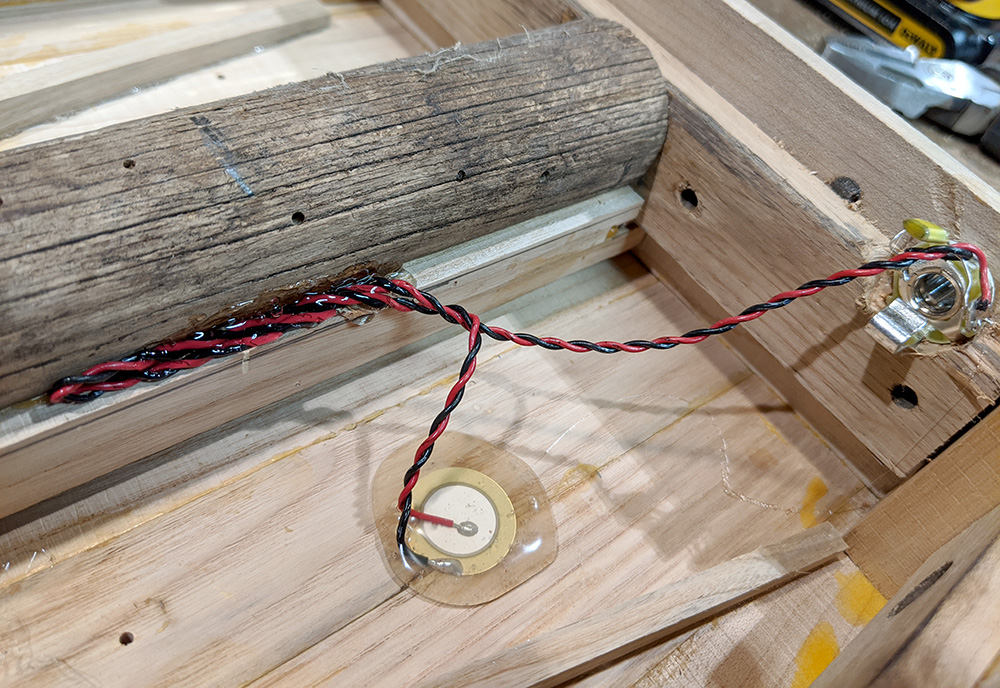
The last thing I do before gluing on the back panel and sealing the box, is install a piezo pickup. If you look close you can see the yellow 0.01uF capacitor I soldered onto the jack to help bleed off some of the treble. I also took care to secure the wire so it wouldn't flop around inside the box. |
|
|
|
|
|
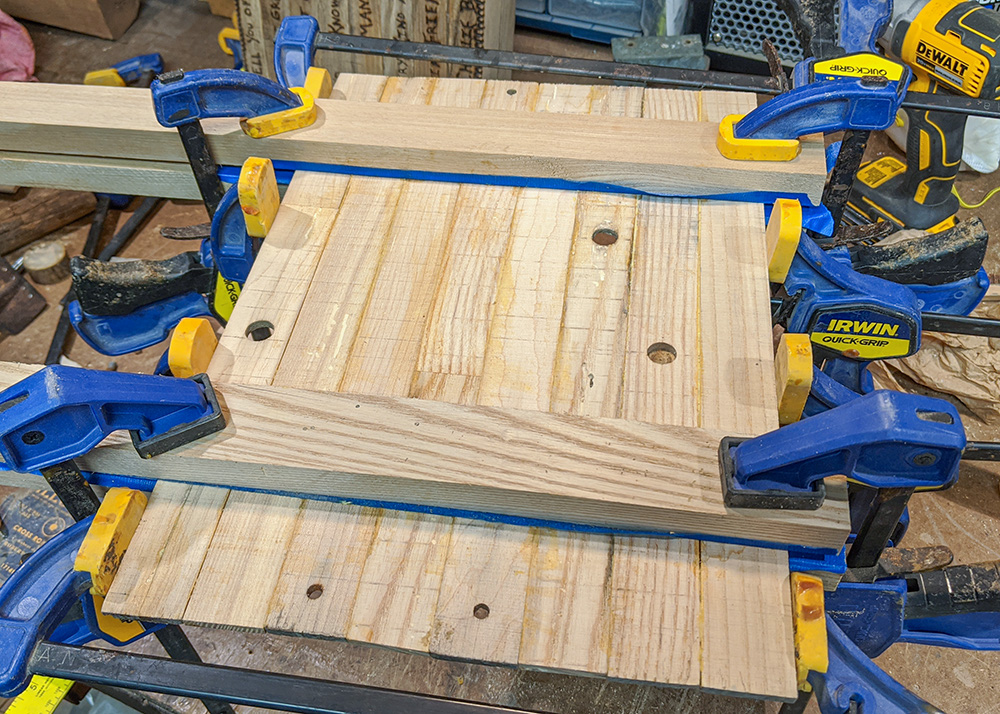
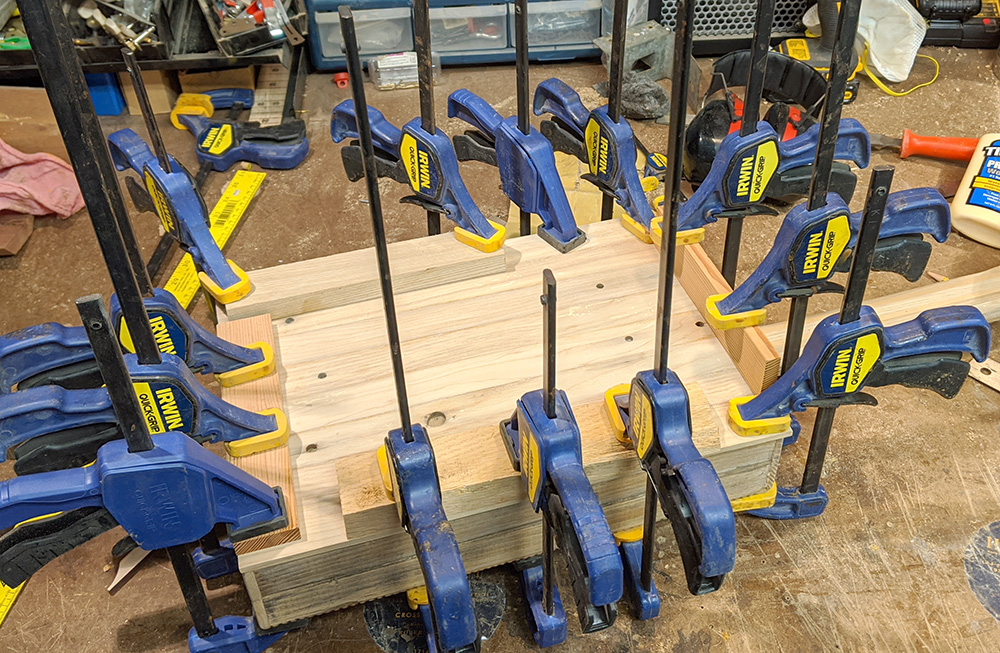
Now the back panel gets glued in place, using scrap wood clamping cauls to help distribute the pressure. It takes a lot of clamps to get a nice tight join when gluing on slightly uneven panels like this. |
|
|
|
|
|
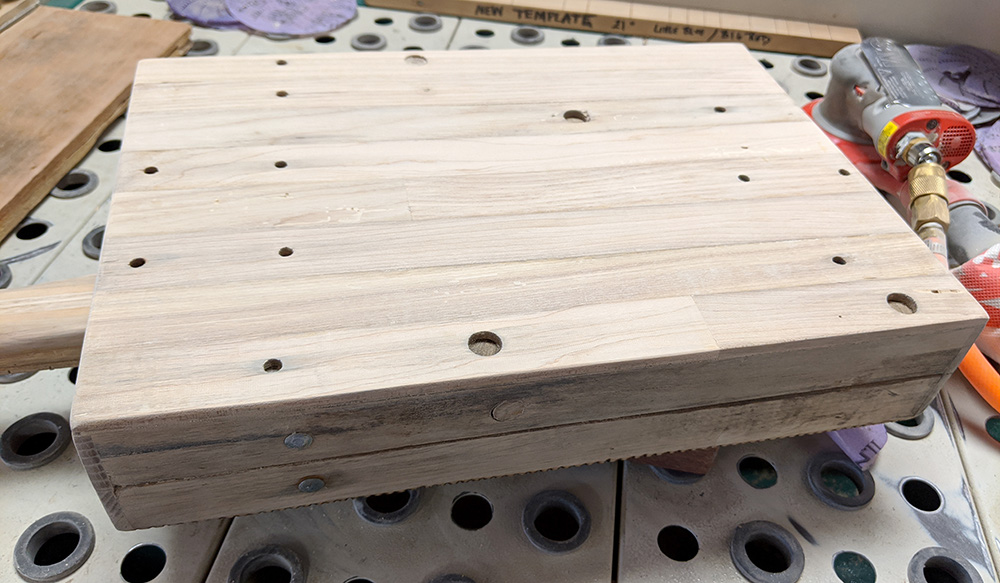
Once the glue sets, it's over to the sanding table to sand off overhangs, smooth and round everything over. |
|
|
|
|
|
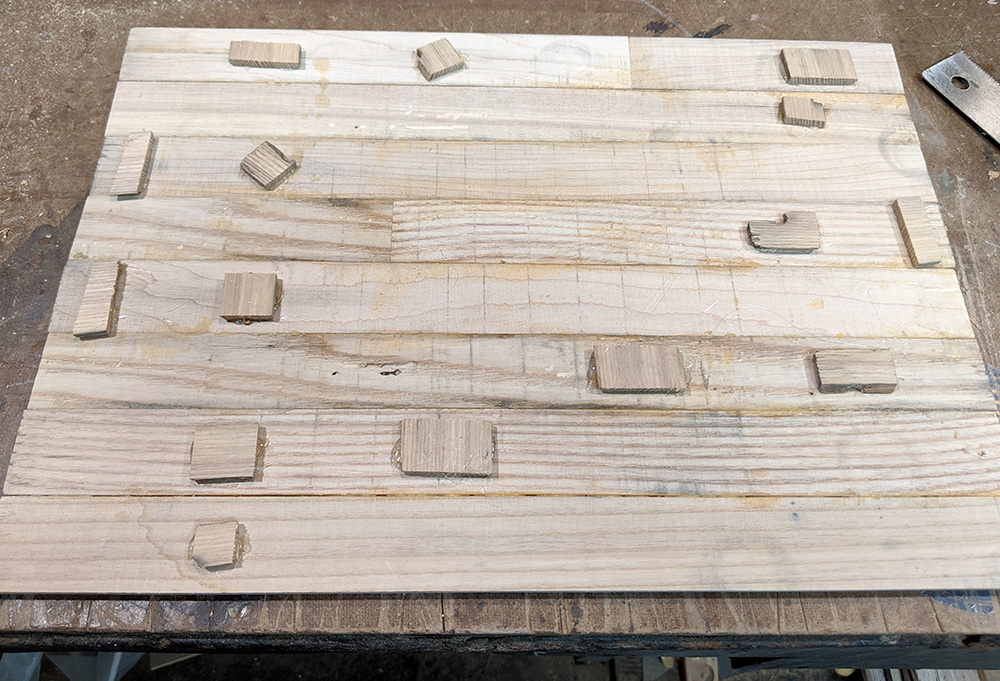
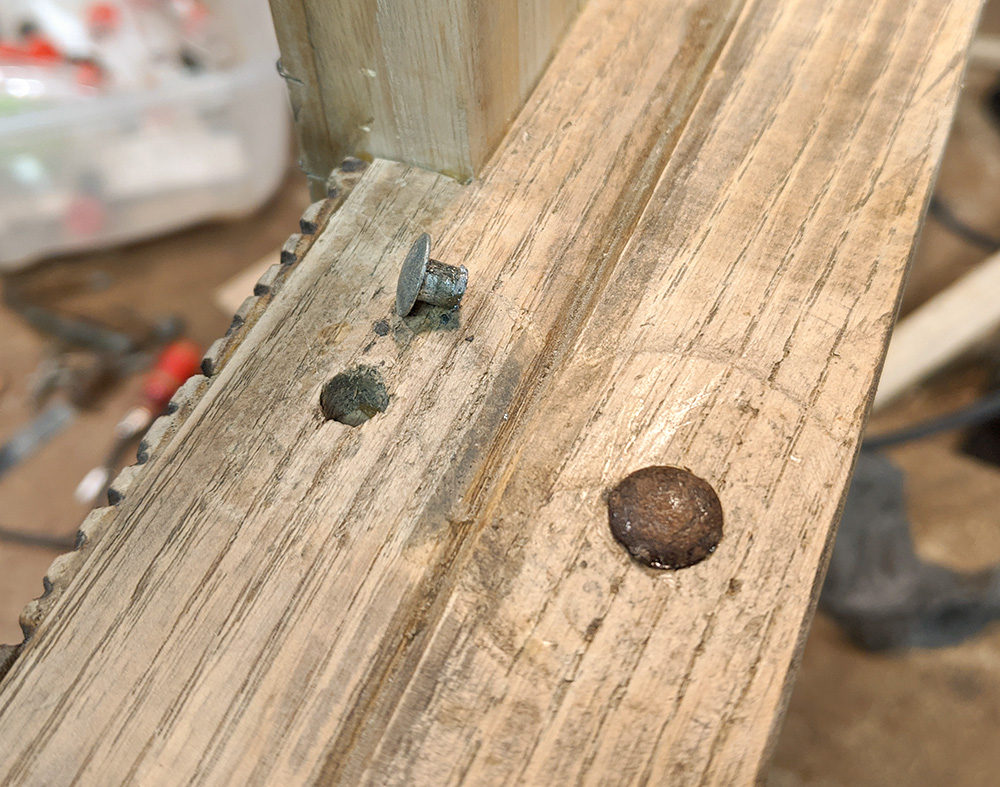
As yet another decorative touch, I cut the heads off the bolts and pins I took out of the roofing brackets, and hot-glue them into the holes in the side panels. This both looks cool and follows my goal of using as much of the raw materials as possible. |
|
|
|
|
|
Then it's over to the finishing bench to apply a coat of linseed oil to the entire guitar. I remove the tuners from the headstock before doing so, so the oil doesn't get into the tuners and gum them up. Linseed oil is my favorite finish because of how easy it is to use and how it brings the grain out of wood, especially more strongly-grained hardwoods like oak. In this case, it darkened the soundboard down a bit more than I would have liked, but I suspect it to lighten in time. |
|
|
|
|
|
She's starting to look like a guitar! |
|
|
|
|
|
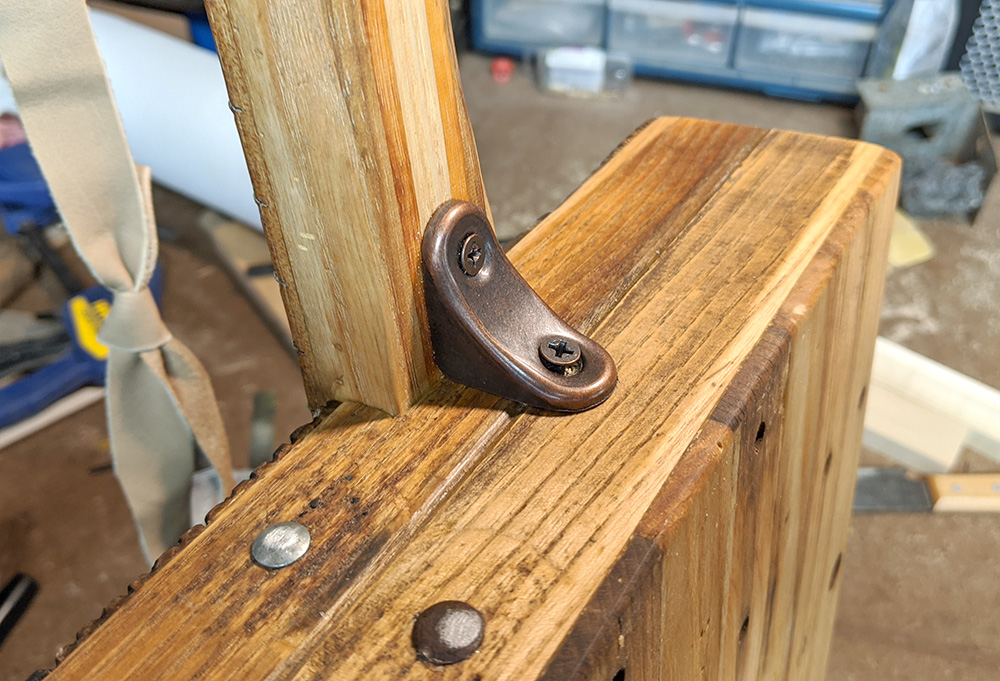
A final step is to add a metal brace to the neck to give it just a little more resistance to the string tension. Before doing so I use the grinder to add just a little back angle to the brace so that it pulls the neck back just a bit once screwed down. Now, why is that bottom screw sticking out a little, you ask? Well, that's because I got carried away with the impact driver and twisted the head off of the first screw, so I had to drill a new hole at a non-ideal angle. Gitty's Law of Instrument Building is that the closer an instrument is to done, the more likely a last-minute addition like this is to go wrong. |
|
|
|

|
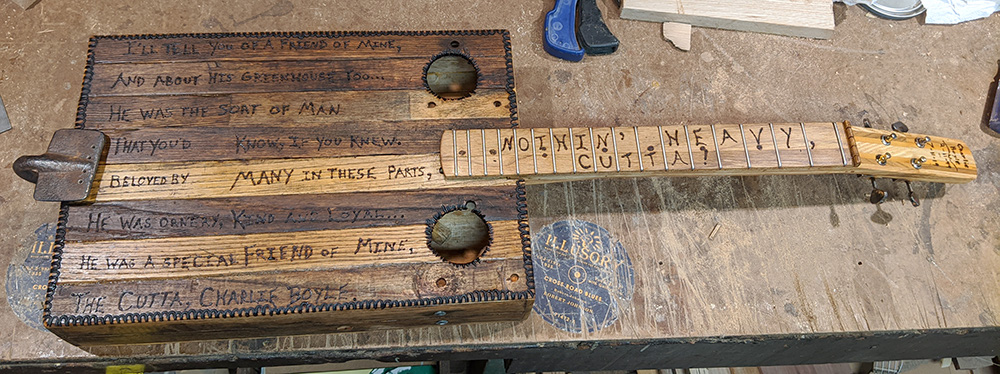
At long last, the Toolshed Guitar is finished. What a thrill went through me when I got her strung and tuned and gave her that first strum. Every time I play this instrument, I will be thinking of my friend Charlie Boyle, and I know he would be proud of it too. |
|
|
|
|
|
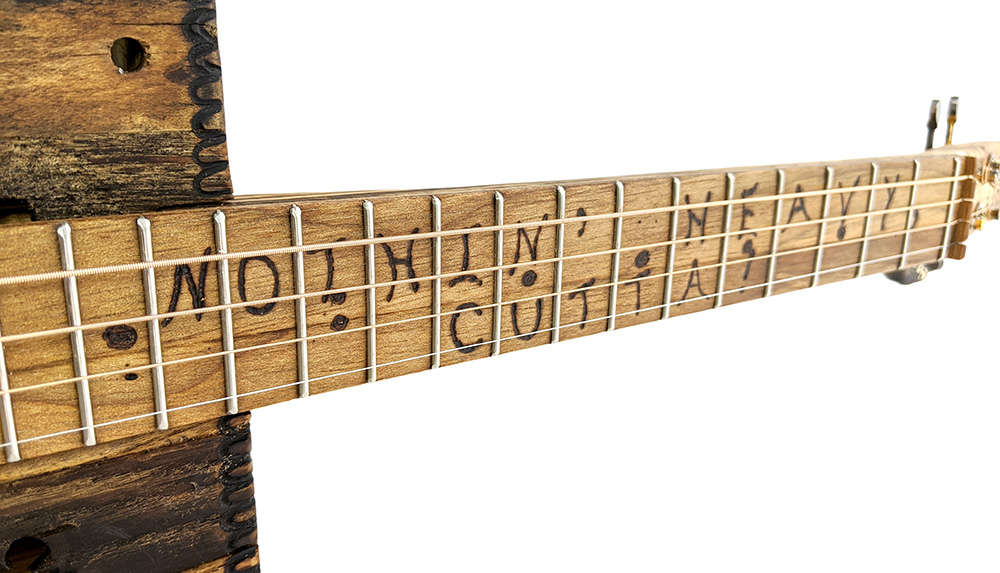
Close-up of fretboard detail. |
|
|
|
|
|
Close-up of soundboard detail. |
|
|
|
|
|
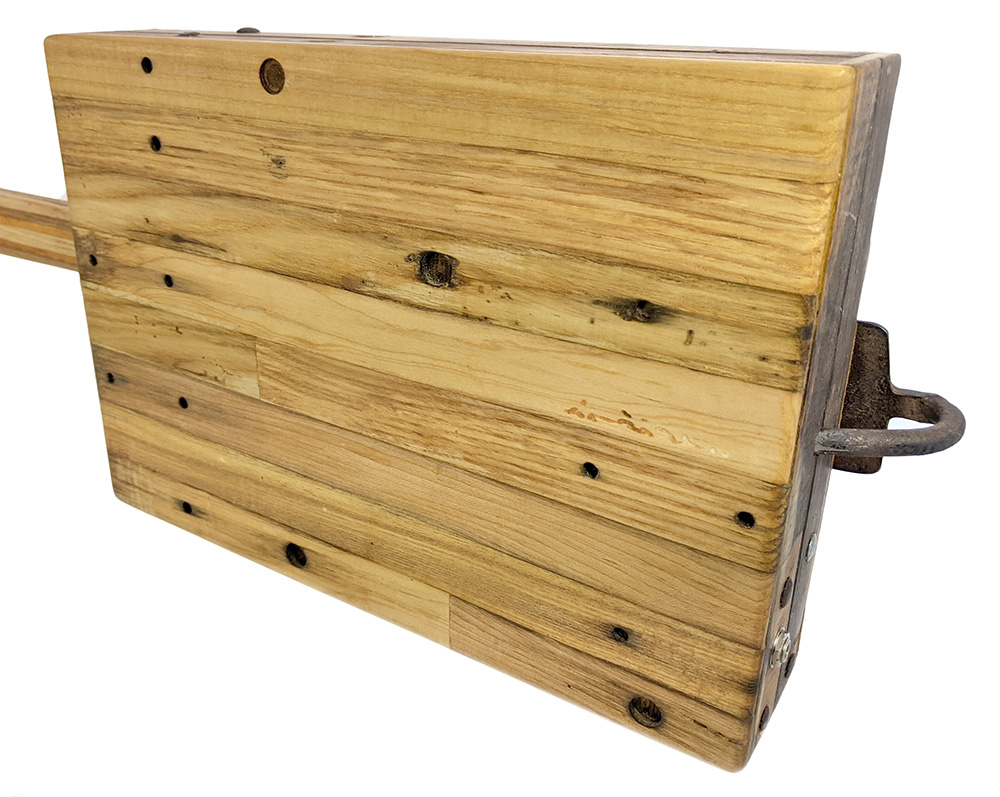
Close-up of instrument back. |
|
|
|
|
|
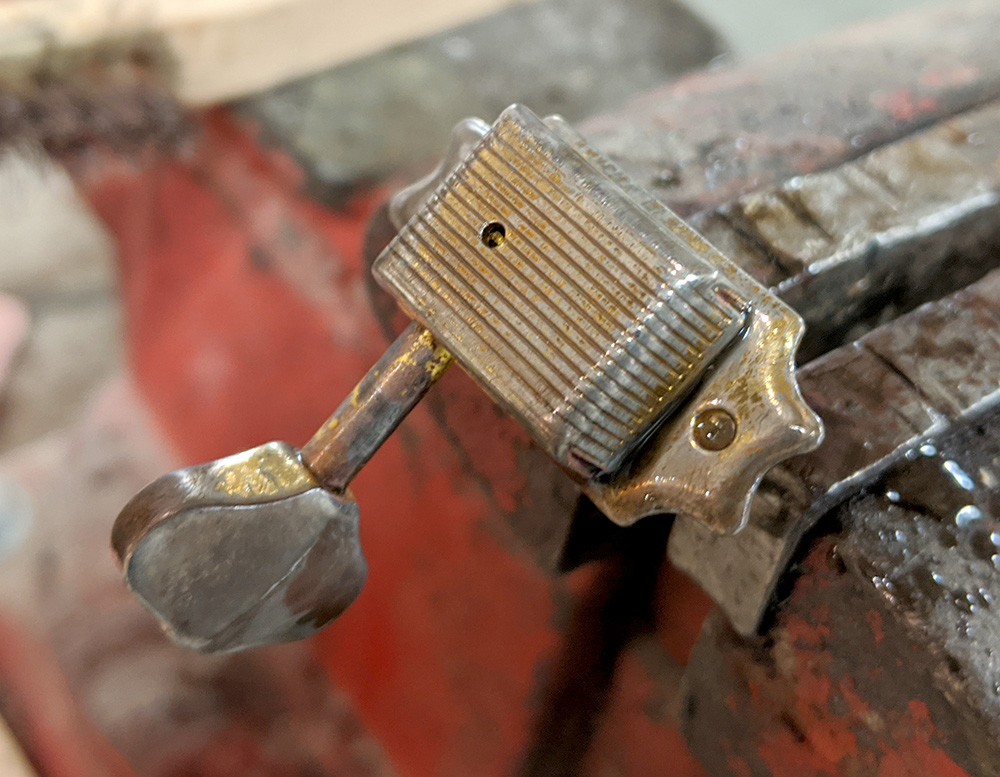
Close-up of the back of the headstock, with custom relic'd tuners. |
|
|
|
|
|
Closeup of the hoe-head tailpiece. |
|
|
|


 Then it was time
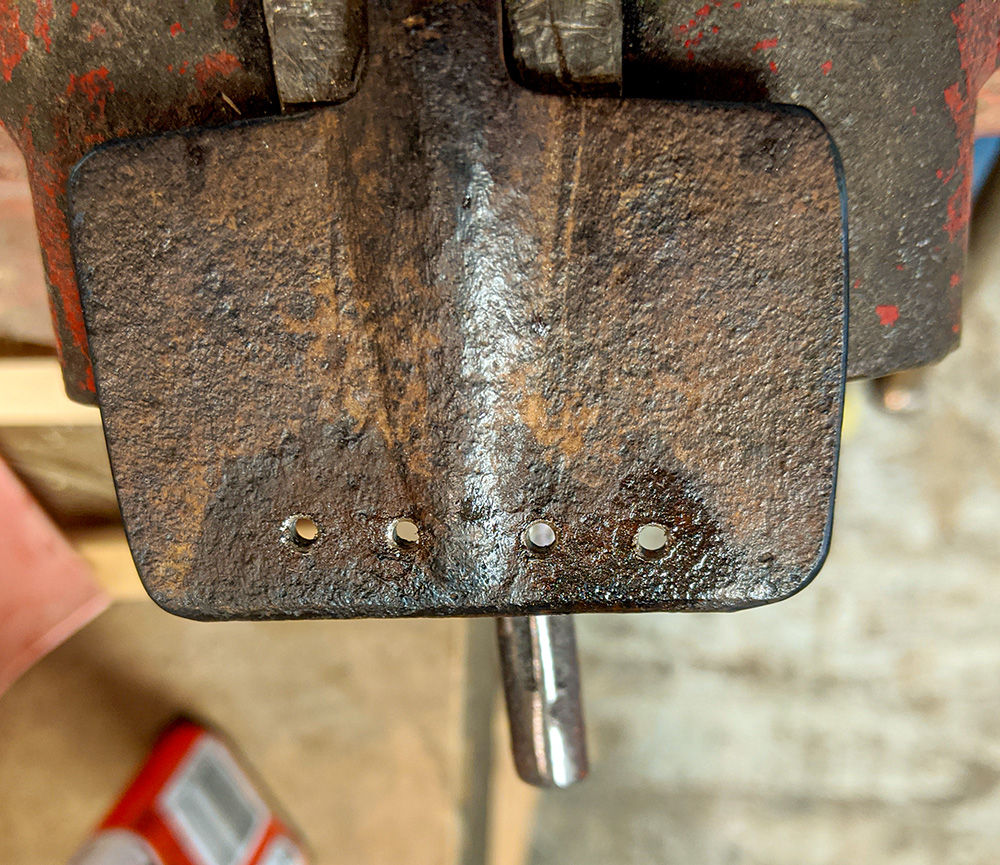


Recent Posts
-
Steve Holladay's "Pocket Box Guitar"
If you're a member of the Friends of C. B. Gitty group on on Facebook, you've probably seen some of …14th Jan 2026 -

2024 World's Wildest Electric Cigar Box Guitar Build-Off Winners!!!
C. B. Gitty Crafter Supply is proud to announce the winners of the 2024 "World's Wildest Electric Ci …31st Oct 2024 -
")
Improved C. B. Gitty: Easier Than Ever! (Work in Progress)
Ben “Gitty” has been cleaning house, making our website even easier find your favorite parts, kits a …7th Oct 2024