

Improved Stand Alone Pre-Amp Hack - Use tiny craft store box
Reduced feedback. Deeper bass response. And no more "quack," now in an even smaller package!
Hi all, it's Shane Speal.
A couple years ago, I created a simple hack that allowed you to turn a C. B. Gitty pre-amp into a standalone unit.
These plans became so popular, they were included in my upcoming book, Making a Poor Man's Guitars (Fox Chapel Publishing, October 2018).
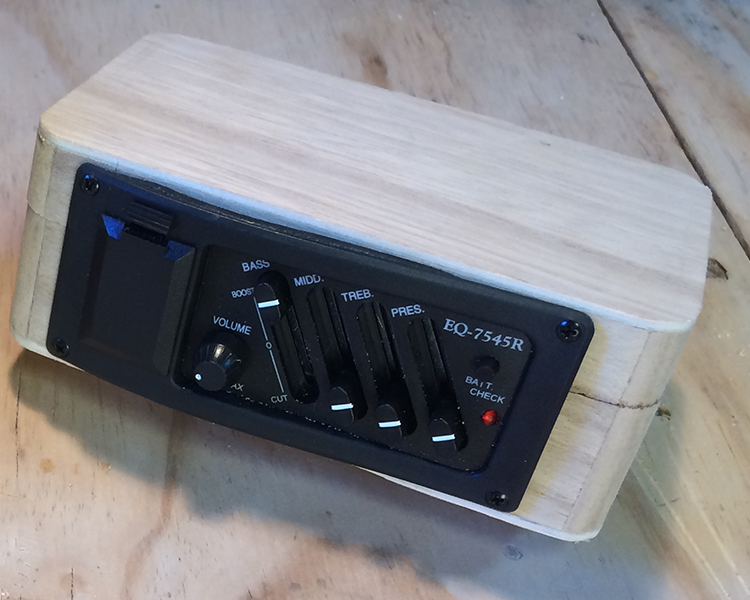
Just recently, I was perusing an craft store when I discovered some cute, little wooden lunch boxes.
They're only .25" x 3.5" x 2" and have a handle on top.
I immediately realized they were the perfect casing for the pre-amp project.

The original cigar box design works great, except it takes up a bunch of room in my gig bag.
This new version is light and very portable.
I've taken the original pre-amp hack article and updated it here for you.
This new version gives you the smallest portable pre-amp yet, and the perfect thing to drive your cigar box guitars in a live concert.
Note: The video and some of the photos come from the original article.
First of all, here's how it sounds...
DIY Pre-Amp Sound Demo
I built this prototype in less than one hour.
Here's how to do it:
Parts Needed

- C. B. Gitty Pre-Amp Unit Model EQ-7545R ($16.49)*
- 1/4" guitar jack ($4.49 for a 3 pack)
- Small wooden lunch box
- 9-volt battery
*Note: a piezo rod pickup is included with the pre-amp. We'll need this!
Tools Needed
- Wire stripper/cutter
- Soldering iron and solder
- Coping saw, scroll saw or rotary tool.
- Small #1 Phillips head screwdriver
- A couple rubber bands
Here's a quick overview of the process.
Overview Video
The video is from the original article and uses a cigar box.
We'll get into detail using the new tiny lunchbox photos after the video:
Here's how the inside of the pre-amp should look after the steps below.
Notice how the pre-amp unit is mounted to the bottom of the box and the jacks are positioned in the tight space above it?
That's how you will fit all components inside this little case.

Installation Process
Step 1:
Remove the hinges from the tiny lunchbox.

Step 2:
Put the front and back of the box together again and hold with rubber bands.

Step 3:
Cut a 3.5-inch x 1.5-inch ( 8.9-cm x 3.8-cm) hole in the base of the tiny lunchbox to fit the pre-amp.

Step 4:
Take the rod piezo out of the pre-amp packaging.
Using wire cutters, cut off the rod piezo pickup from its wire.
Cut closest to the pickup, leaving the longest length of wire possible.

Step 5:
Pull back the ground wire sheath to expose the lead wire.
Strip off 1/4-inch ( 6-mm) of the lead wires insulation.

Step 6:
Solder the ground sleeve wires to the ground prong (the inner, circular portion of the jack).
Solder the lead wire to the other prong (the lead prong) of the jack.
This is now our hacked pickup wire and will become the input jack.

Step 7:
Insert the 2.5mm plug of the hacked pickup wire into the receptacle of the pre-amp unit.

Step 8:
Drill two 3/8-inch ( 10-mm) holes in the sides of the box, one on each side.
Make sure they are near the top of the box, near the handle so that the jacks are clear of the pre-amp.
Notice how I removed a bit of the wood on the inside of the box around the jacks.
This was because the wood was too thick for the jack shafts.
I used a rotary tool to shave some of the wood.
Once you've drilled them both, install both guitar jacks to the cigar box.
Put the "hacked" pickup jack on the right side for "Input" and the black casing jack on the left side for "Output."
Step 9:
Close the box and mount the pre-amp using the black screws.
Close the latch on the handle side, insert a battery, and test the unit to make sure all soldering and setup are working ok.
Step 10:
Once the unit is tested and working, you can glue it shut.
Optional:
Add a belt clip to the side of the pre-amp so you can attach it to your guitar strap!
Additional Notes:
- Unplug the guitar cables when not in use or it will drain your 9 volt battery.
- Dialing-in the right tones is an art. Each instrument is different. The pre-amp is there to sculpt the tones ... and to also give signal boost to low-output piezos.
- If the guitar sounds too distorted, try dialing back the volume on the pre-amp and increasing the volume on the amp/PA system.
- If you sell cigar box guitars with piezo pickups, these pre-amps could be a great way to make additional income. Get fancy with them and give them a product name.
Get the Pre-Amp & Improve Your Sound
Have one unit that you can use with all of your cigar box guitars by using the craft-store box hack in this article.
To do that, get your pre-amp here.

More Must-Reads
Want to learn more about how to really dial-in the tone on your acoustic/electric cigar box guitars?
Read the following articles to learn more about how to install and use pre-amps and rod piezos.
Easy DIY Pre-Amp: Makes Piezo-Equipped Cigar Box Guitars Sound Better
THE BEST ACOUSTIC TONE: Piezo Rod Pickup & Pre-Amp in a Neck-Through Cigar Box Guitar
What's A Rod Piezo & Why Use One In Your Cigar Box Guitar?
Recent Posts
-
Steve Holladay's "Pocket Box Guitar"
If you're a member of the Friends of C. B. Gitty group on on Facebook, you've probably seen some of …14th Jan 2026 -

2024 World's Wildest Electric Cigar Box Guitar Build-Off Winners!!!
C. B. Gitty Crafter Supply is proud to announce the winners of the 2024 "World's Wildest Electric Ci …31st Oct 2024 -
")
Improved C. B. Gitty: Easier Than Ever! (Work in Progress)
Ben “Gitty” has been cleaning house, making our website even easier find your favorite parts, kits a …7th Oct 2024